Beginner’s Guide to Crafting DIY Cabinets for kitchen

If you’re excited to make your kitchen awesome and want simple steps, keep reading. Look forward to a DIY cabinet kitchen change.
Our tutorial is perfect for beginners who want to learn about making their kitchen cabinets. Even if you’re not familiar with these things, we’ll explain everything most simply. Well, you can do it, and we’ll help you every step of the way.
First, let’s make sure we’re clear on the basics. DIY means doing things on your own. Kitchen cabinets are where you keep your kitchen stuff, like plates, pans, and pots. We’re going to make this tutorial super easy.
There is no confusing stuff, just simple instructions. We’ll show you how to pick the right materials, measure properly, cut without any trouble, put everything together, and look. You’ll have your kitchen cabinets.
We’ll show you how to make kitchen cabinets one easy step at a time.
Step by Step for DIY Kitchen Cabinet
Step 1: Planning and Measurement
To start, examine your kitchen’s layout closely. This will help you determine the right sizes for your DIY cabinets. Afterward, look into planning out the design.
Choose the specific type of cabinets you’re pointing for, whether they’re more like shelves or have doors, and also figure out the ideal size for them. Don’t forget to factor in what items you’ll be storing within these Step-by-step cabinets building.
By doing so, you’ll ensure that you’ll have enough space for all your kitchen essentials. Remember, your kitchen serves both practical and beauty purposes. So, as you go about your cabinet planning, strive to hit a balance between use and style.
Step 2: Gathering Materials
Here’s a straightforward list of items you’ll need some flat pieces of wood for the main parts, screws to keep everything in place, hinges to make things like doors swing, and handles so you can easily open and close things. And don’t forget about the simple tools you’ll need: a saw to cut the wood into the right shapes, a drill to make holes, and a measuring tape to check the sizes.
It’s super important to have all of these things ready to go before you start working on Easy DIY cabinet plans. That way, you won’t need to stop and search for stuff while you’re busy. Have a blast working on your project.
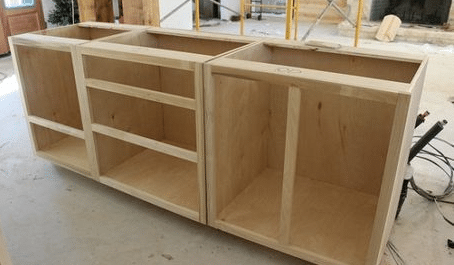
Step 3: Cutting and Assembly
Start by measuring and cutting plywood into sections for sides, shelves, and doors. These parts are essential for the cabinet’s foundation, organization, and opening. Next, use screws to assemble the sides, shelves, and doors securely, creating a strong cabinet structure.
These DIY cabinet makeover tips steps ensure both strength and stability. For balance confirmation, employ a level tool by placing it on the cabinet. A centered bubble indicates balance, while any tilt suggests adjustments to the base or components.
Step 4: Door Creation
Choose what you want your cabinet doors to look like; you can either create them yourself or buy ones that suit your fashion. Ensuring that you attach the hinges and handles properly is important, as this guarantees that the doors will open and close smoothly.
This not only makes your cabinets practical but also increases their appearance. Taking the time to get these details right will result in Easy DIY cabinet plans that are not only working but also lovely and pleasing, adding to the overall invite of your space.
Step 5: Painting or Staining
First off, smooth things out by giving those diy cabinet surfaces a good sanding. Think of it as giving them a mini spa treatment to make them super smooth. Now, here comes the fun part: choosing your colors. You’ve got two pals to choose from: paint or stain.
Think about painting as the colorful character who loves to shine, while stain is cool and lets the natural beauty peek through. It’s like picking your team for a fashion showdown. After you’ve painted or stained, take a breather and let each layer dry.
Step 6: Installation
When you’re ready to set up the DIY cabinet’s makeover tips, handle them carefully as you position them on the wall. It’s important to take your time and ensure they’re not crooked but instead securely and evenly attached. After the cabinets are in place, go ahead and attach the doors.
If you notice that the doors aren’t fitting perfectly or something seems a bit off, don’t be concerned. You can easily make the necessary adjustments to ensure that everything lines up perfectly. These Easy DIY cabinet plans might take a bit of patience, but the result will be well worth the effort, providing you with working and lovely Customizable cabinet kits in your space.
Step 7: Final Touches
Slide the drawers into their places; these are like little storage boxes. If there’s anything extra to add, like hooks or holders, put those on, too. Now, take a step back and look at your work. Look at how everything fits together.
If you spot anything that doesn’t quite look or feel right, don’t worry. You can easily make some changes. Remember, you’re the boss of this organizing project. It’s all about making your DIY cabinets better for you.
Maintenance and Care

1. Regular Cleaning
When it’s time to give your stuff a freshening up, you don’t need anything fancy. Just grab some mild soap or make a mixture of vinegar and water. This tag team can tackle grease, dust, and those annoying stains.
But here’s the trick: keep away from anything rubbing. Rough materials might sound tough, but they could hurt the diy cabinet surface. So, stick to the friendly stuff that won’t cause any damage.
Oh, and before you pat yourself on the back for a job well done, remember the handles and knobs. They’re part of cabinets, too, and they could use a little cleaning love.
2. Stop Scratches
Keep your shelves safe from spills and scratches by using cabinet liners. These liners help protect your shelves and keep them clean. To make sure your DIY cabinets and drawers don’t get damaged, use soft-close hinges and slides.
These special hinges and slides stop your cabinets and drawers from getting worn out too quickly. By doing these easy things, you can keep your storage spaces in good shape for a long time.
3. Polishing Wood Cabinets
Just give them a little polish now and then. Find a special product that’s made of wood. This way, you won’t harm your cabinets. All you need to do is follow the instructions on the product. Taking care of your diy cabinets like this helps them stay shiny and attractive.
Plus, it makes them last much longer. So, if you want your kitchen or wherever you have wooden cabinets always to look its best, remember to treat them to a gentle polish when they need it.
4. Control Moisture
Excess moisture is bad for Easy DIY cabinet plans, but you can protect them easily. Think of cooking and steam building up. That’s when your exhaust fan becomes a hero. Just turn it on and say goodbye to extra moisture that could harm your cabinets. Spills happen, but don’t wait. Grab a cloth or paper towel and clean them up right away. This stops water from causing damage to your cabinets.
These simple steps make a big difference. By following them, you’re not only keeping your Step-by-step cabinets building looking good, but you’re also making them last longer.
5. Temperature Awareness
Cabinets can be harmed by temperature changes, just like how weather affects us. So, it’s essential to take care of them. Think about if you place cabinets right next to things that release a lot of heat, such as stoves or dishwashers. The heat can cause cabinets to warp, similar to paper getting wavy when wet.
To keep your Affordable DIY cabinet ideas happy and looking their best, give them some space from these heat sources. Leave a gap between the cabinets and the things that make heat. This way, your cabinets can avoid the extra heat and stay strong and useful for a long time.
6. Proper Storage
When you’re arranging your Step-by-step cabinet building, make sure not to overload it with too much weight. Too many heavy things can stress the shelves and hinges, causing them to wear out faster.
To avoid this, distribute the weight evenly. Think of it as teamwork; when each part carries a fair share, your cabinet stays strong and lasts longer without issues. Just like a well-coordinated team can achieve more, balanced diy cabinets can handle everyday use and endure over time without straining or losing work.
7. Regular Inspections
Check your doors and cabinets for any wiggly hinges, knobs, or handles. If you find any, tighten them up or switch them out for new ones. This keeps everything warm and working right. It’s like giving your staff a little hug to keep them happy and safe.
8. Avoid Harsh Chemicals
When you’re cleaning your cabinets, it’s a good idea to use mild cleaning stuff. These are nice to the surface and won’t cause any harm. Don’t use strong chemicals because they can hurt the cabinet’s finish.
Keeping your Affordable DIY cabinet ideas looking good is important, and using the right cleaning stuff can help with that. Stick to the safe stuff and pick gentle products on your cabinets. This way, they’ll stay nice and pretty for a long time. Just remember, gentle cleaning is the way to go for your cabinets.
Benefits of DIY Kitchen Cabinets

1. Cost Savings
Creating your kitchen cabinets can help you save money. You can buy materials for less and skip the extra cost of ready-made cabinets. It’s not only good for your budget but also a fun project. Making your Customizable cabinet kits lets you customize them to fit your kitchen and style. And you’ll feel proud knowing you made something useful and nice for your kitchen.
2. Customization
You can design your cabinets just the way you want. This means you can make them fit perfectly in your kitchen and look how you like. Whether you like modern, classic, or different ways, you’re in charge of how your DIY cabinet makeover tips are designed and how big they are. Choose to have cabinets that don’t just hold stuff but also make your kitchen look amazing.
3. Long-Term Value
Making your own strong and well-built cabinets can make your home worth more money. And you also get storage that’s just right for you. It’s like a double win: you improve your home and have a useful storage space. Instead of buying basic cabinets, consider having ones that match your trend and fit perfectly. These Affordable DIY cabinet ideas last a long time, so you can keep your things organized and give a mark to your home.
Conclusion
In this beginner’s guide, we’ve learned how to create your kitchen cabinets. We began by understanding the tools needed, basic ones you likely already have, and then moved on to the exciting process of measuring and cutting. Remember, measure twice and cut once. Next, we jump into the assembly. It might have seemed tricky initially, but with our clear instructions, you beat it like a pro.
Painting and finishing brought out your creativity, cabinets, and style. Your kitchen and maybe even your world is more beautiful with your personal touch.
Your kitchen cabinets might not be perfect, but they’re yours, and that’s amazing. So, what’s next? You might be motivated to handle more projects. Or maybe you just gained a new regard for craftsmanship.
Whatever you choose, remember this ride. Keep finding, keep creating, and keep your DIY spirit alive. Happy DIYing!
Frequently Asked Questions
Can I Build Kitchen Cabinets without Prior Woodworking Experience?
Absolutely. This tutorial is designed for beginners and provides step-by-step guidance.
How Long Does It Take to Complete a DIY Cabinet Project?
The time it takes to finish making a set of cabinets can change depending on how hard it is. If it’s not too hard, you might need a couple of weekends to get it done.
What Type of Wood Is Best for DIY Cabinets?
People often use plywood and hardwood because they are strong and can be used in many different ways.
Should I Paint or Stain My Cabinets?
Staining brings out the wood’s natural beauty, while painting gives you lots of colors to choose from.
Can I Install Cabinet Doors without Special Tools?
Sure. Most hardware stores have door hardware that’s simple to put up and needs only a few basic tools.


