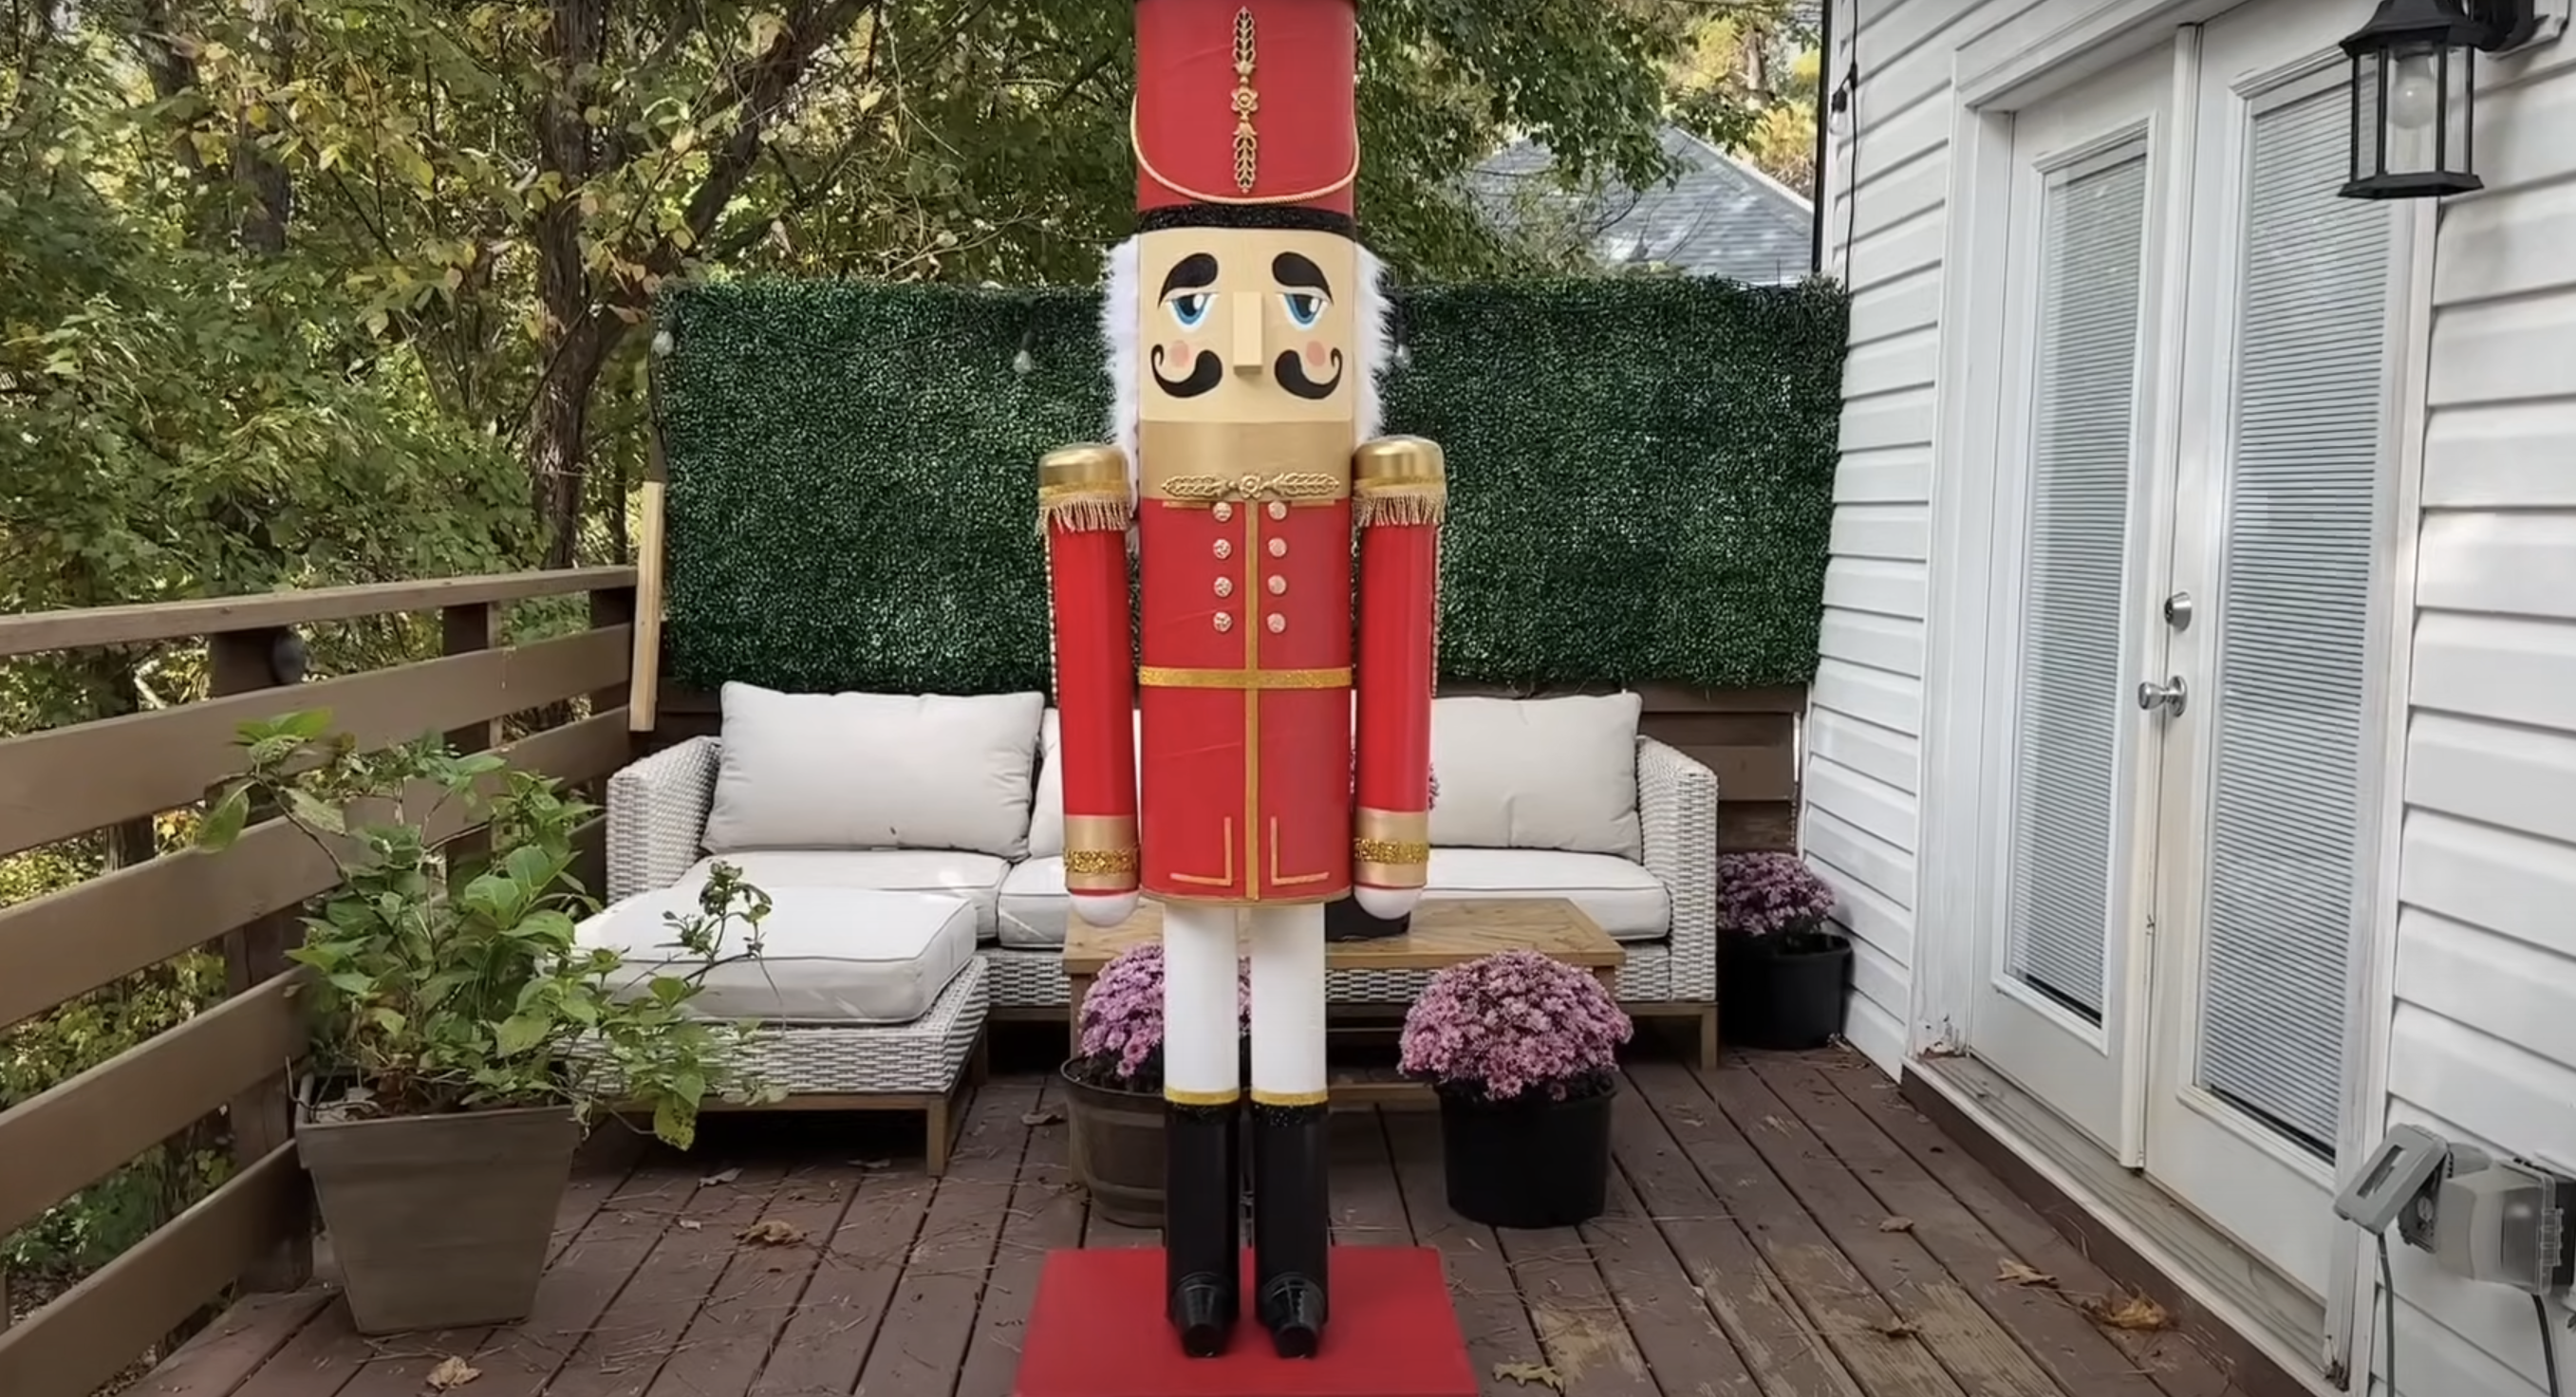
DIY Life Size Nutcracker for Christmas

Convert your holiday display this season with a show-stopping, life-size DIY nutcracker that will have neighbors stopping in their tracks.
This impressive decoration looks professionally made but can be created using affordable materials from your local hardware store; no specialized woodworking skills are required.
Suppose you’re looking to create a classic focal point for your front yard or an unforgettable indoor holiday statement piece.
This blog provides everything you need to build a nutcracker that will become a cherished part of your holiday traditions for years to come.
Story Behind the Nutcracker
The nutcracker has a rich history that makes it much more than just a holiday decoration.
These charming figures originated in Germany in the 17th century, where woodcarvers from the Erzgebirge region crafted them as good luck symbols and protectors of the home.
Created as practical tools for cracking nuts at family gatherings, these wooden figures improved into more decorative items featuring colorful military uniforms.
German folklore believed nutcrackers represented power and strength, with their ability to crack the hardest nuts symbolizing protection against difficult problems and evil spirits.
Tools and Materials Required to Make a Nutcracker
Building your life-size nutcracker might seem challenging, but with the right materials and steps, it’s actually quite doable.
| Item | Description / Details |
|---|---|
| 4″ diameter PVC sewer drain pipe | Thinner than regular PVC pipe |
| 2×4 lumber | Standard wood framing material |
| 24″x24″ plywood | 1/2″ or 3/4″ thick plywood sheet |
| 12″ wide Sonotube | Cardboard concrete form tube, 48″ tall |
| DryLock weatherproofer | Waterproofing solution for surfaces |
| Exterior latex paint | Various colors for painting |
| PVC end caps | Caps for sealing PVC pipe ends |
| 4″ shatterproof Christmas ornament balls | Decorative, durable ornament balls |
| Nylon string | For hanging or tying materials |
| Golden rope trim | Decorative trim with golden finish |
| Golden fabric | Fabric with gold color for decoration |
| Rhinestone ribbon (gold and black) | Sparkly ribbon for embellishment |
| White fur fabric | Soft, white fabric for texture |
| Red Solo cups | Plastic cups, typically red |
| Pizza pan | Flat, round metal pan |
| Gold spray paint | Metallic spray paint for finishing touches |
| Hot glue gun and glue sticks | Adhesive tool for assembly |
| Wood screws (various sizes) | Fasteners for wooden parts |
| Washers | Distributes screw load |
| Drill and bits | Tool for drilling holes |
| Jigsaw | Power saw for cutting curves and shapes |
Step-by-Step Process to Make a Lifesize Nutcracker
Here’s a step-by-step process on how to make your own real-life-size Nutcracker in 13 easy steps:
Step 1: Create the Legs and Arms
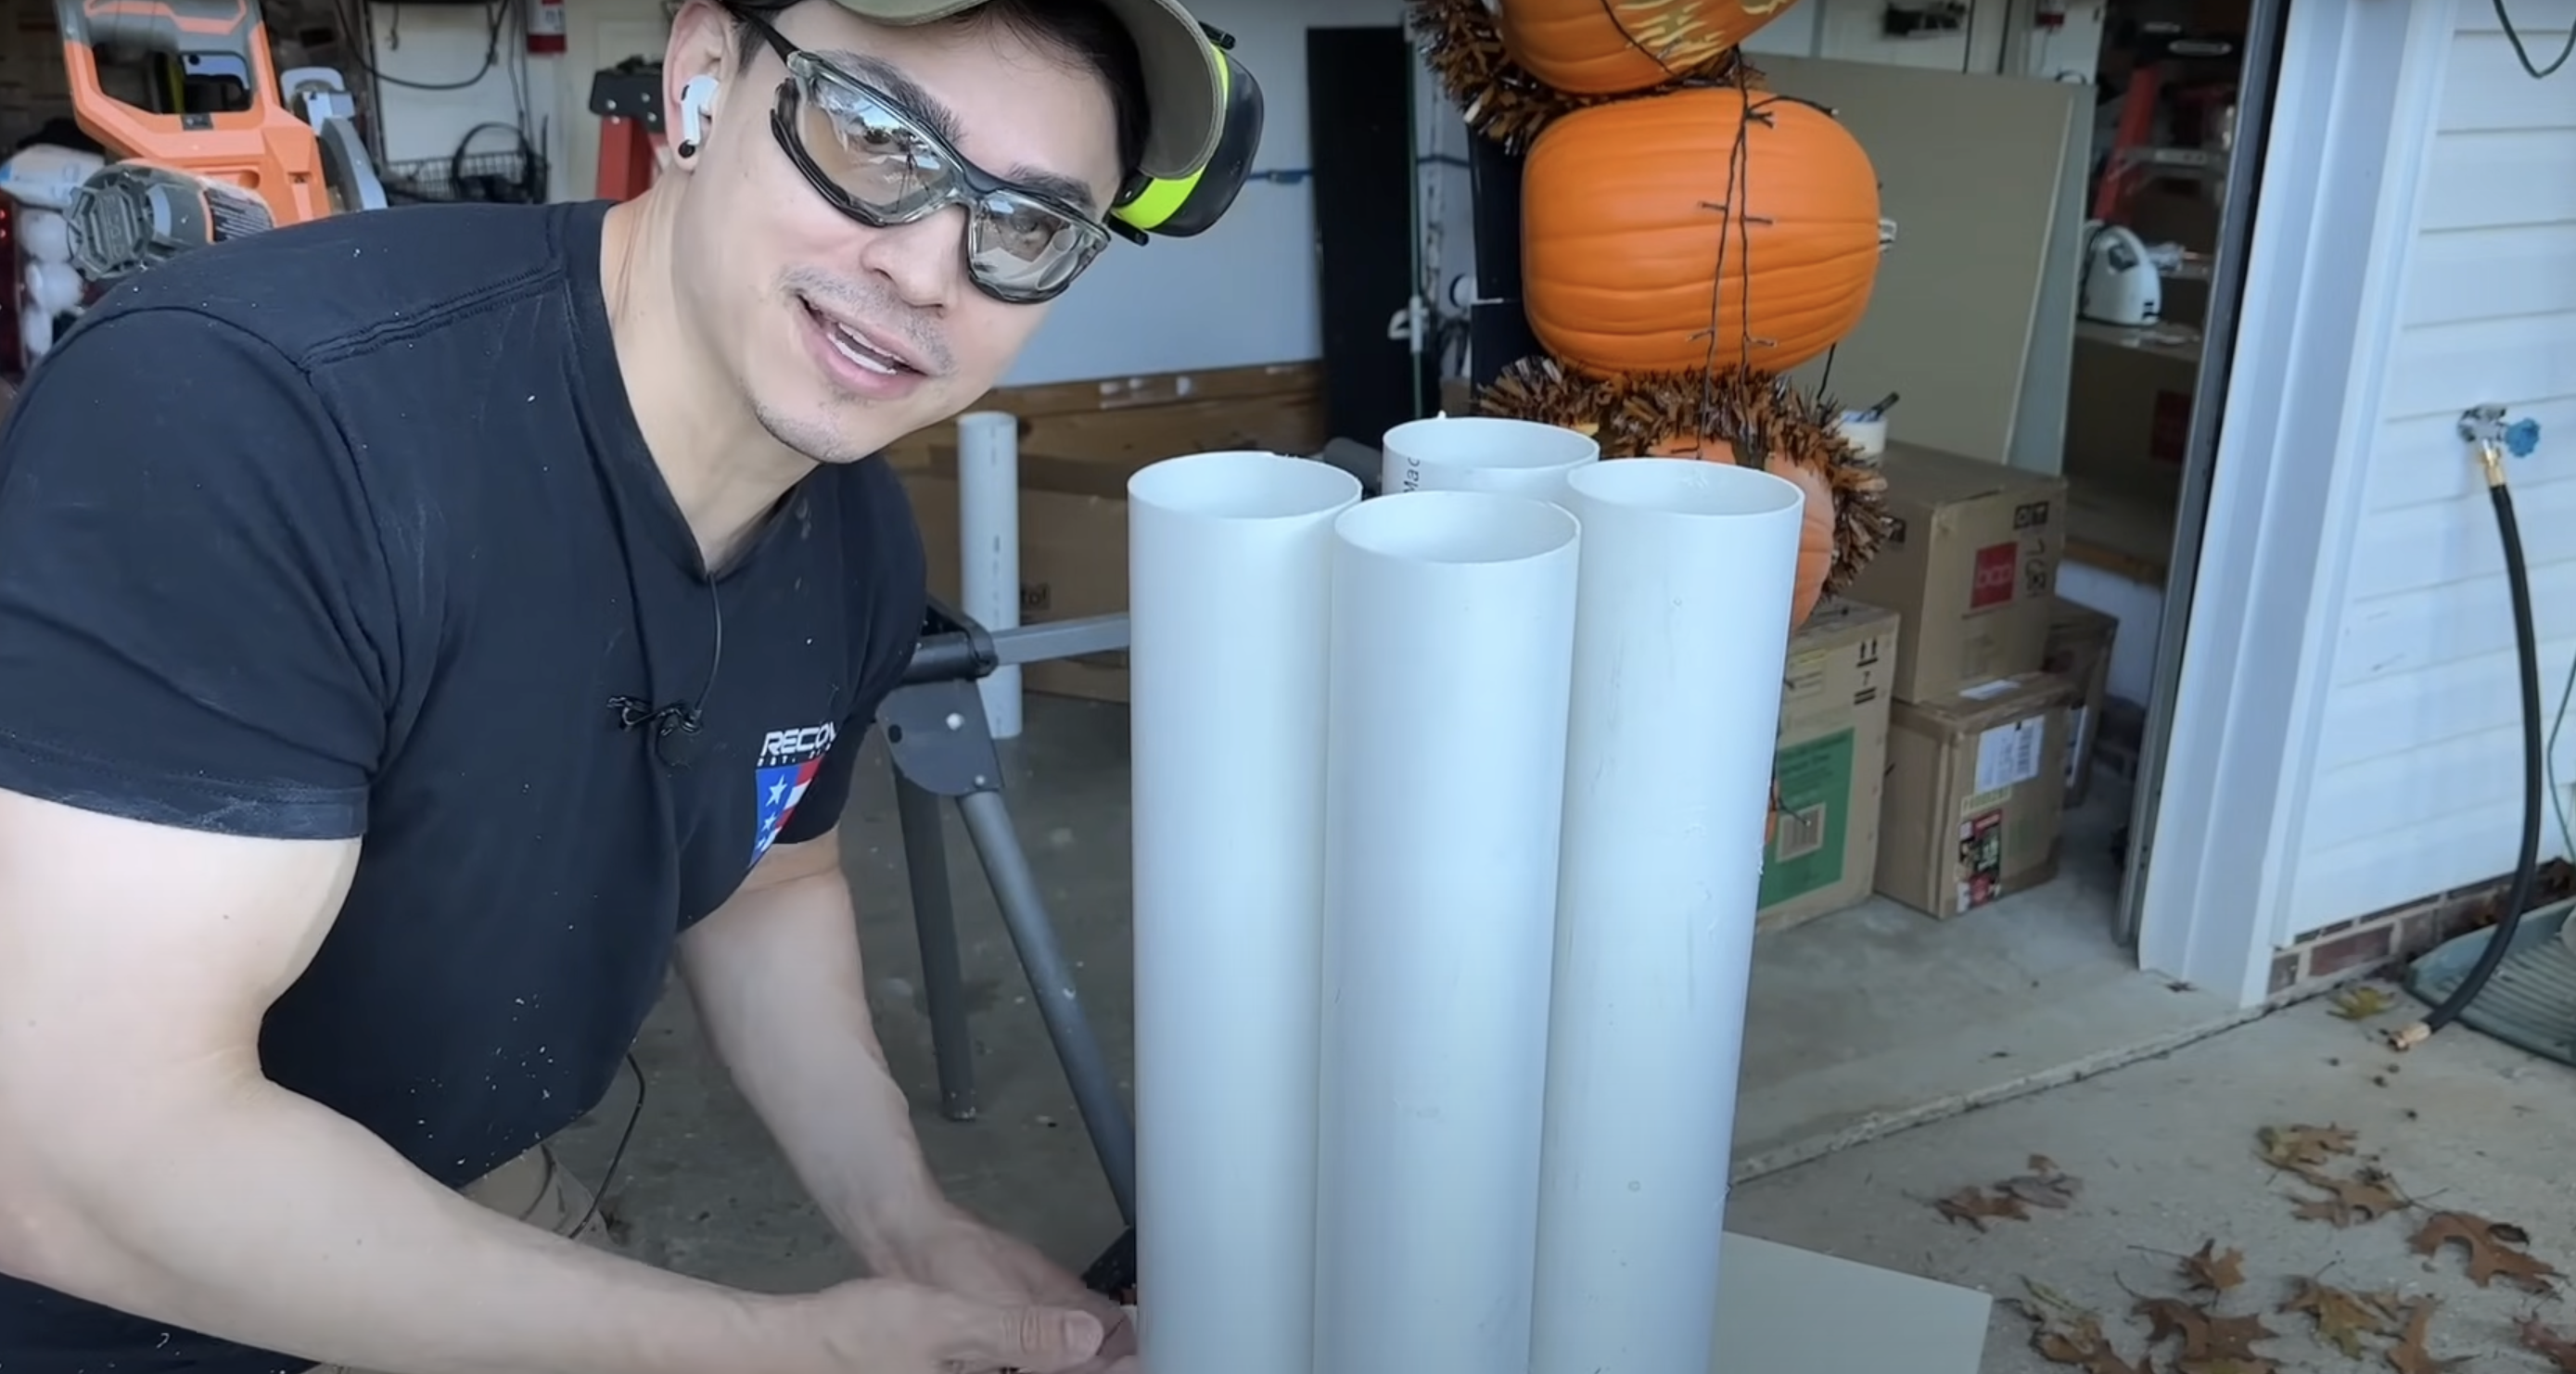
Begin by cutting the 4-inch PVC sewer drain pipe into four separate pieces. Two 24-inch sections will serve as the legs, and two additional sections will serve as the arms.
Pro Tip: Label each piece with a marker so you don’t mix them up later. It’ll save time when assembling.
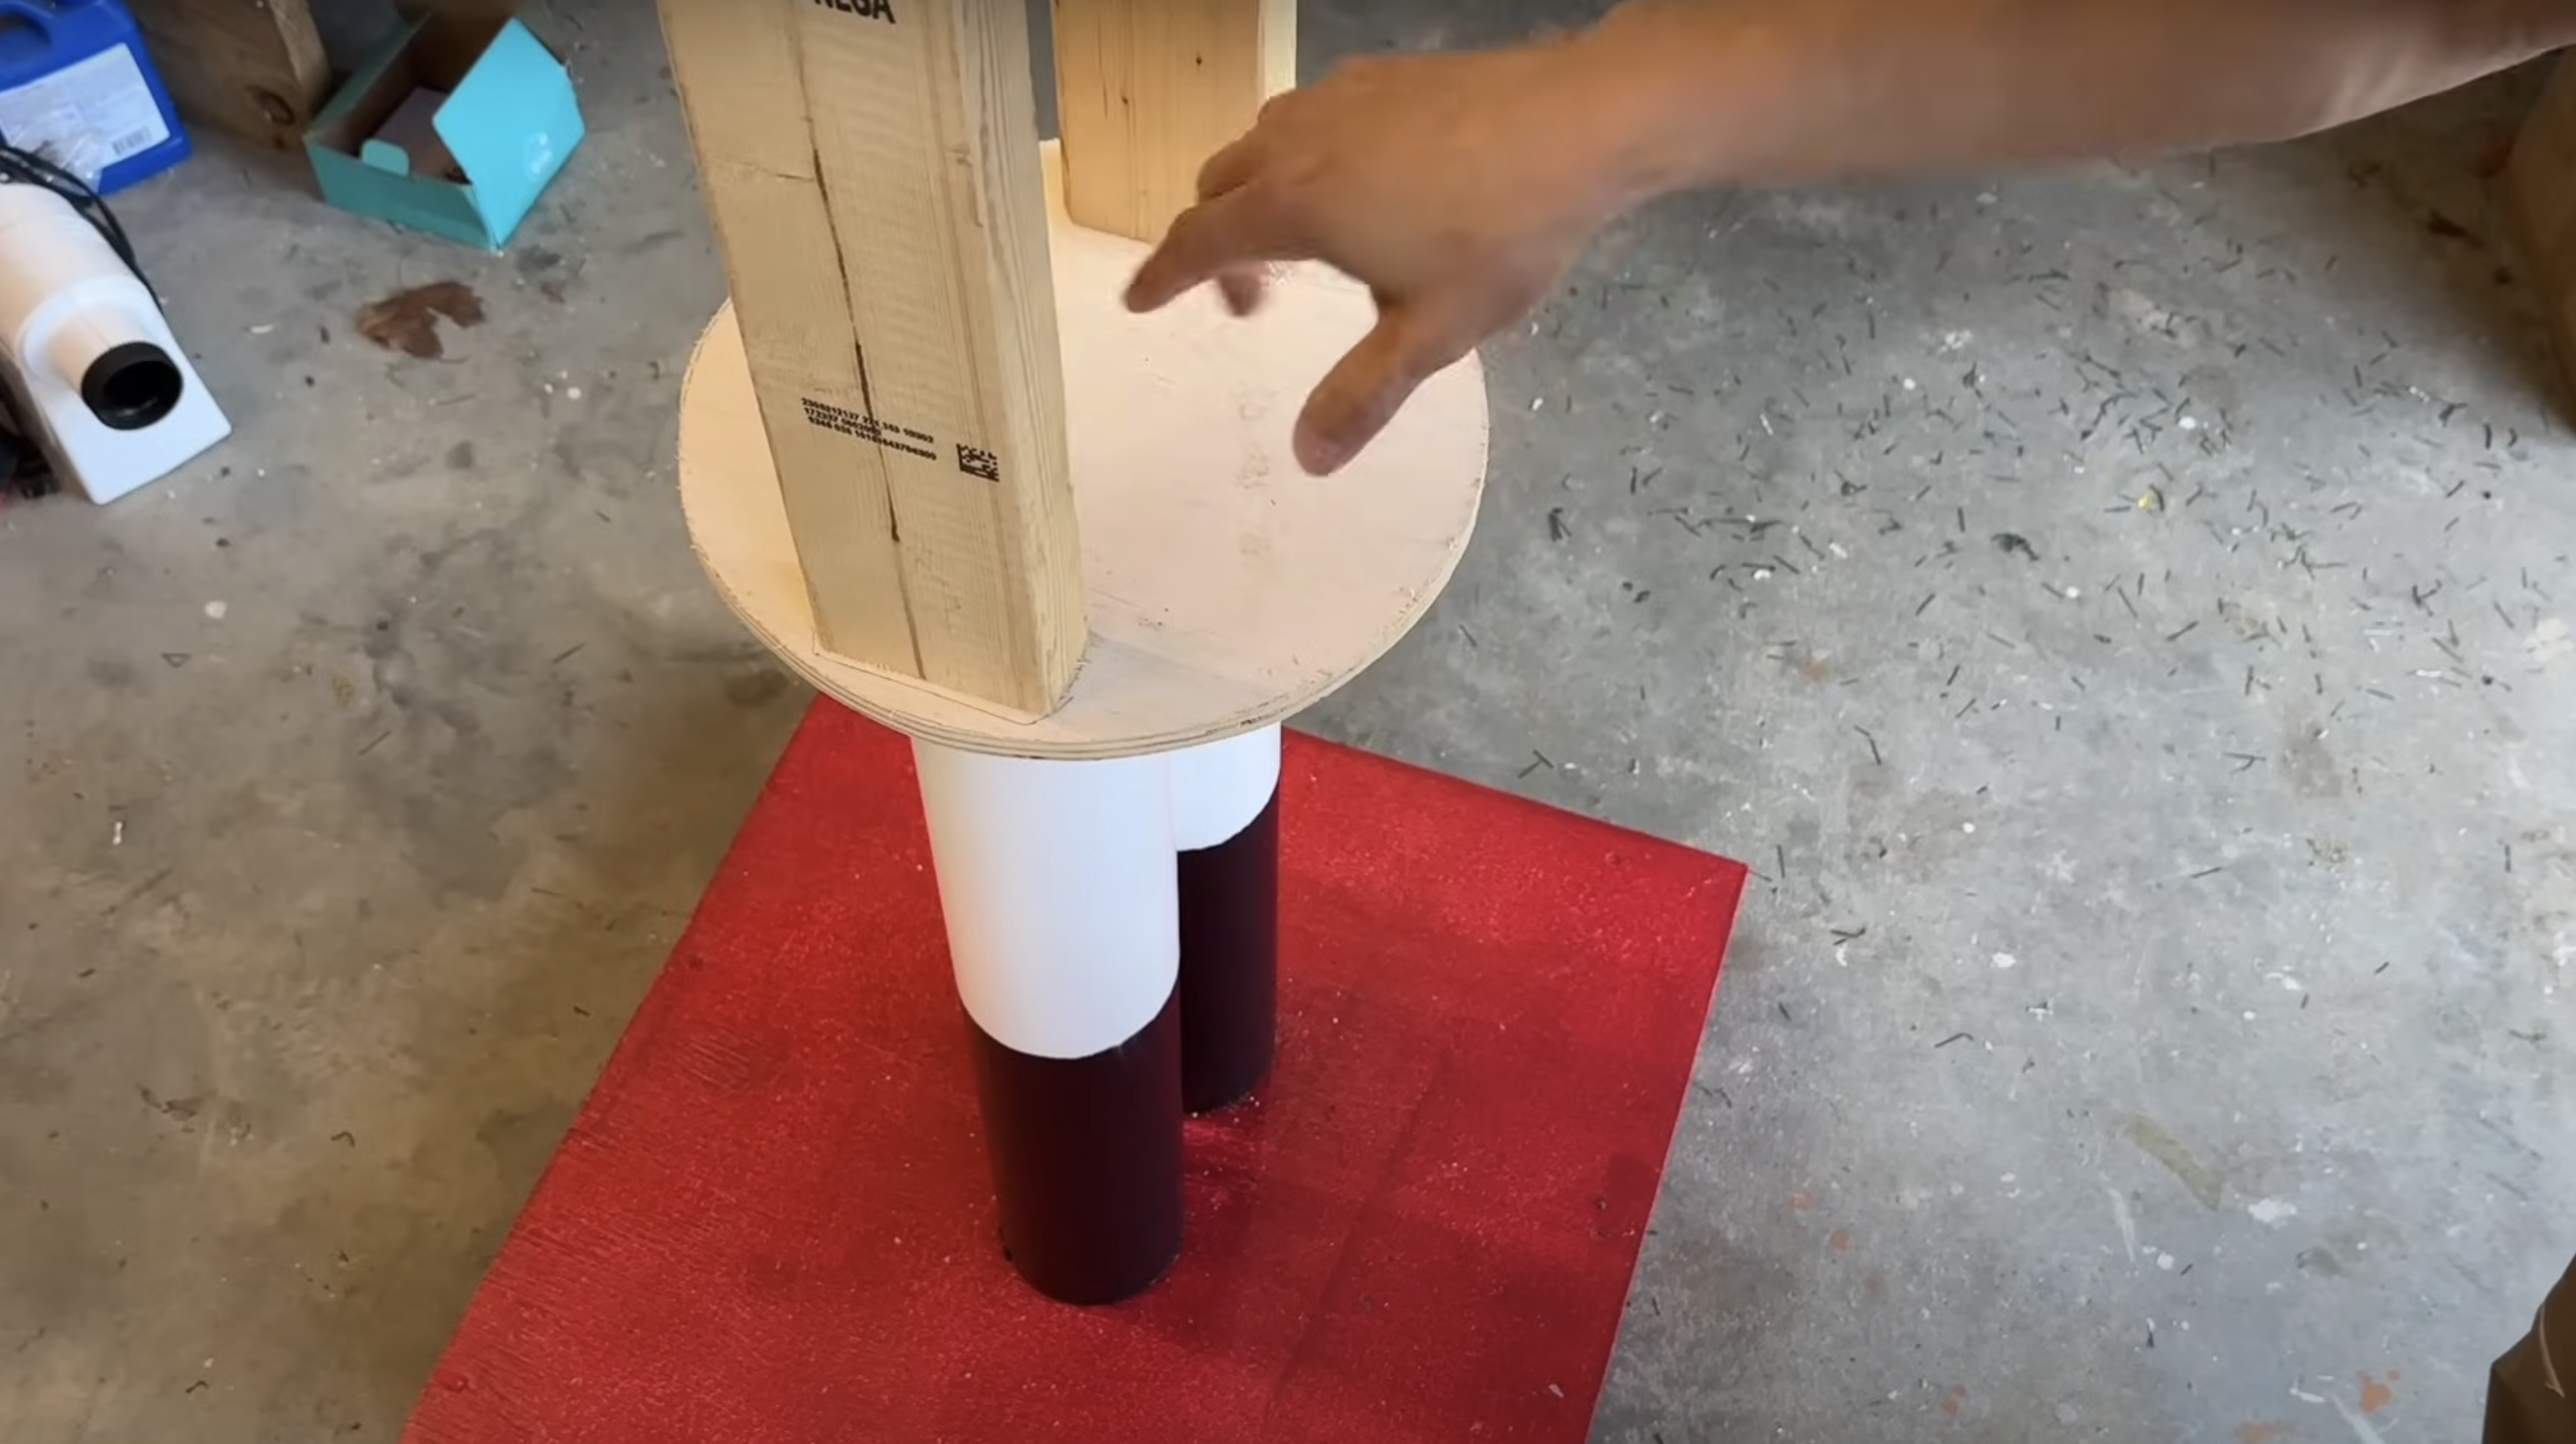
Step 2: Build the Base
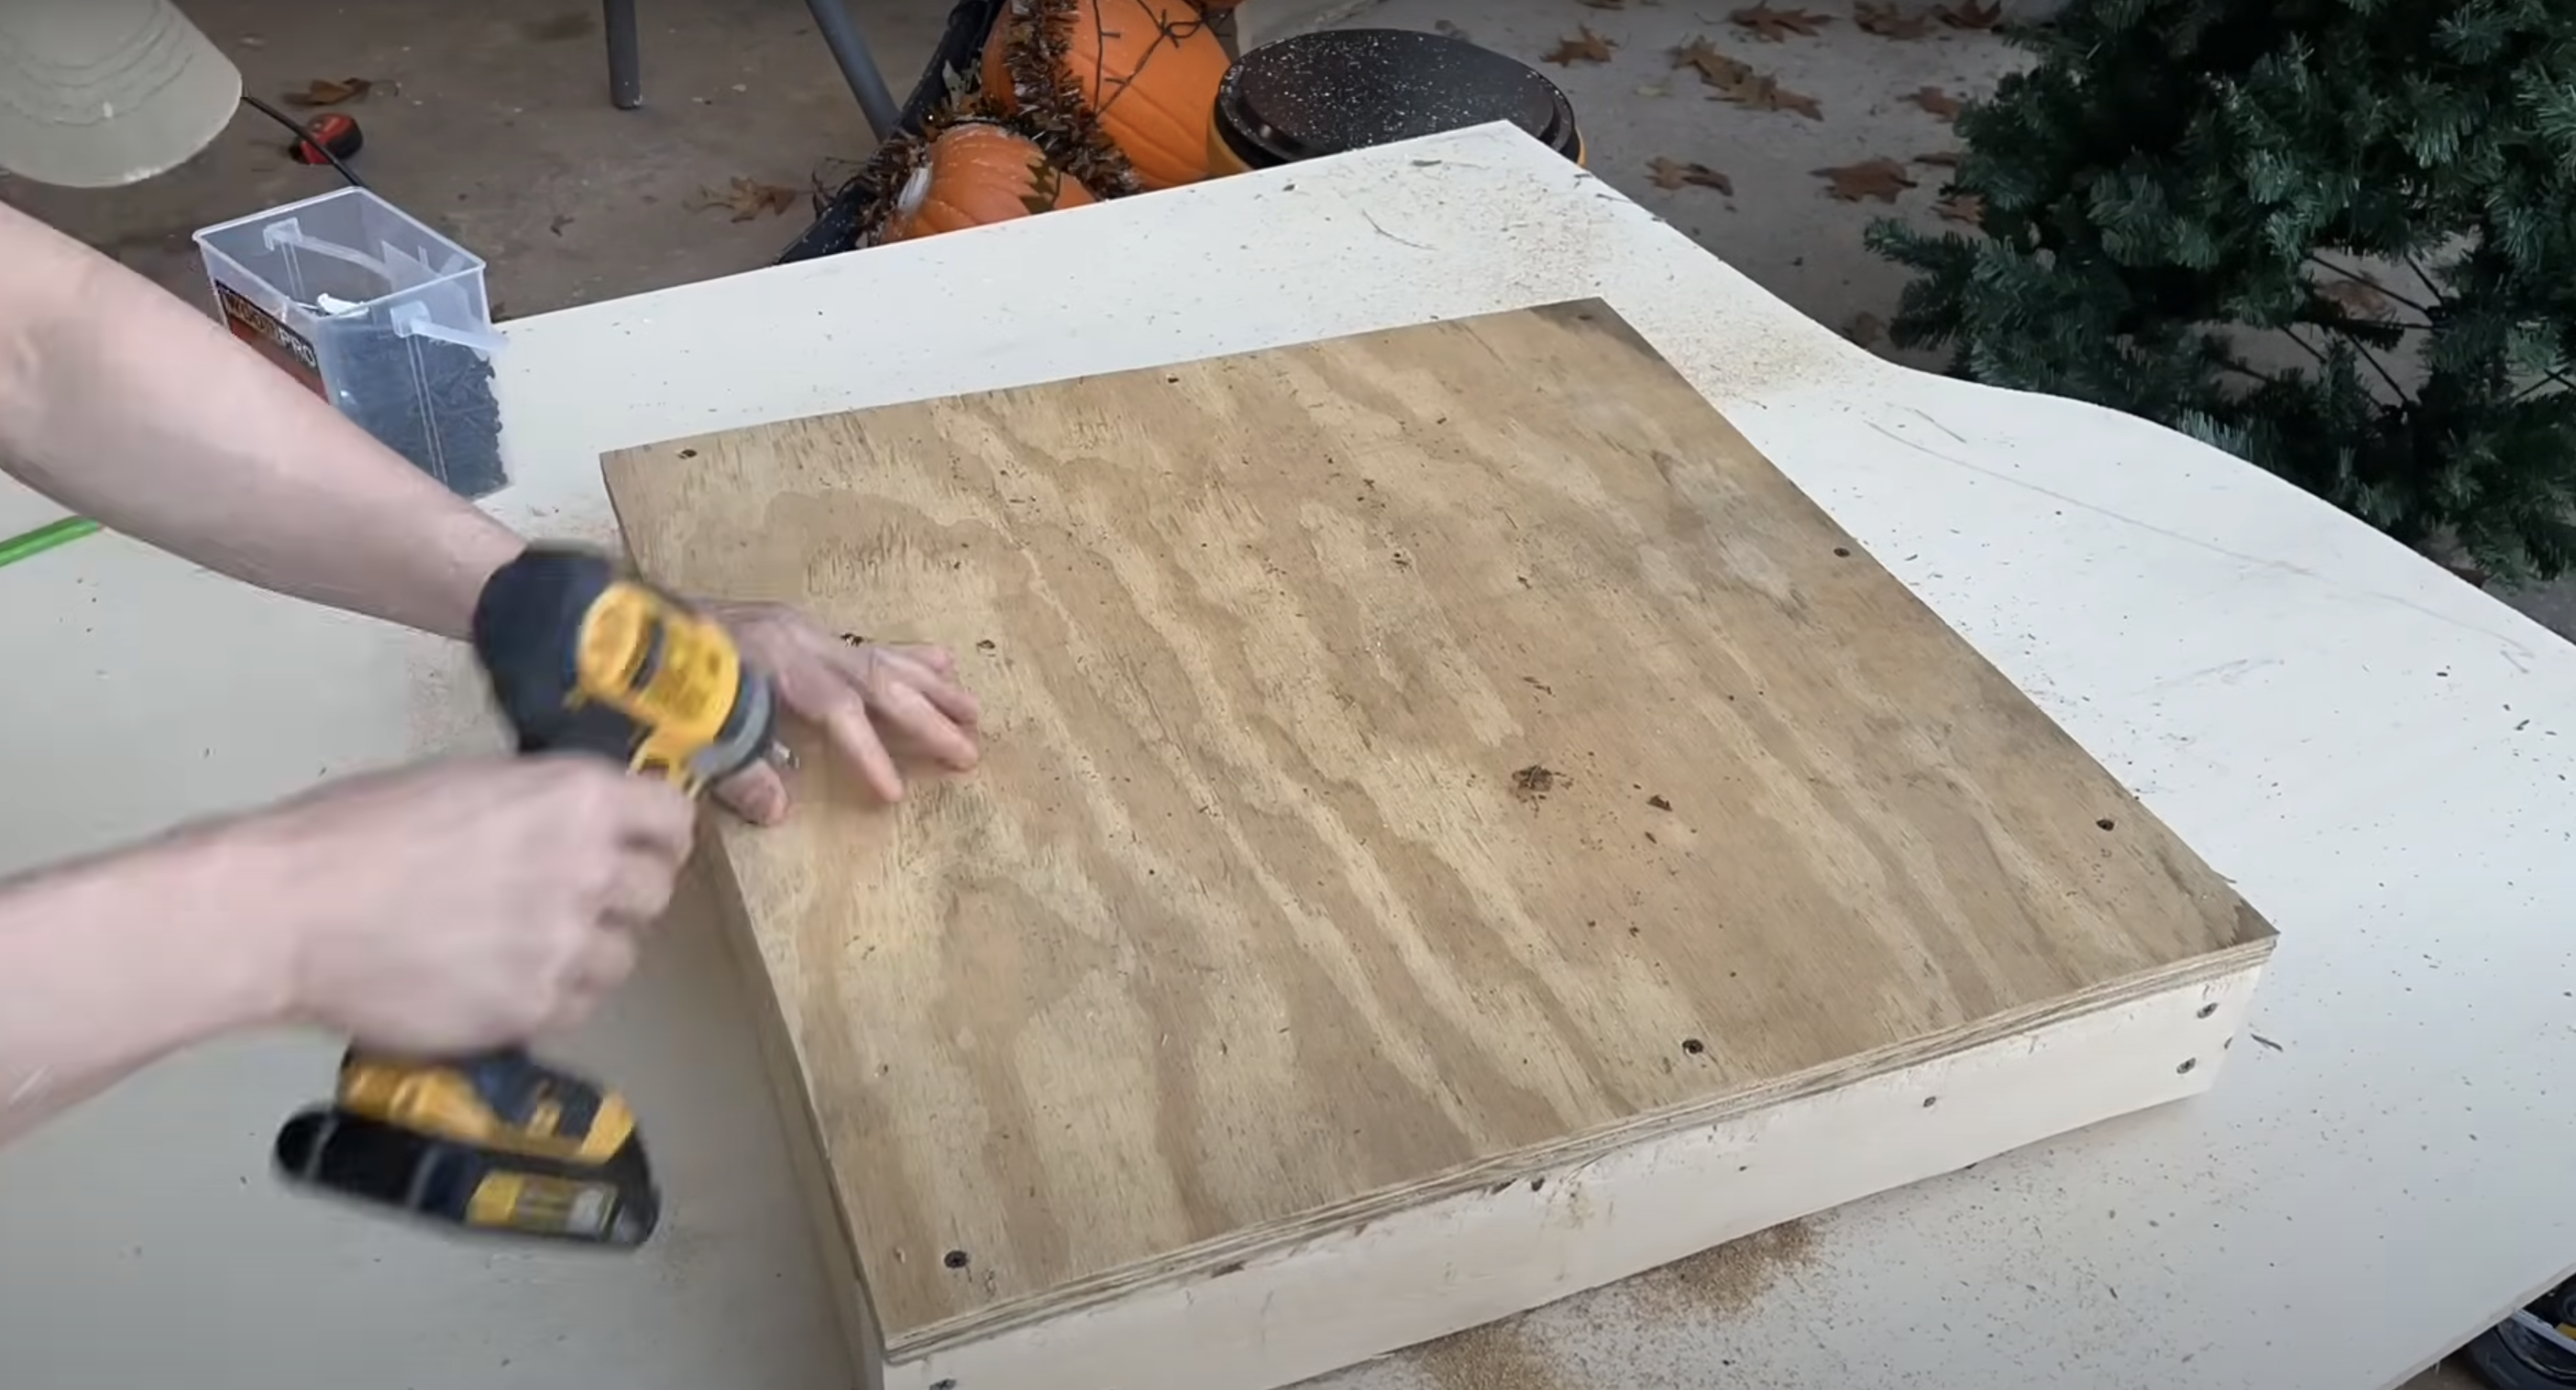
Start by cutting four pieces of 2×4 lumber, two at 24 inches in length and two at 21 inches. Assemble these pieces into a square frame measuring 24 inches by 24 inches, and secure them with screws.
Then, cut a piece of plywood to the same 24-inch by 24-inch dimensions. Finally, attach the plywood to the frame using 1 1/4-inch screws.
Pro Tip: Use clamps to hold everything steady while screwing it together. Makes it way easier!
Step 3: Prepare the Body
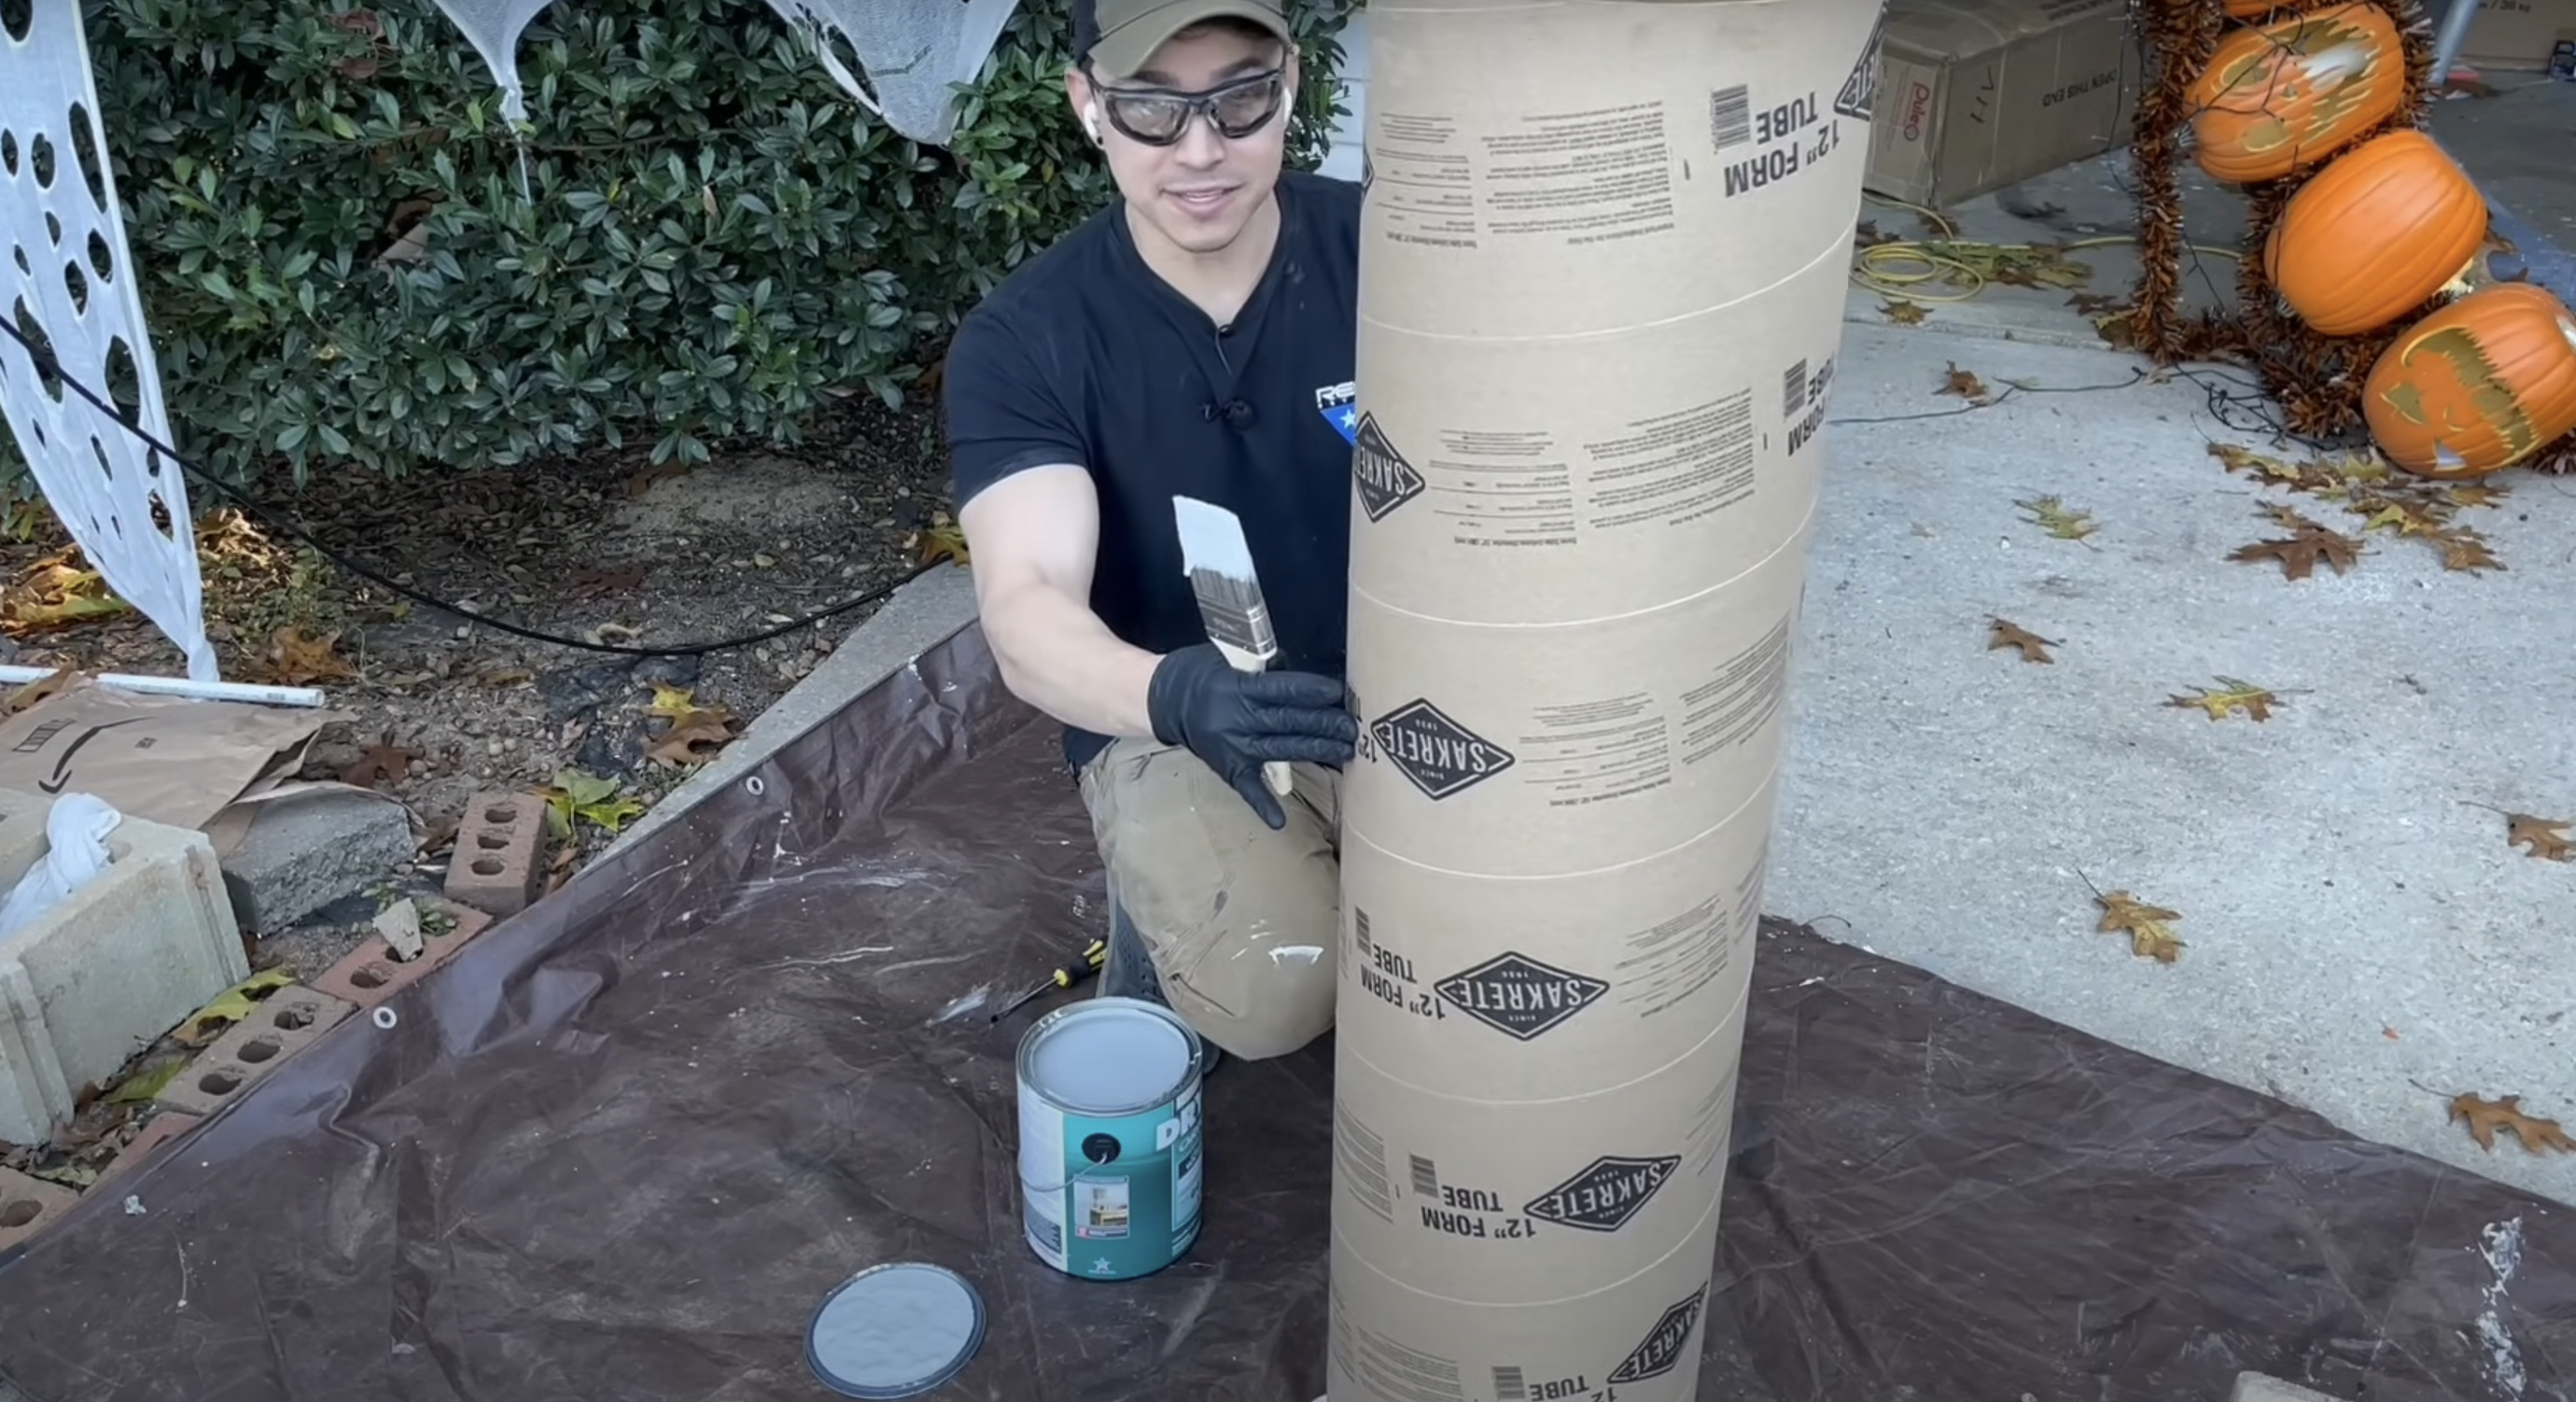
Obtain a Sonotube 48 inches tall and 12 inches in diameter. To ensure it’s well-sealed, start by applying two coats of DryLock weather proofer.
Next, divide the tube into three sections for painting: the top 12 inches for the hat, the middle 12 inches for the face, and the bottom 24 inches for the torso.
Mark these sections carefully and use painter’s tape to separate them. Once marked, paint each section in the appropriate colors for a finished look.
Pro Tip: Paint one section at a time and let it dry fully before moving to the next. Keeps the lines clean.
Step 4: Attach Legs to Base
Cut two additional 2x4s to 24 inches in length. Place them inside the PVC leg pipes, leaving about a one-inch gap between them.
Mark their positions on the base, then drill pilot holes through the base into the ends of these 2x4s. Finally, secure the 2x4s to the base from underneath using 3-inch screws.
Pro Tip: Drill the pilot holes first so the wood doesn’t crack when you drive in the big screws.
Step 5: Create Support for Arms and Body

Cut two 2×4 pieces to 16 inches each. Position them on top of the leg assembly, aligned along the sides where the arms will be placed, leaving a 1/4-inch to 1/2-inch gap from the edges.
Secure these pieces to the assembly from underneath using 2-inch screws. Once secured, place a wooden disc on top of the completed structure.
Pro Tip: Double-check the balance before you screw down the disc. It’ll help the nutcracker stand nice and straight.
Step 6: Prepare for Arm Attachment
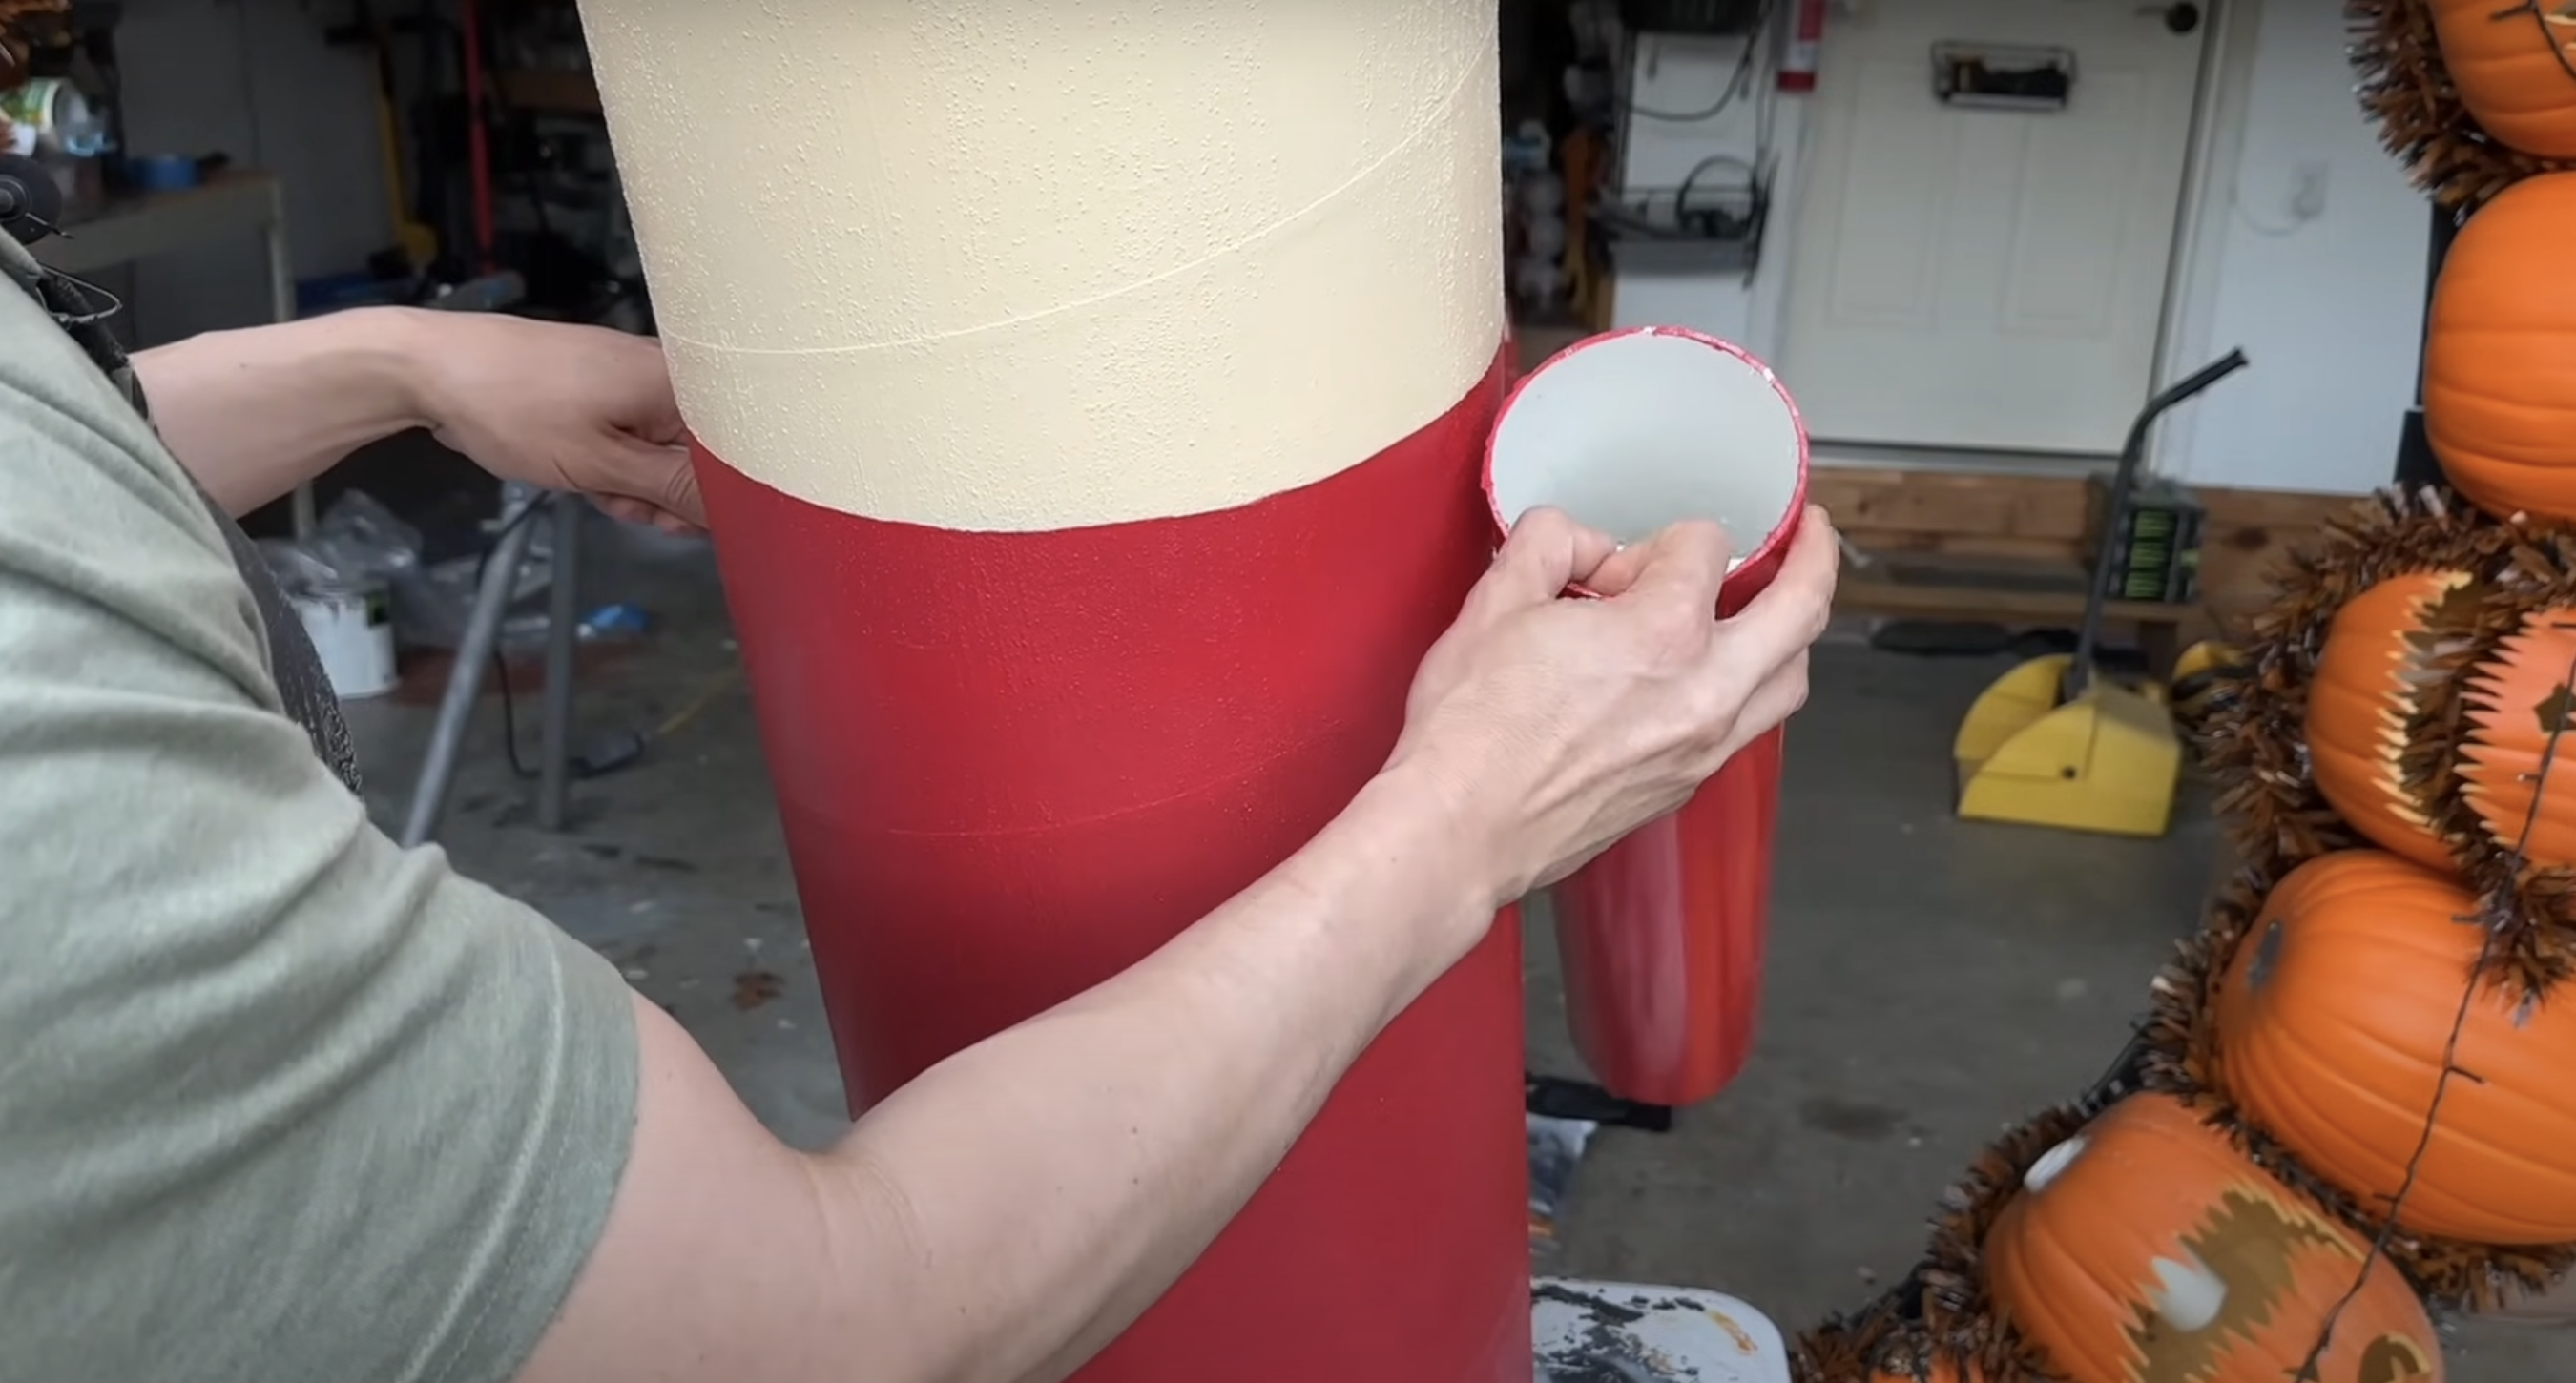
Cut two 20-inch lengths of 1/2-inch PVC pipe. Measure 3 inches down from where the torso section starts on the Sonotube, and drill 1/2-inch holes on both sides at this mark.
In each arm piece, drill corresponding 1/2-inch holes, also positioned 3 inches from the top.
Pro Tip: Drill slowly and use a clamp or helping hand to hold things steady — safety first!
Step 7: Paint the Face
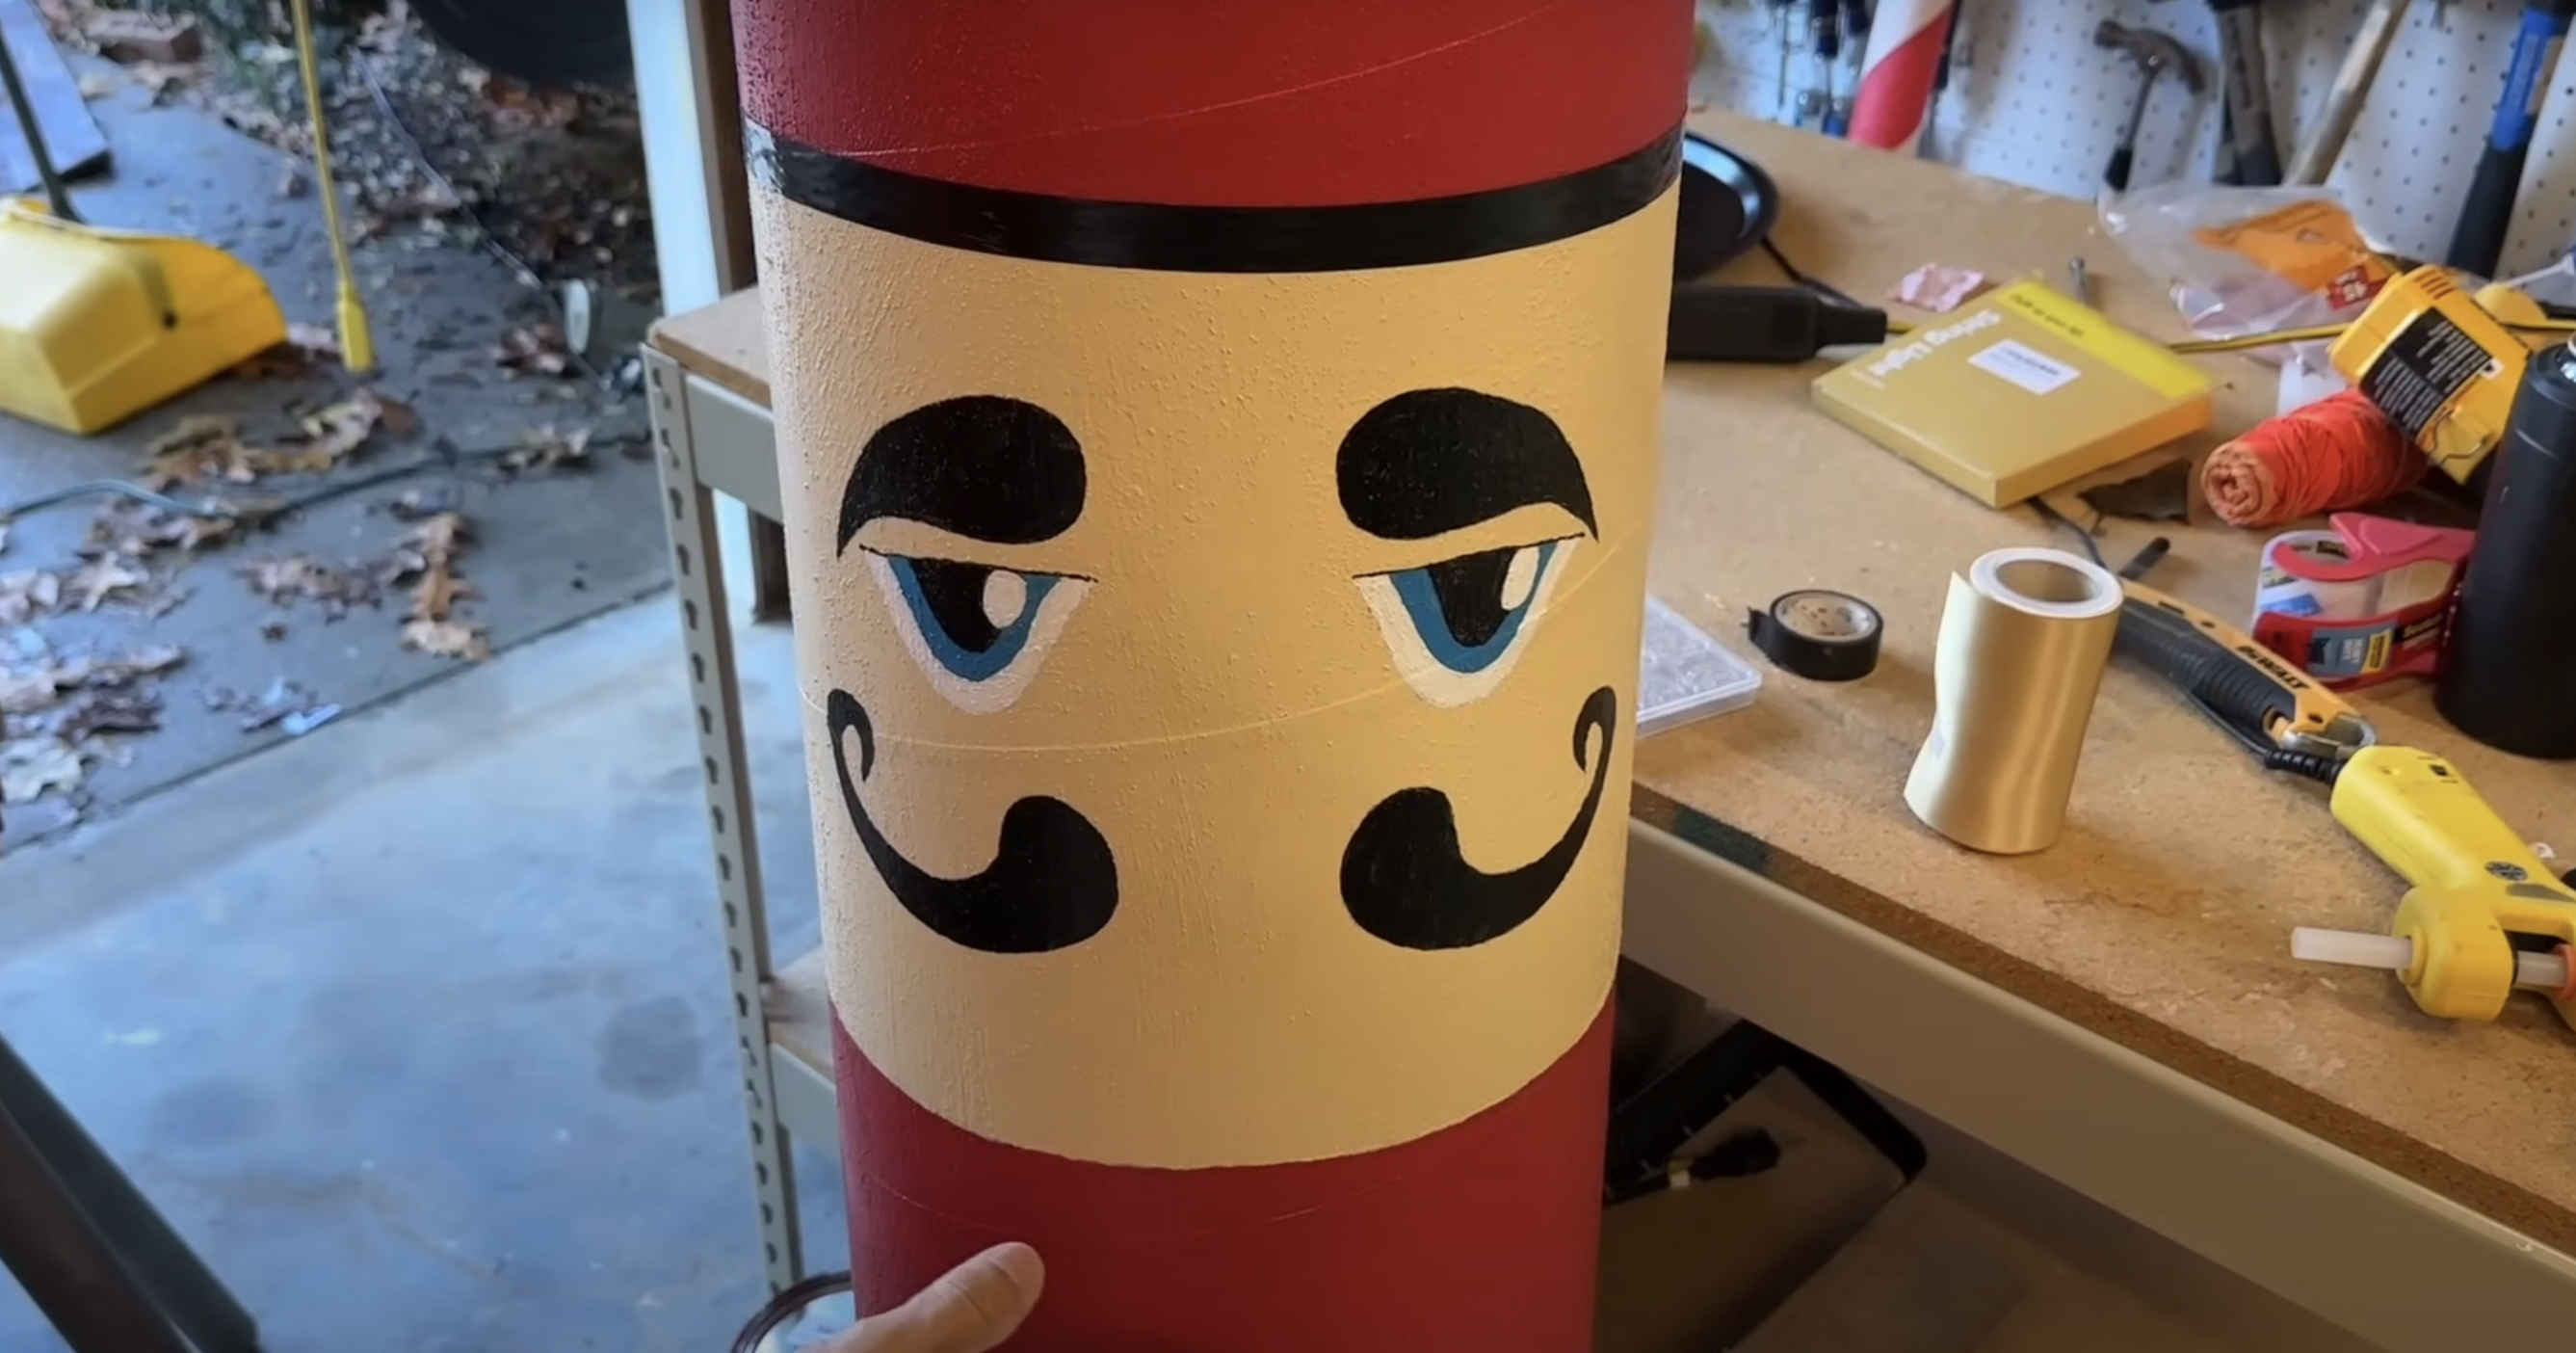
Paint the facial features onto the designated face section of the Sonotube. Cover the seams with black electrical tape to ensure a neat transition between the different paint colors.
Then, cut a nose from a scrap piece of 2×4, paint it to match the face section, and securely attach it using hot glue.
Pro Tip: Use a pencil to sketch the face before painting. Mistakes are easier to erase than paint!
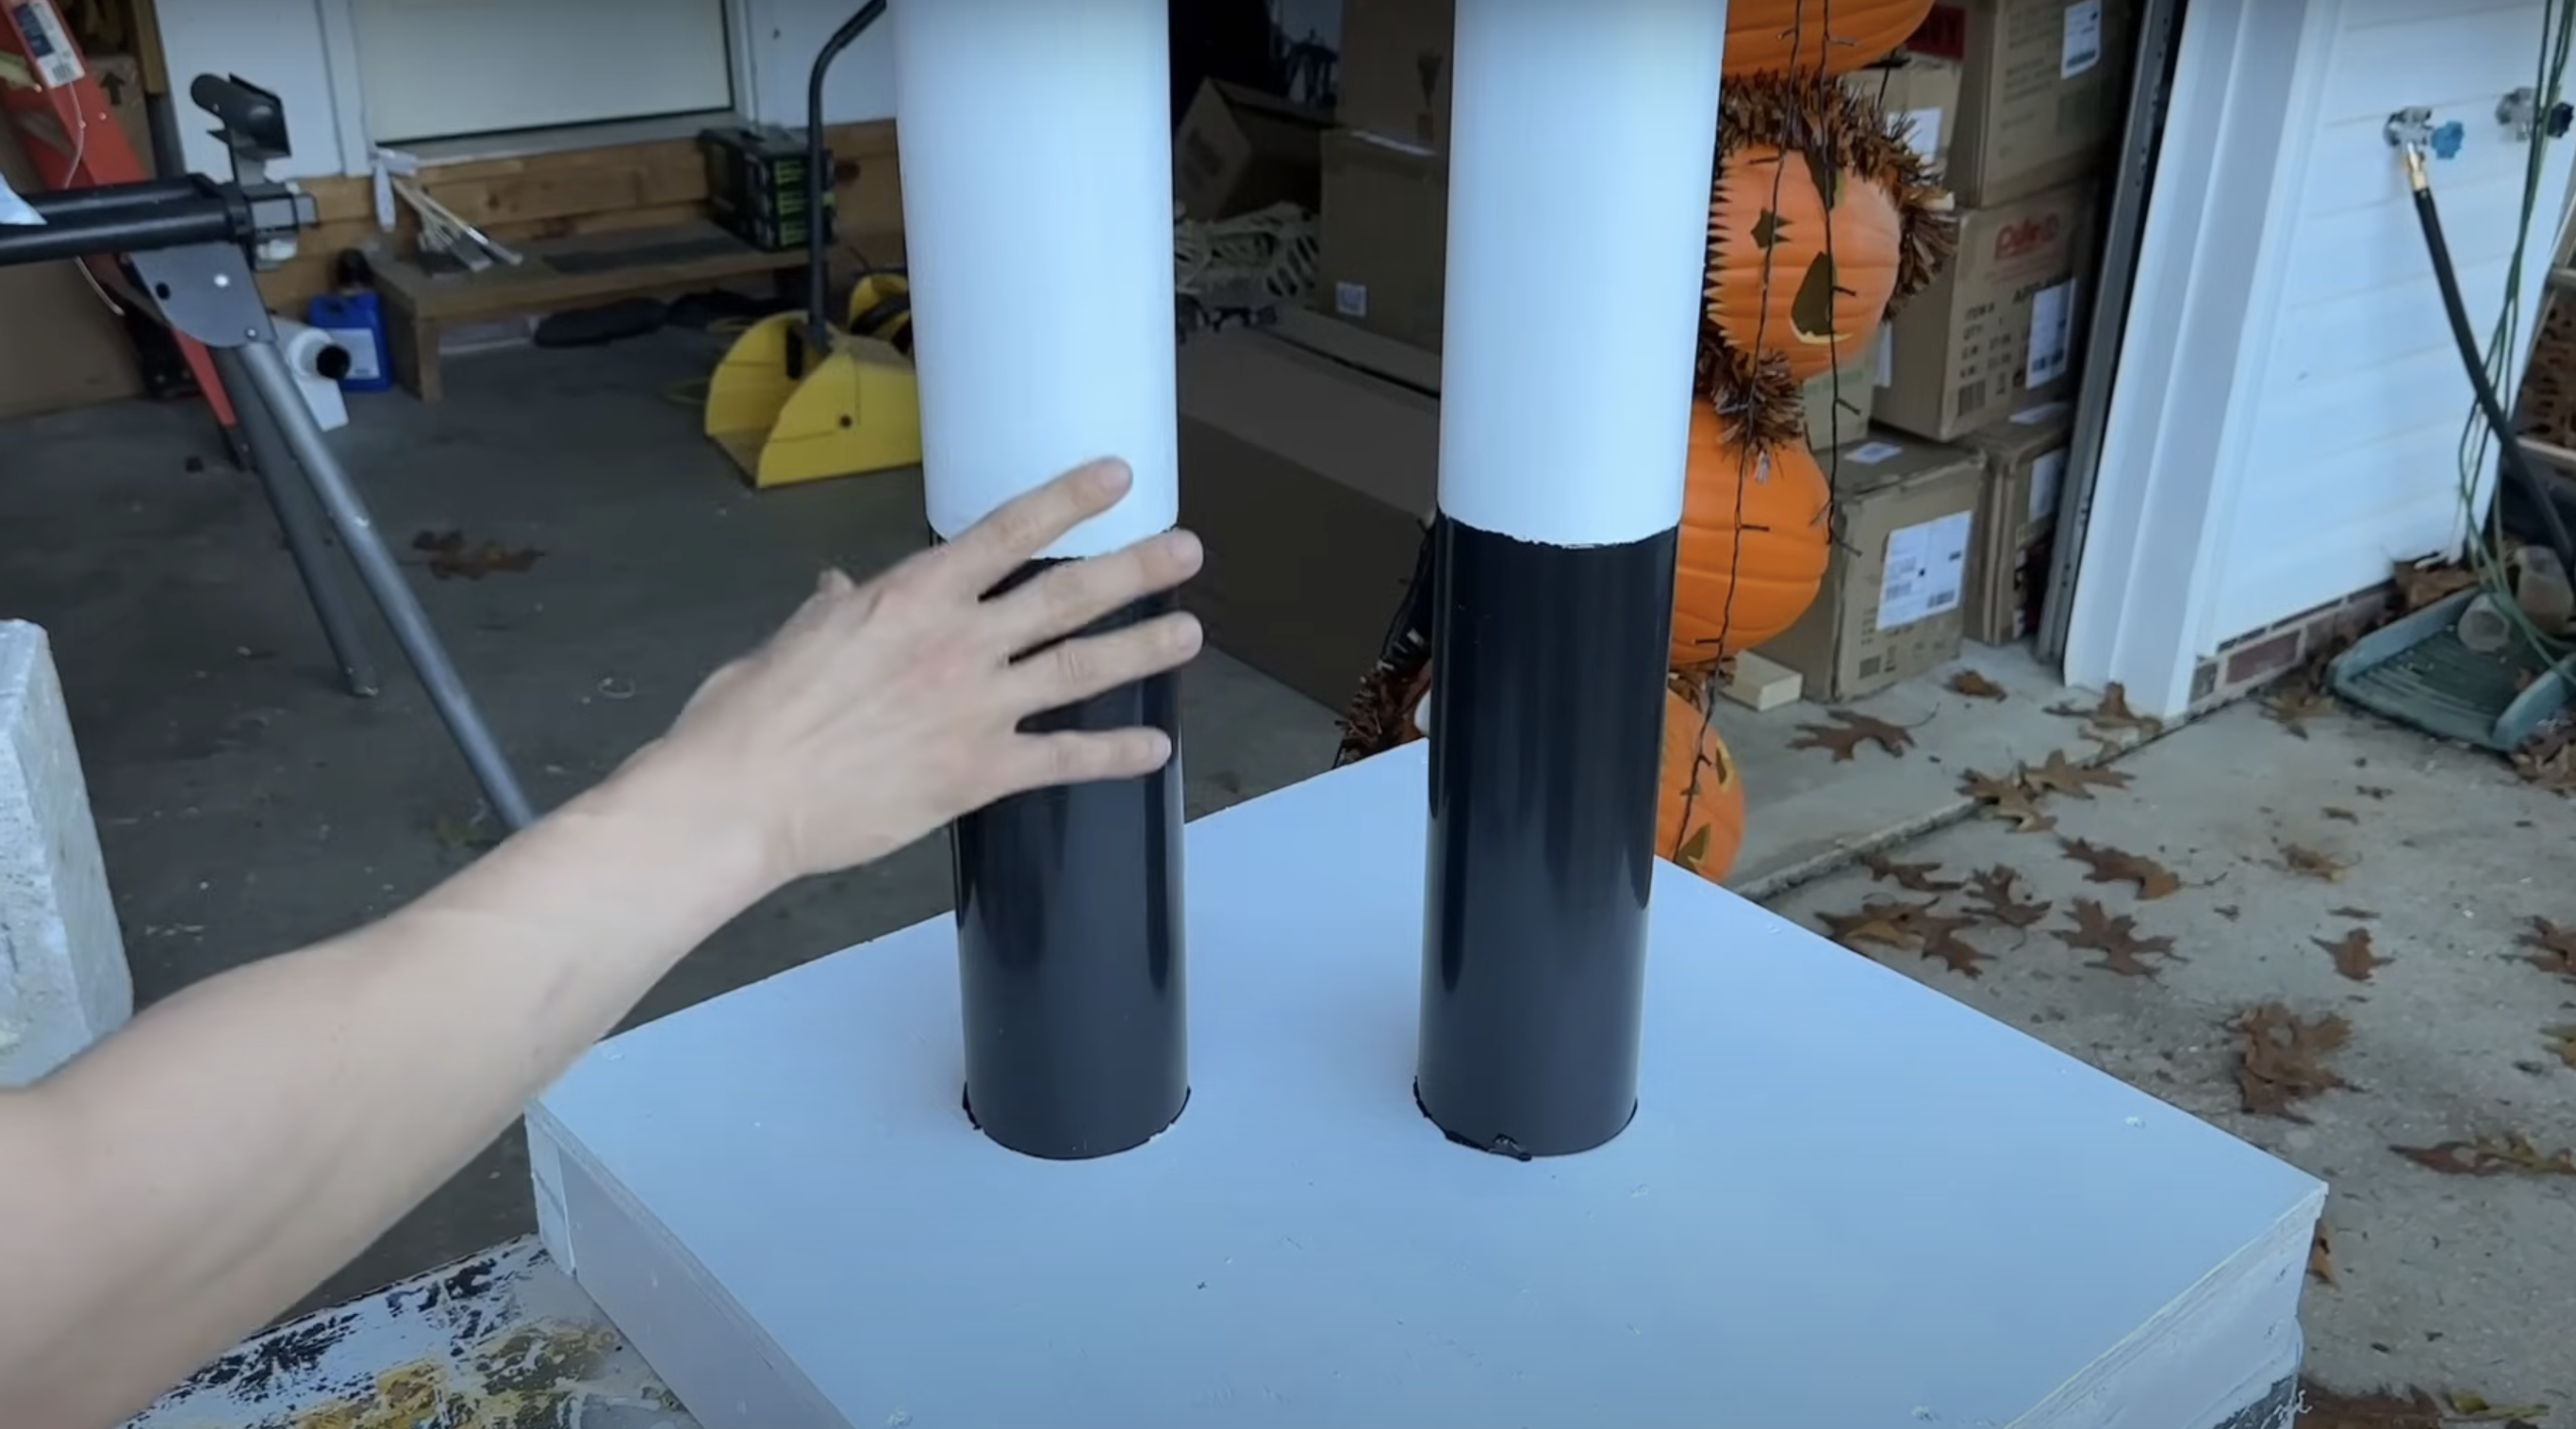
Step 8: Paint Arms and Legs
Paint the entire length of the arms red. For the legs, apply white paint to the top half and black paint to the bottom half, creating a clean, two-tone design.
Pro Tip: Use painter’s tape to keep the color sections neat and sharp.
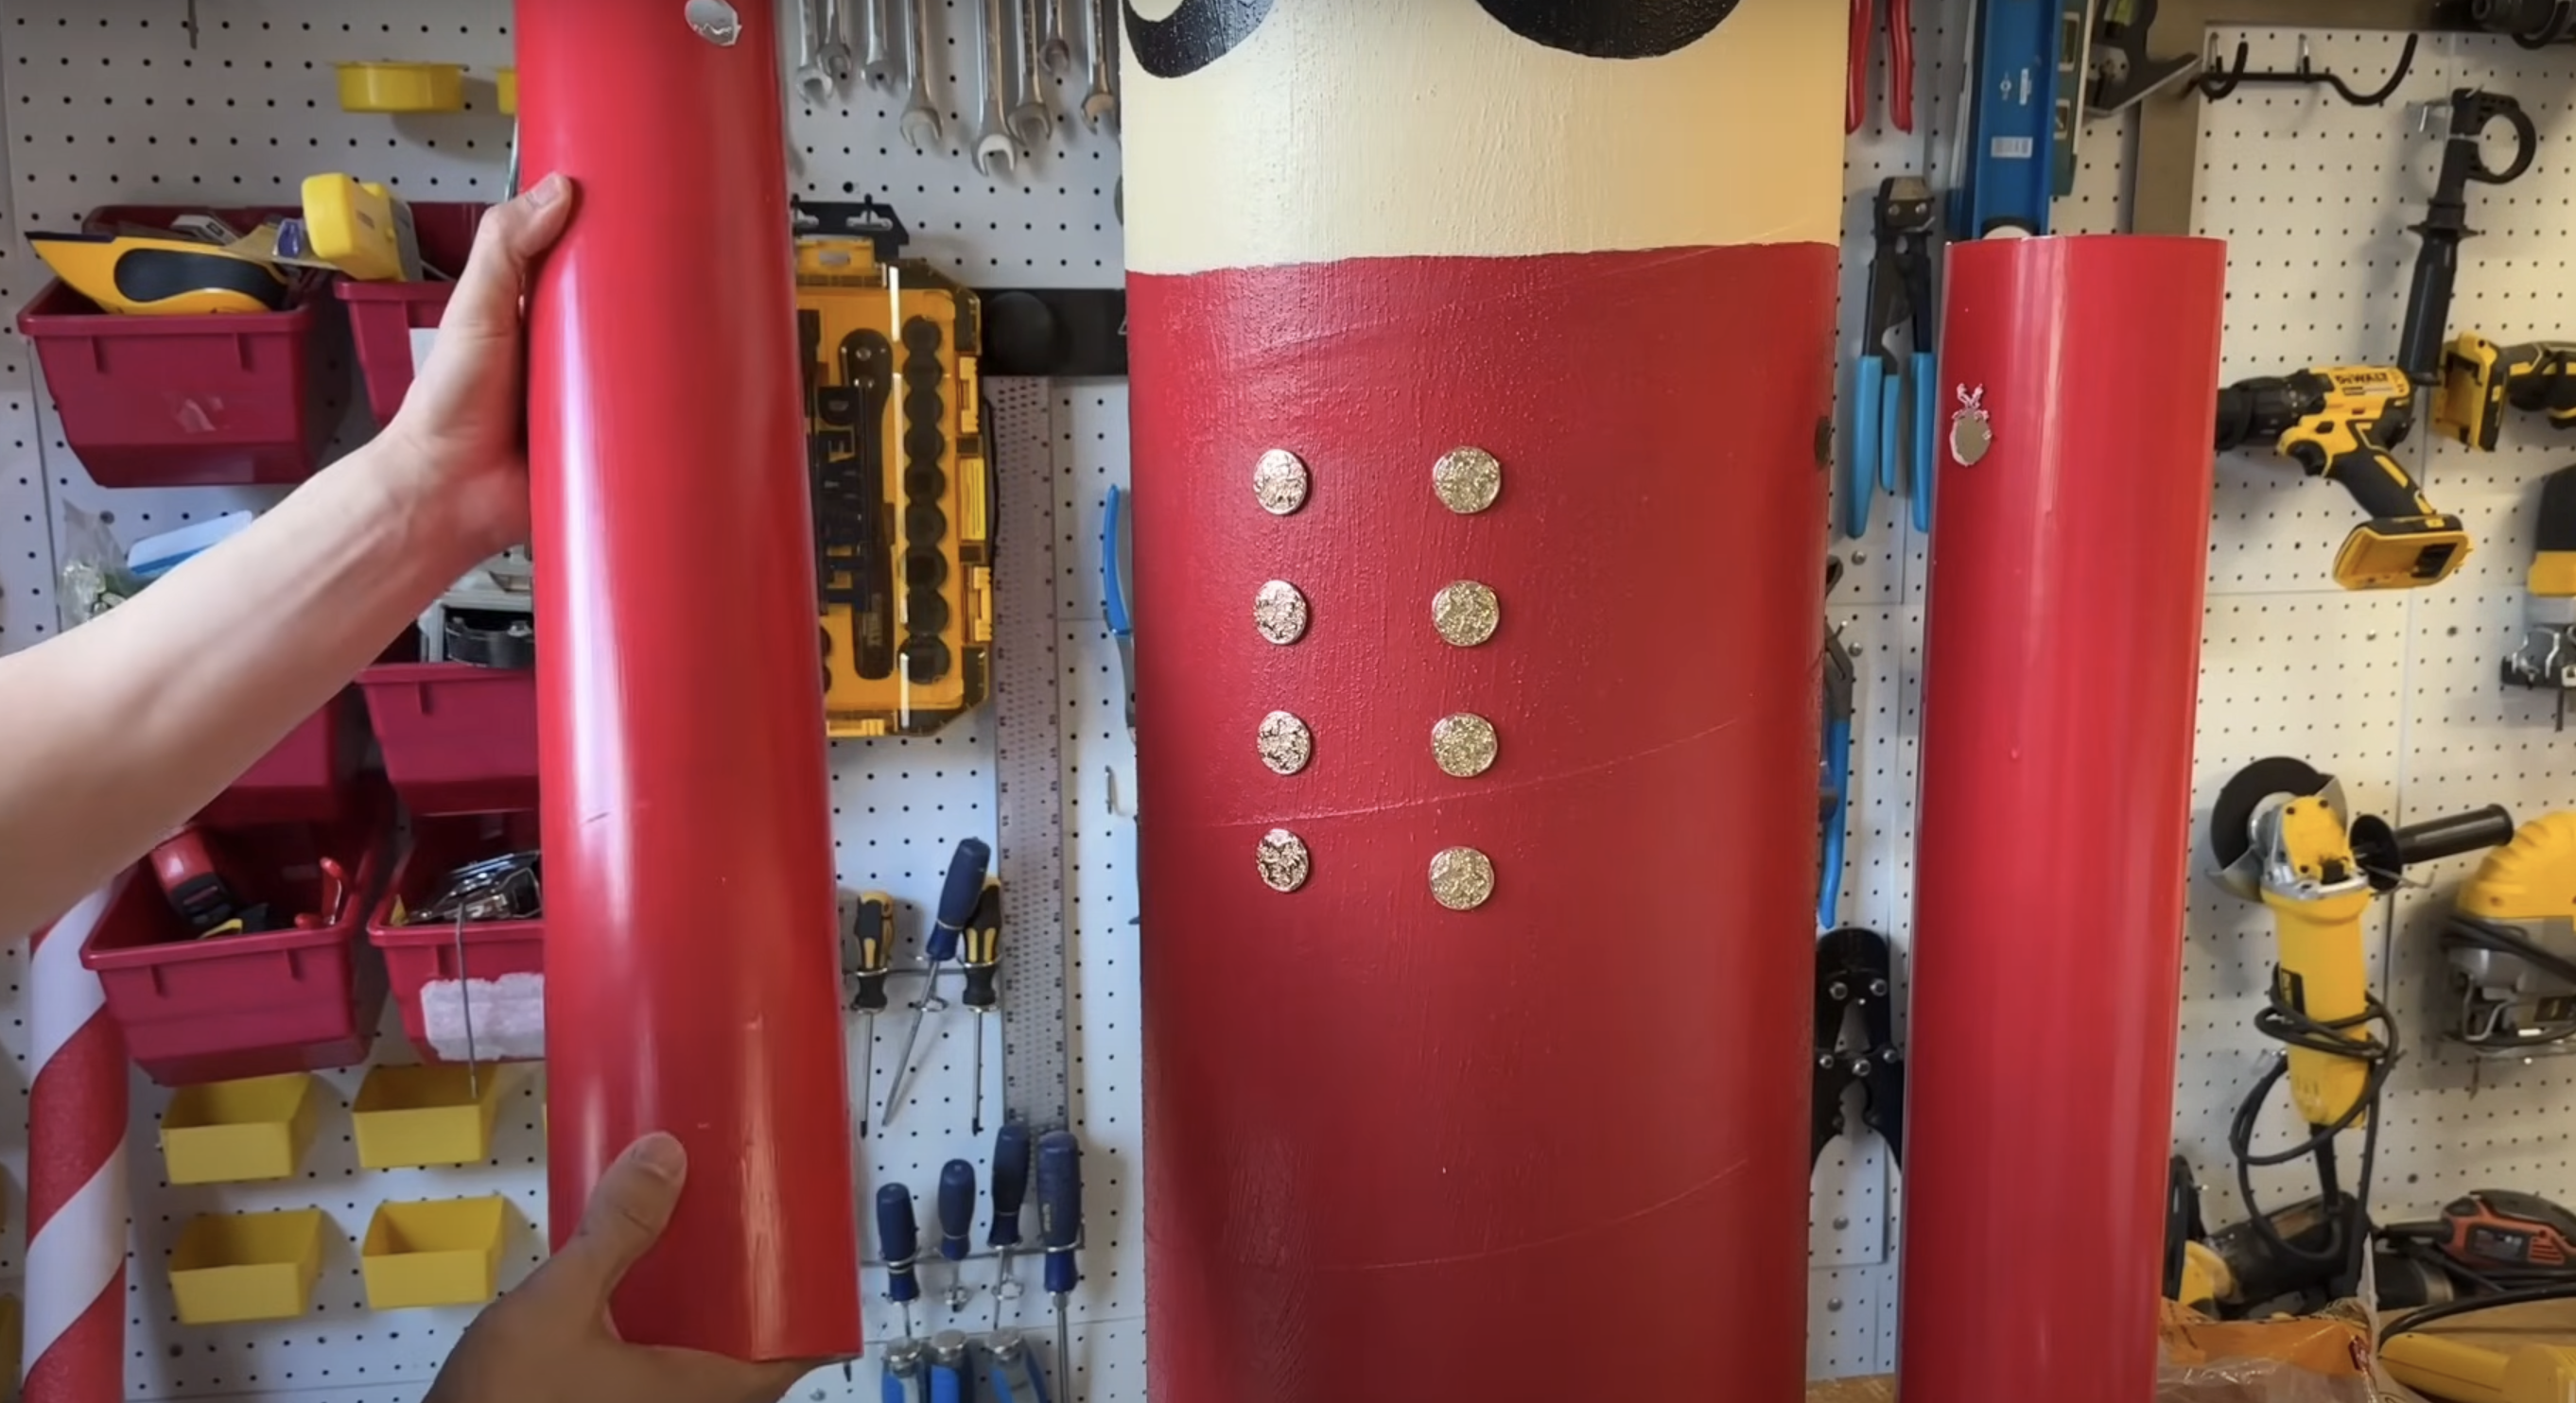
Step 9: Add Decorative Elements
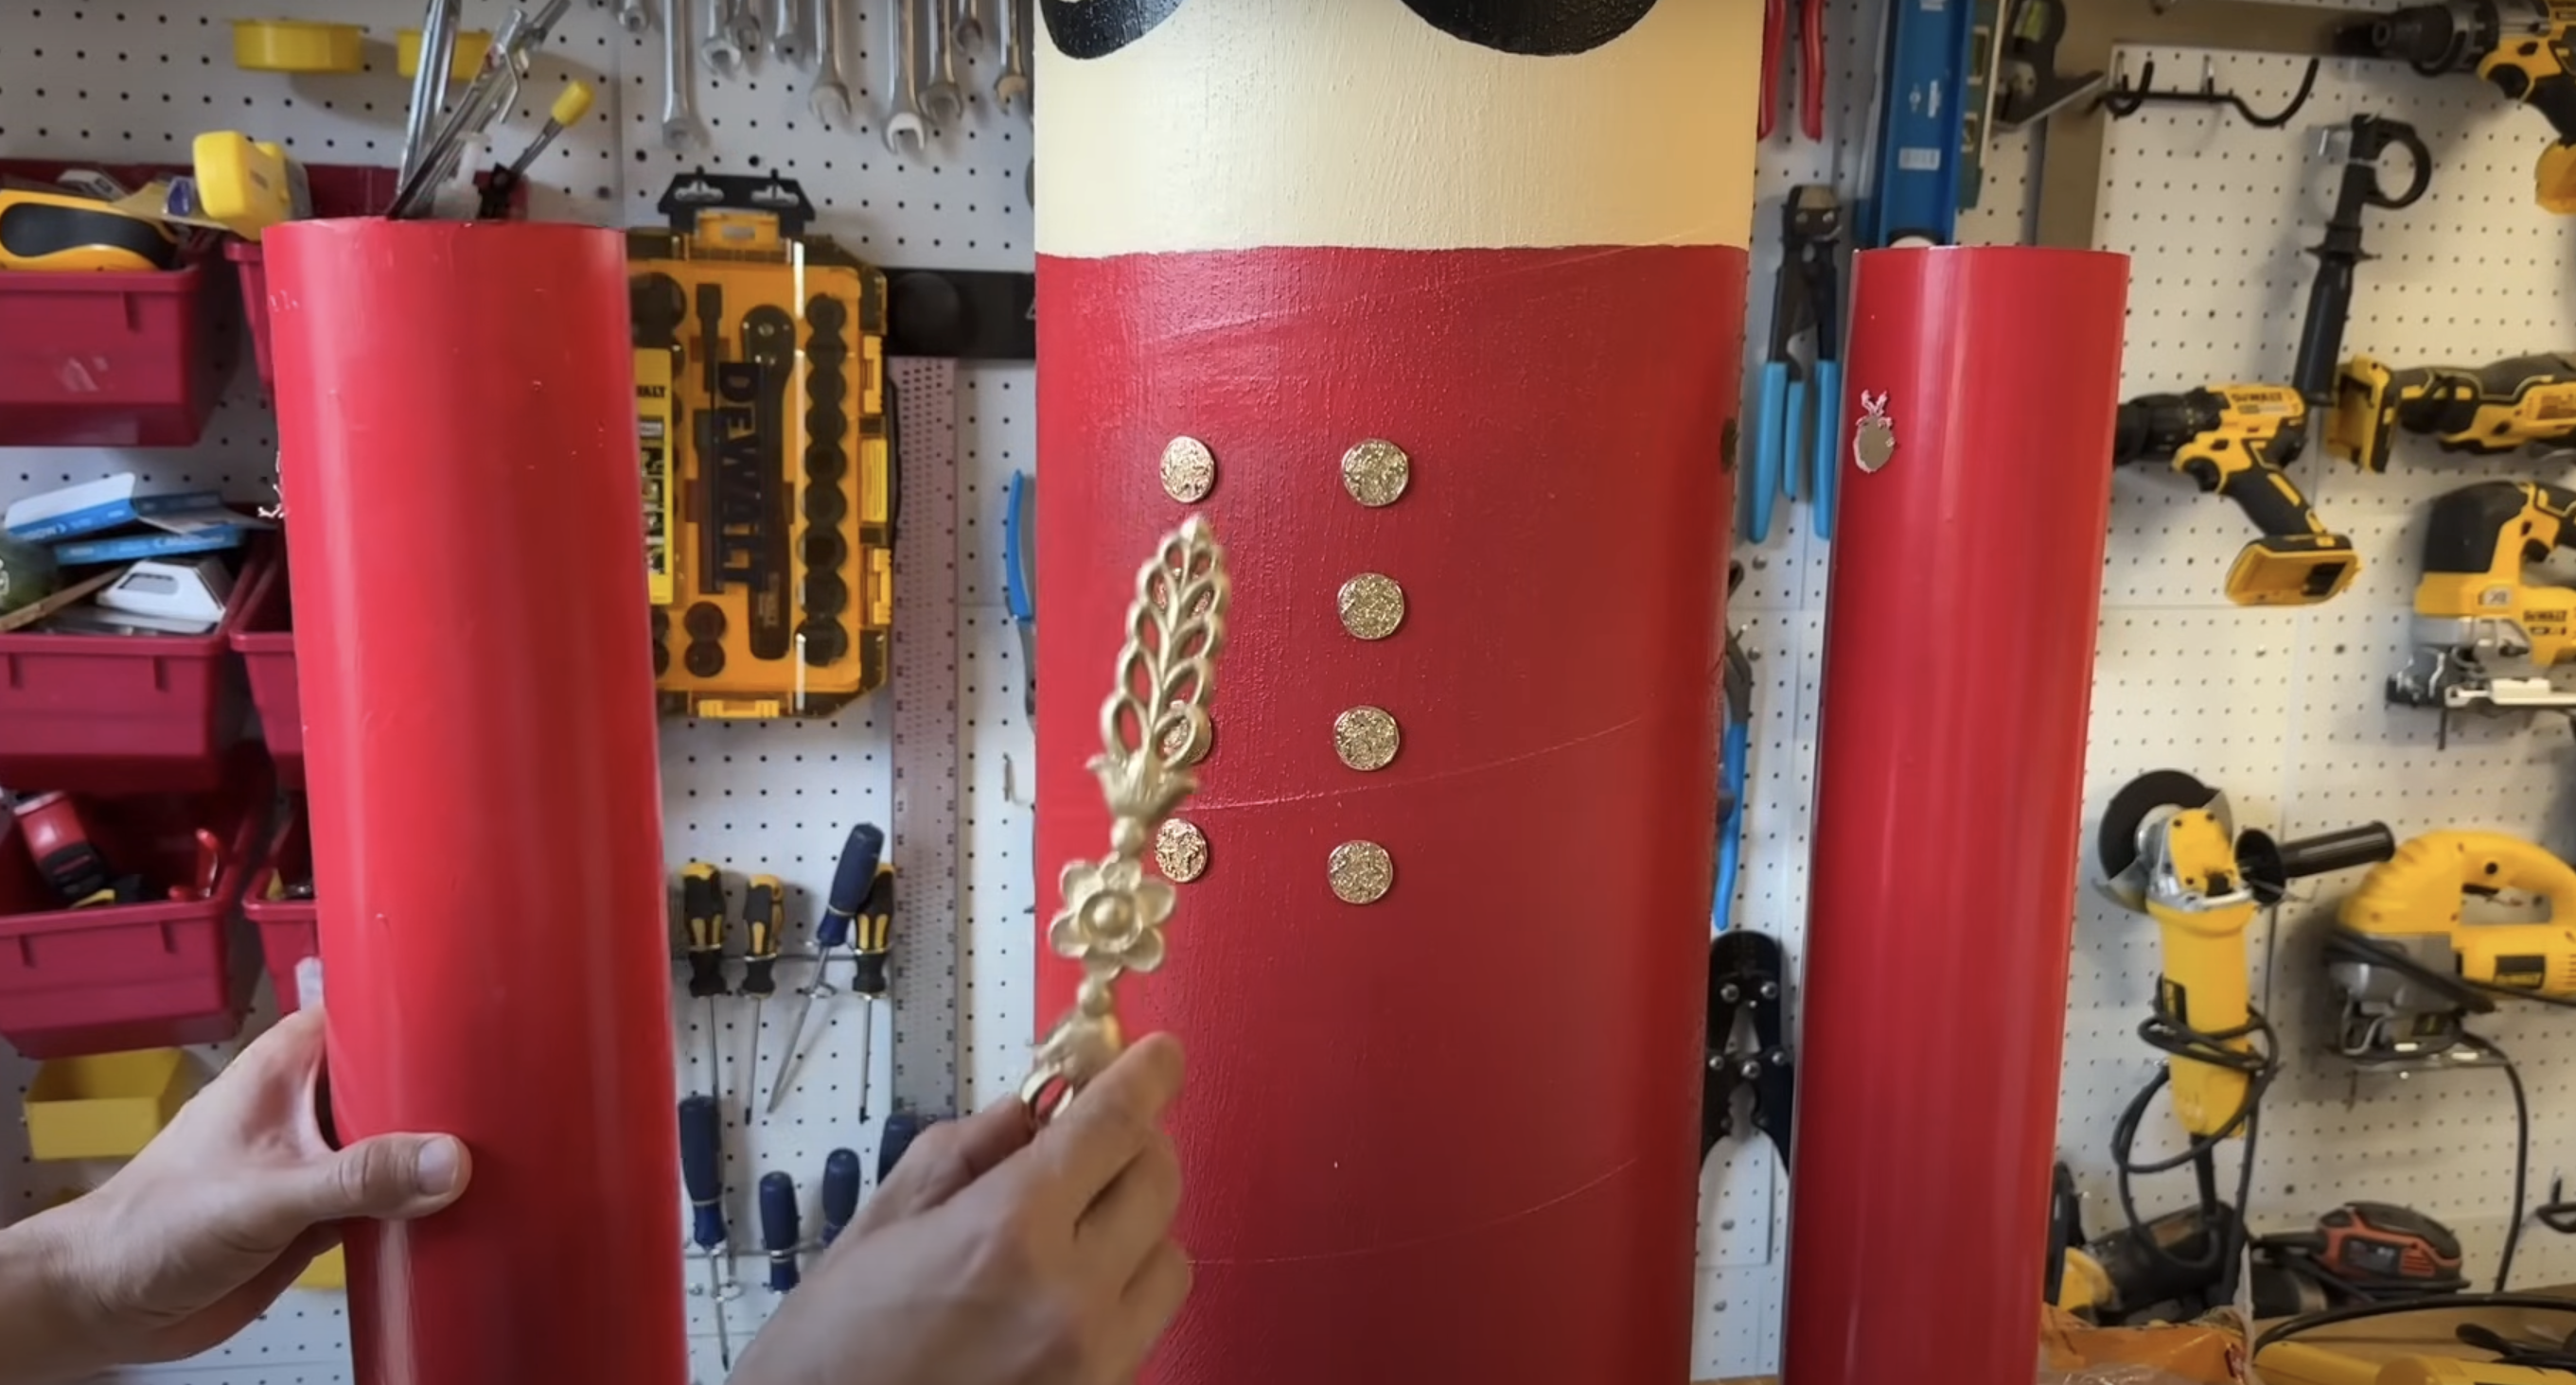
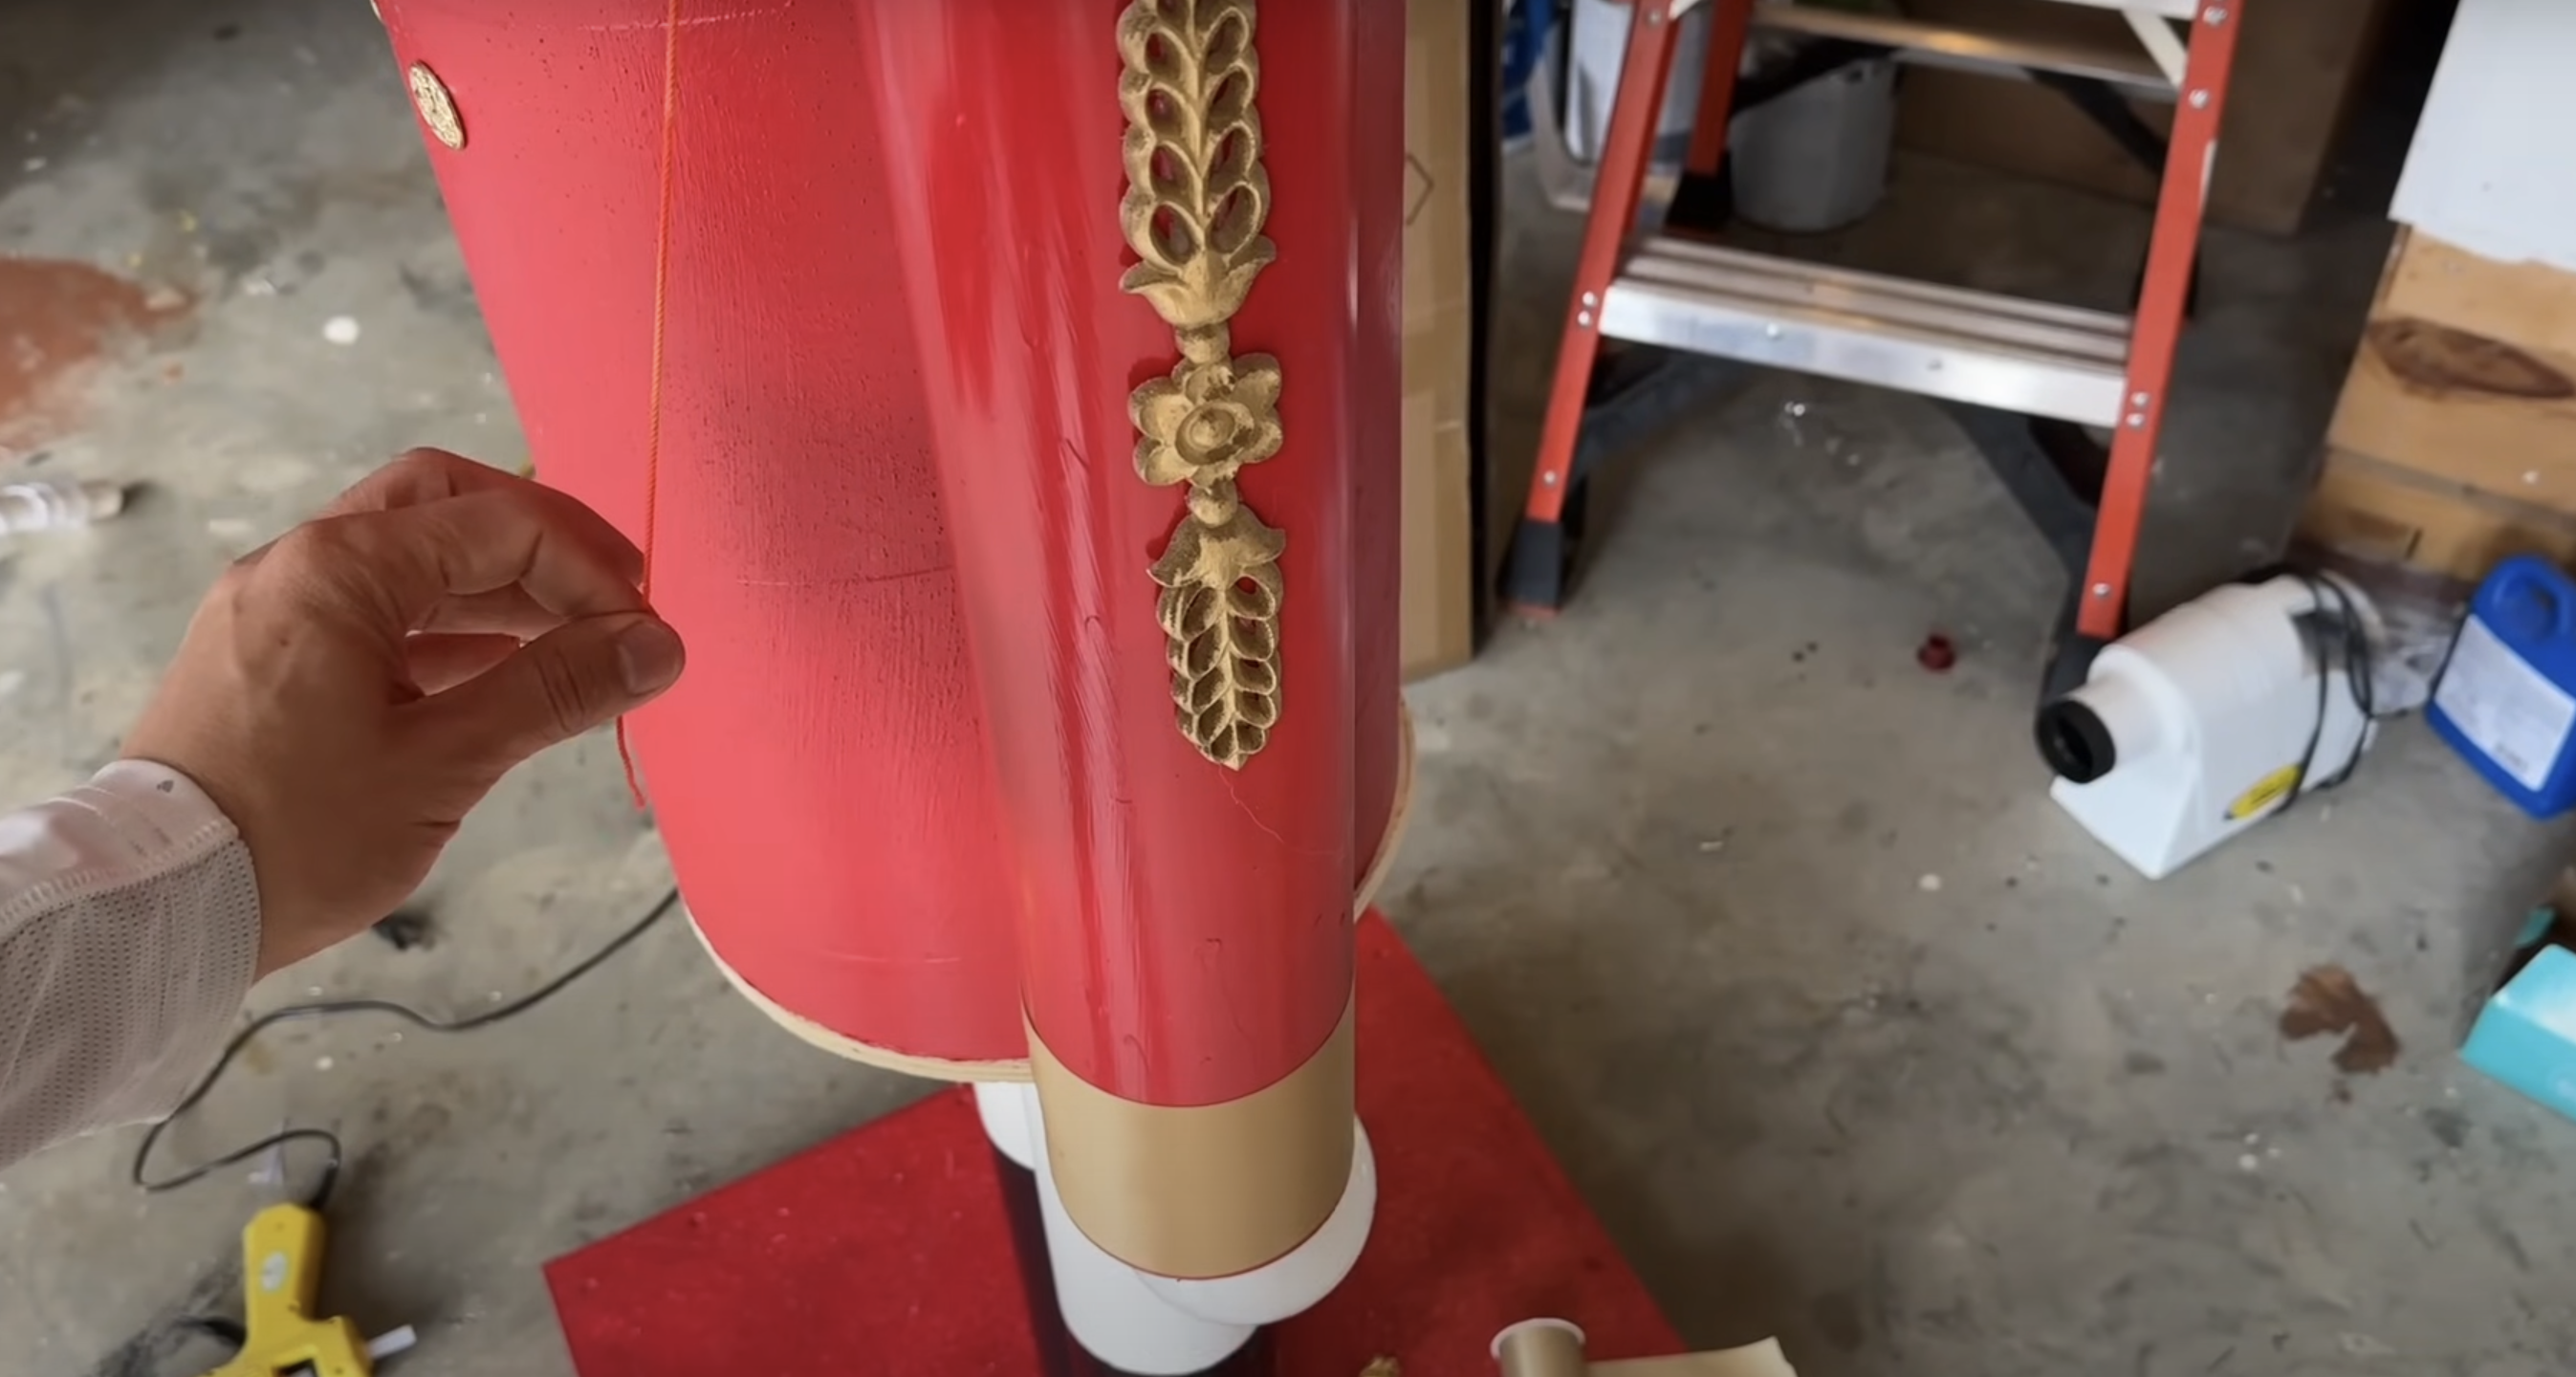
Add gold buttons along the torso, spacing them evenly at 2-inch intervals for a polished look. Attach gold wooden onlays to both the shoulders and the hat to uplift the decorative details.
Wrap golden fabric around the wrists to create cuffs, and add a gold ribbon at the neck for a refined finish. To complete the design, apply rhinestone ribbon trim to selected areas, bringing a touch of sparkle.
Pro Tip: Hot glue works great for decorations, but be quick — it sets fast!
Step 10: Assemble the Nutcracker
Position the PVC legs over the 2x4s on the base, ensuring a stable fit. Place the wooden disc on top of the legs and secure it firmly with screws. Once the disc is in place, set the Sonotube body onto it.
To ensure the body is stable and well-supported, attach it to the base by screwing through the Sonotube and into the wood supports, using washers to distribute the pressure.
Pro Tip: Grab a buddy to help lift and hold things in place. It’ll go way smoother with two people!
Step 11: Attach the Arms
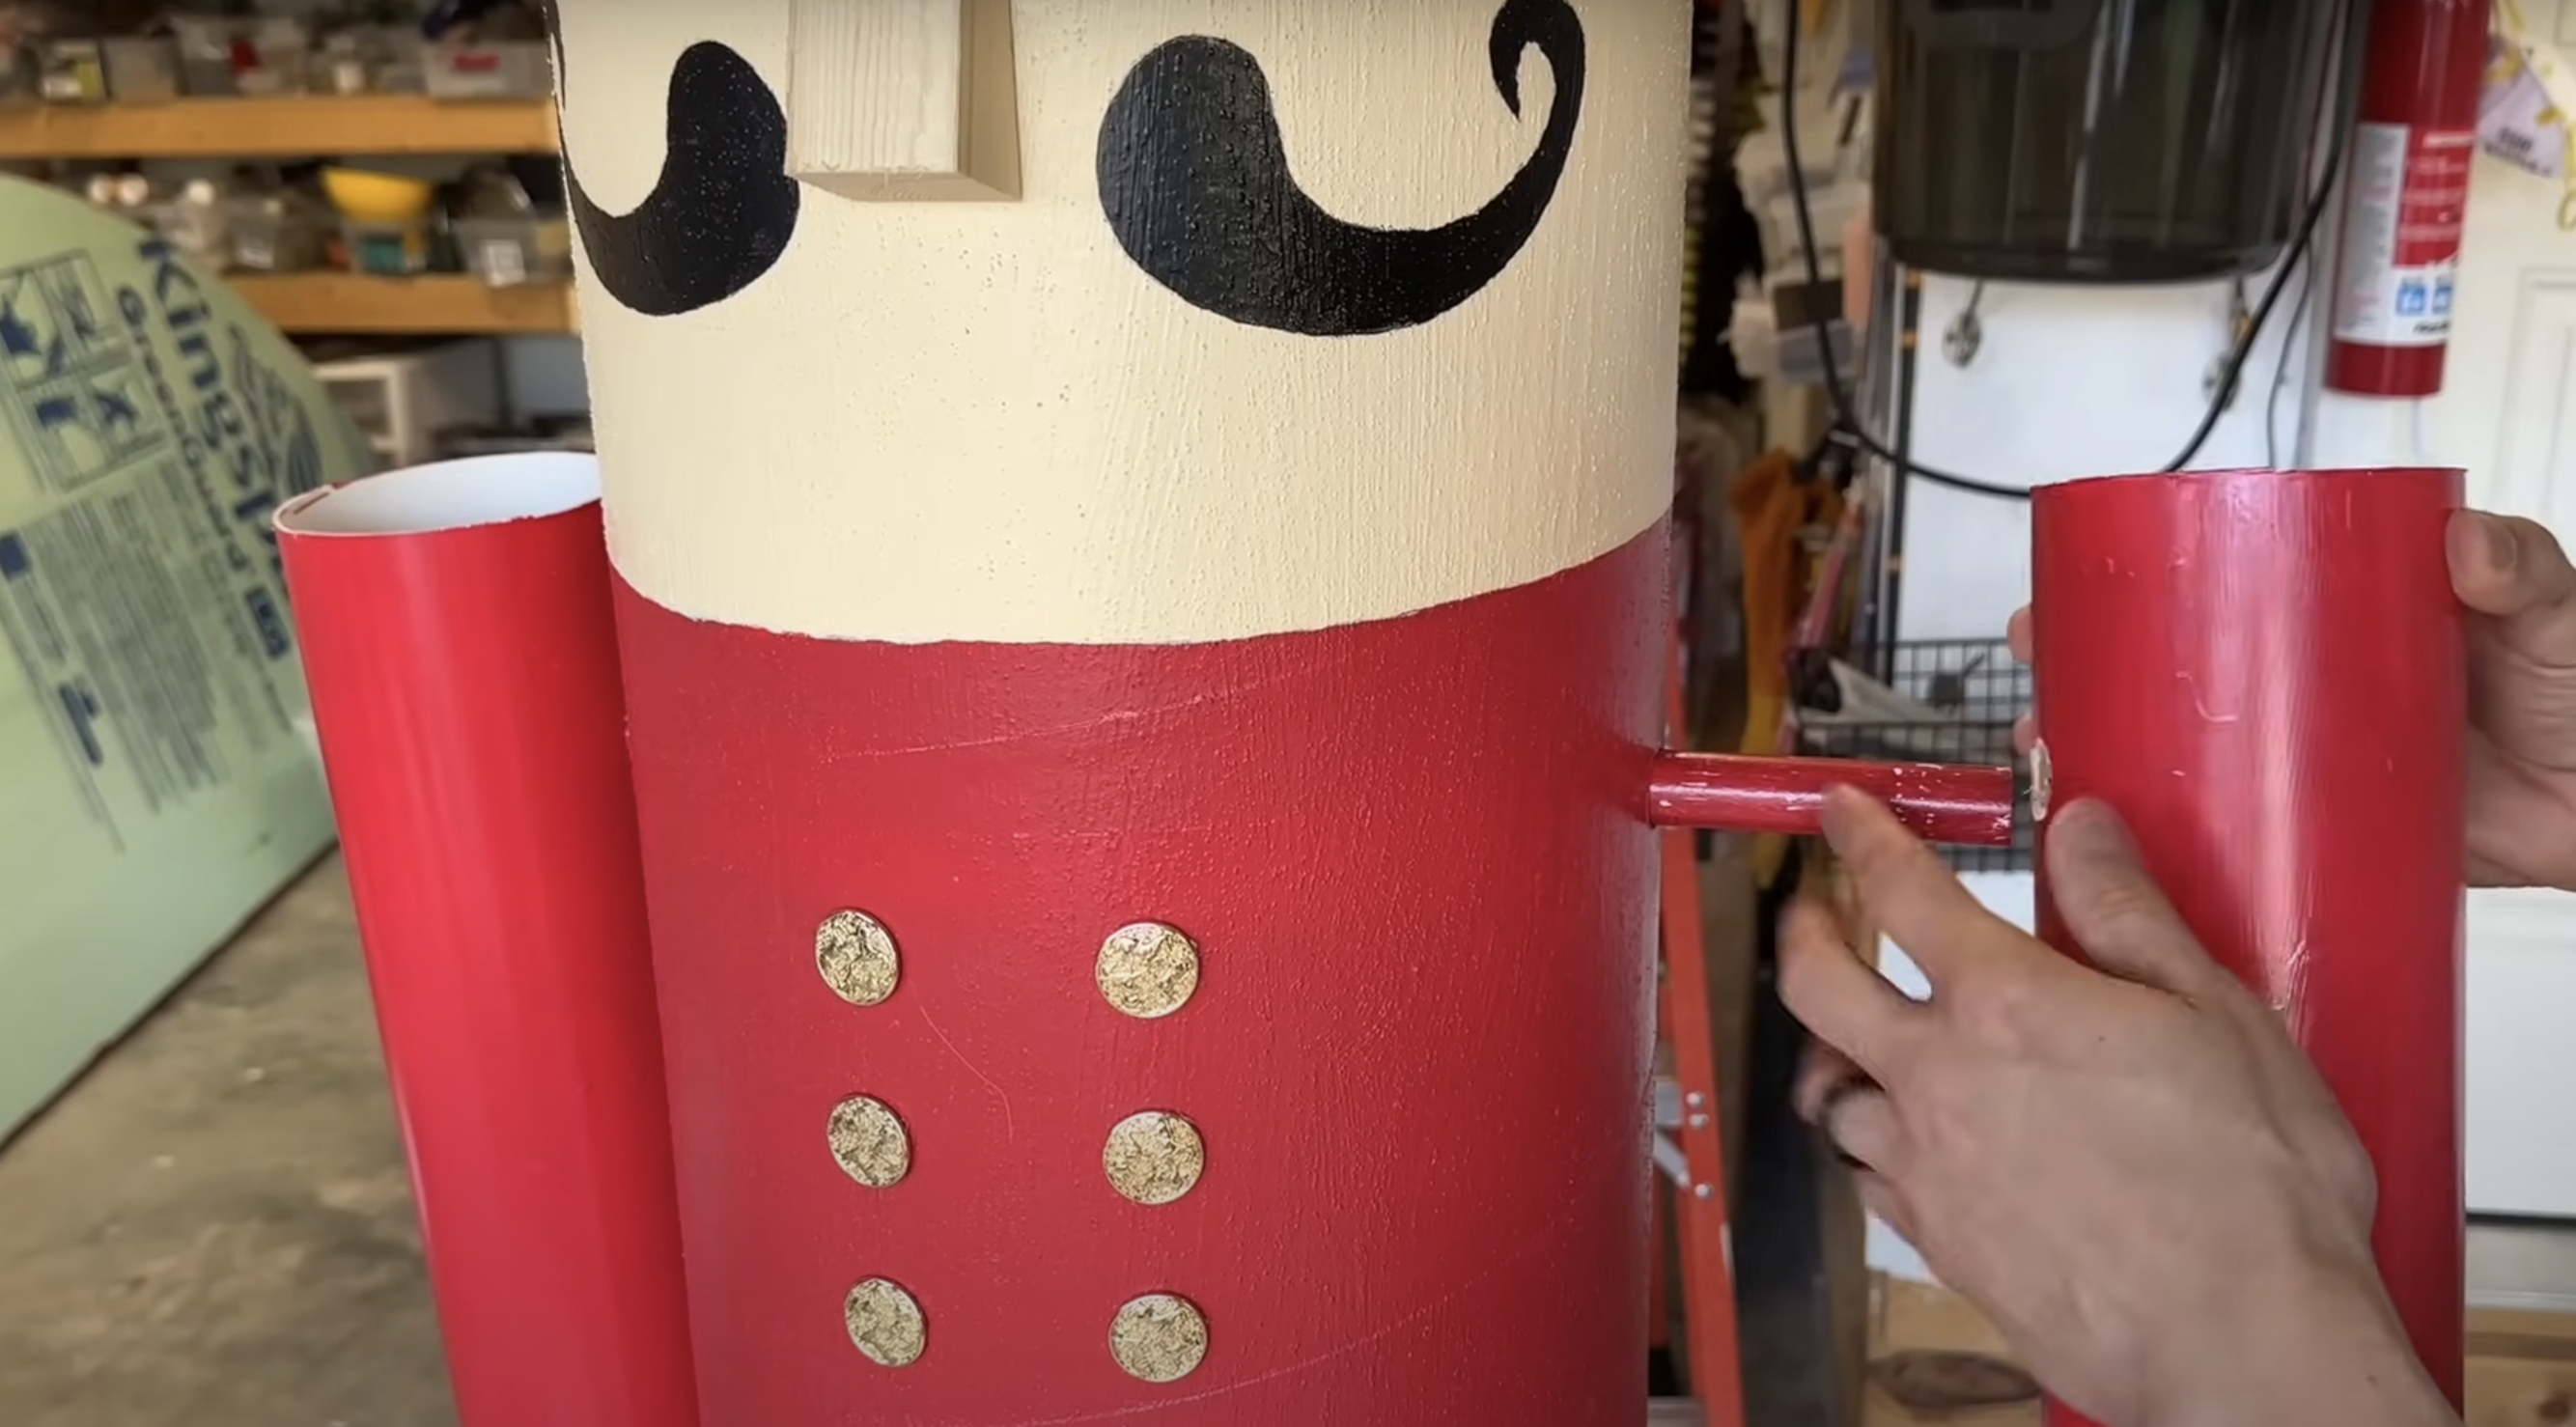
Slide the smaller PVC pipes through the body and into the arms. Leave enough room to fit PVC end caps on each side. Add small screws to keep the pipes from shifting.
Pro Tip: Test the fit before screwing everything down to make sure the arms are even.
Step 12: Add Hands
Tie white Christmas ornament balls onto the ends of each arm using nylon string. Run the string through the arms and knot it to a screw inside.
Pro Tip: If the string gets stuck, use a long piece of wire or a coat hanger to guide it through.
Step 13: Final Details
Decorate the shoulders with fringe. Add expanding foam and white faux fur to the hat area for realistic “hair.” Make feet by cutting and painting red Solo cups black, then placing them under the legs.
Paint the edge of the wooden disc gold for a finished look. Lastly, put a gold spray-painted pizza pan on top of the hat like a crown; it looks cool and keeps water out!
Pro Tip: Add a clear weatherproof sealant spray over everything if you’re planning to use it outside.
Here’s a detailed video tutorial on how to create a DIY life-size Christmas nutcracker:
Additional Tips and Tricks to Make a Better Nutcracker
Here are some more tips and tricks to make your DIY project better and durable for a long time:
- Suppose you display your creation outdoors. Weather-proof it with exterior paints and sealants. This prevents water damage and color fading.
- Make your nutcracker collapsible by using removable screws at connection points for easier storage during off-seasons.
- Add sand or concrete blocks inside the base frame to create a weighted base for better stability in windy conditions.
- Use LED battery lights wrapped inside the body tube to create a glowing nutcracker that stands out at night.
- Trace templates for facial features instead of freehanding them. Print and cut out eye, mustache, and mouth shapes for perfect proportions.
- Pre-drill all screw holes to prevent wood splitting, especially in thinner materials.
- Take photos as you build each section to reference if you make another nutcracker next year.
Conclusion
Building your life-size nutcracker isn’t just about creating a holiday decoration; it’s about crafting a family heritage that will bring joy for years to come.
Yes, it takes some time and effort, but seeing the wonder on visitors’ faces when they spot your handmade creation is absolutely worth it.
Don’t worry if your nutcracker isn’t perfect on the first try. Each little imperfection adds character and makes your creation unique. And remember, you can always refine it next season.
Now go forth and build something magical that your family will treasure for many Christmases to come.
Frequently Asked Questions
Can I Customize the Design of My DIY Nutcracker?
Yes, you can customize the colors, facial features, and accessories to match your holiday decor or personal style.
What is the Estimated Cost of Making a DIY Life-Size Nutcracker?
The estimated cost is around $100, depending on the specific materials and tools used.
Can I Use My DIY Nutcracker Outdoors?
Yes, but ensure that the paint and materials used are weather-resistant. To protect the Sono tube body, apply a waterproof coating like Drylock.


