How to Make a Baseball Wreath DIY

Baseball fans looking to show team spirit at home will love this baseball wreath project! This fun craft combines a love for the game with home decor in a personal way.
These wreaths often get compliments from visitors who assume they were purchased from a store. The surprise comes when learning they’re handmade!
This blog covers the steps to create a baseball-themed wreath, including which materials to gather, how to assemble them, and simple tips for making the wreath stand out.
The best part is that you don’t need fancy skills or tools. The baseball wreath is perfect for both first-time crafters and experienced makers.
Tools & Materials Required for Making Baseball Wreath
Start by gathering your materials and tools for a durable and stylish baseball wreath:
- 14-inch Wired Wreath Frame
- Burlap Garland
- Real Baseballs
- Baseball-Themed Wired Ribbon
- Wooden Plaque (from Dollar Tree)
- Jute Rope Twine
- 8½ x 11 Paper with Printed Phrase
- Mod Podge
- Red Acrylic Paint
- Paint Brushes
- Hot Glue Gun and Glue Sticks
- Scissors
- Pipe Cleaners
- Sandpaper Block
Step-by-Step Guide to Make Baseball Wreath
Follow these simple steps to create a charming baseball wreath, perfect for adding a sporty touch to your home, whether indoors or outdoors:
Step 1: Prepare Your Sign

Start with the wooden plaque from Dollar Tree. Apply a thin, even layer of Mod Podge on the plaque surface.
Cut off any excess paper hanging from the edges. Next, use red acrylic paint and a thin brush to add baseball stitching marks on your sign. Create an arch shape and add those red stitches to make it look like a baseball.
Let everything dry completely before applying a final coat of Mod Podge over the top for protection.
Step 2: Prepare Your Burlap Bundles

Begin by cutting 24 pieces of burlap at 18 inches each (about 12 yards total). Then cut 24 pieces of twine at 14-18 inches each.
For each bundle, lay a piece of burlap flat on your work surface. Place your thumbs in the middle and walk your fingers up the center to create a ruffle effect.
Take a piece of twine and create a loop knot, then place the ruffled burlap in between. Tighten the twine and flip the bundle over, adding a double knot to secure it.
Step 3: Attach Burlap to Wreath Frame
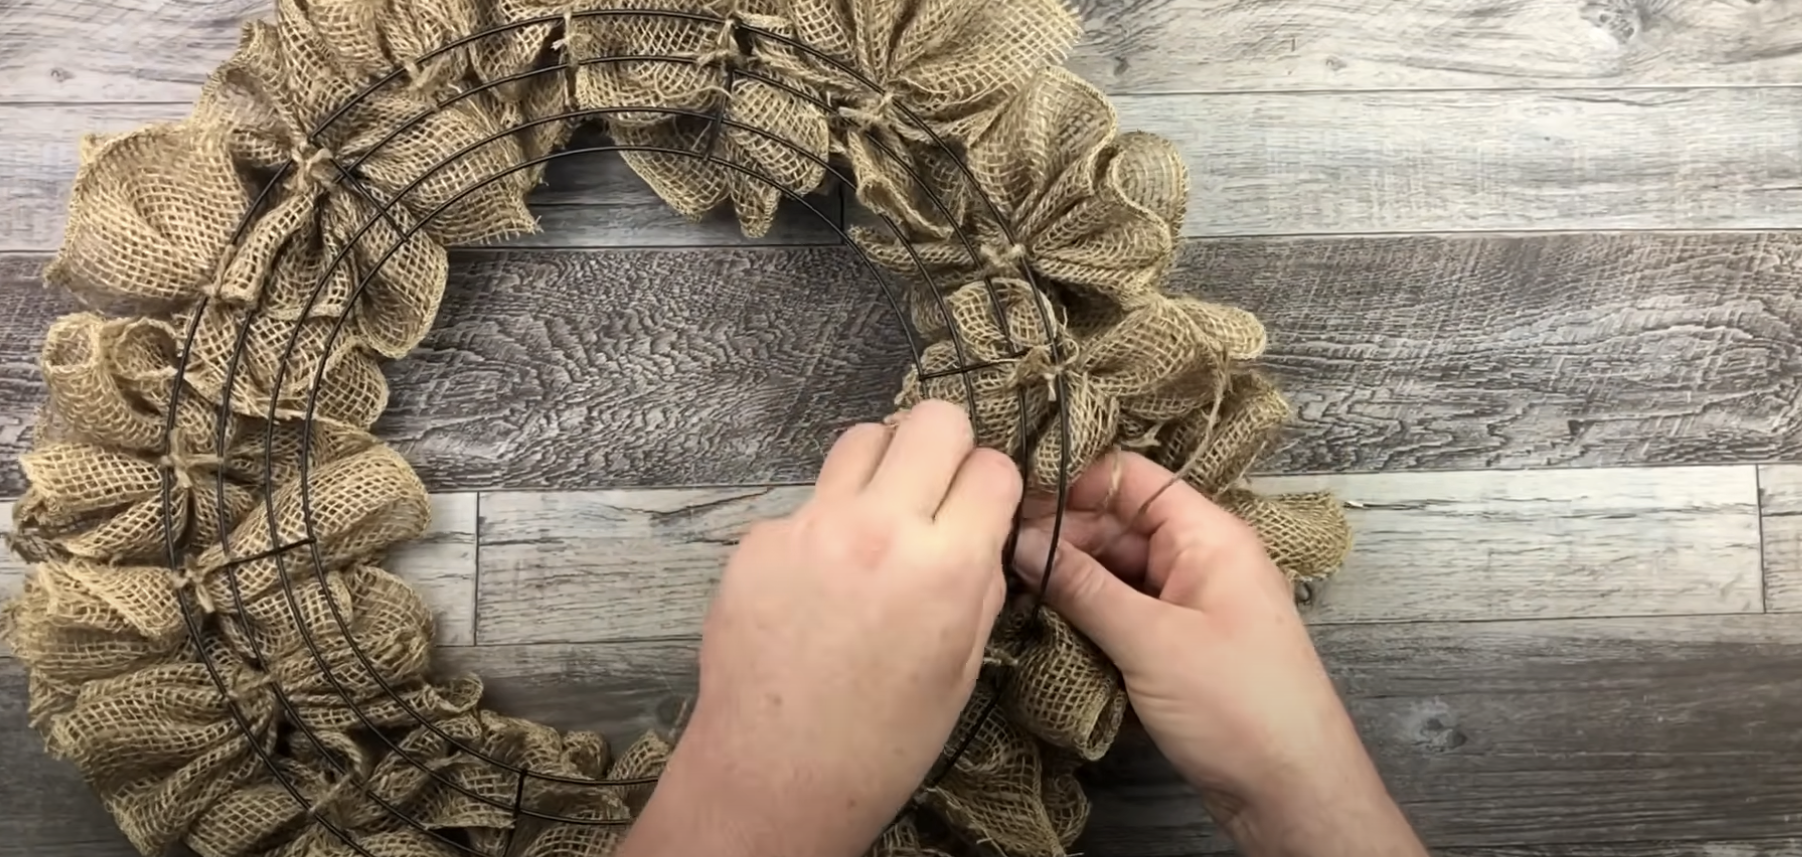
For the outside round, use the two outer wires of your wreath frame. Flip the wreath over so it’s face down and begin attaching your bundles.
Take each bundle and use the excess twine to attach it to the two outer wires and the anchor wire. Create a double knot to secure each bundle firmly, then cut off any remaining excess twine.
For the inside wires, attach 6 bundles at the anchor points. Once all the bundles are attached, add a bit of hot glue to the inside round and allow everything to dry completely.
Step 4: Create Your Bow
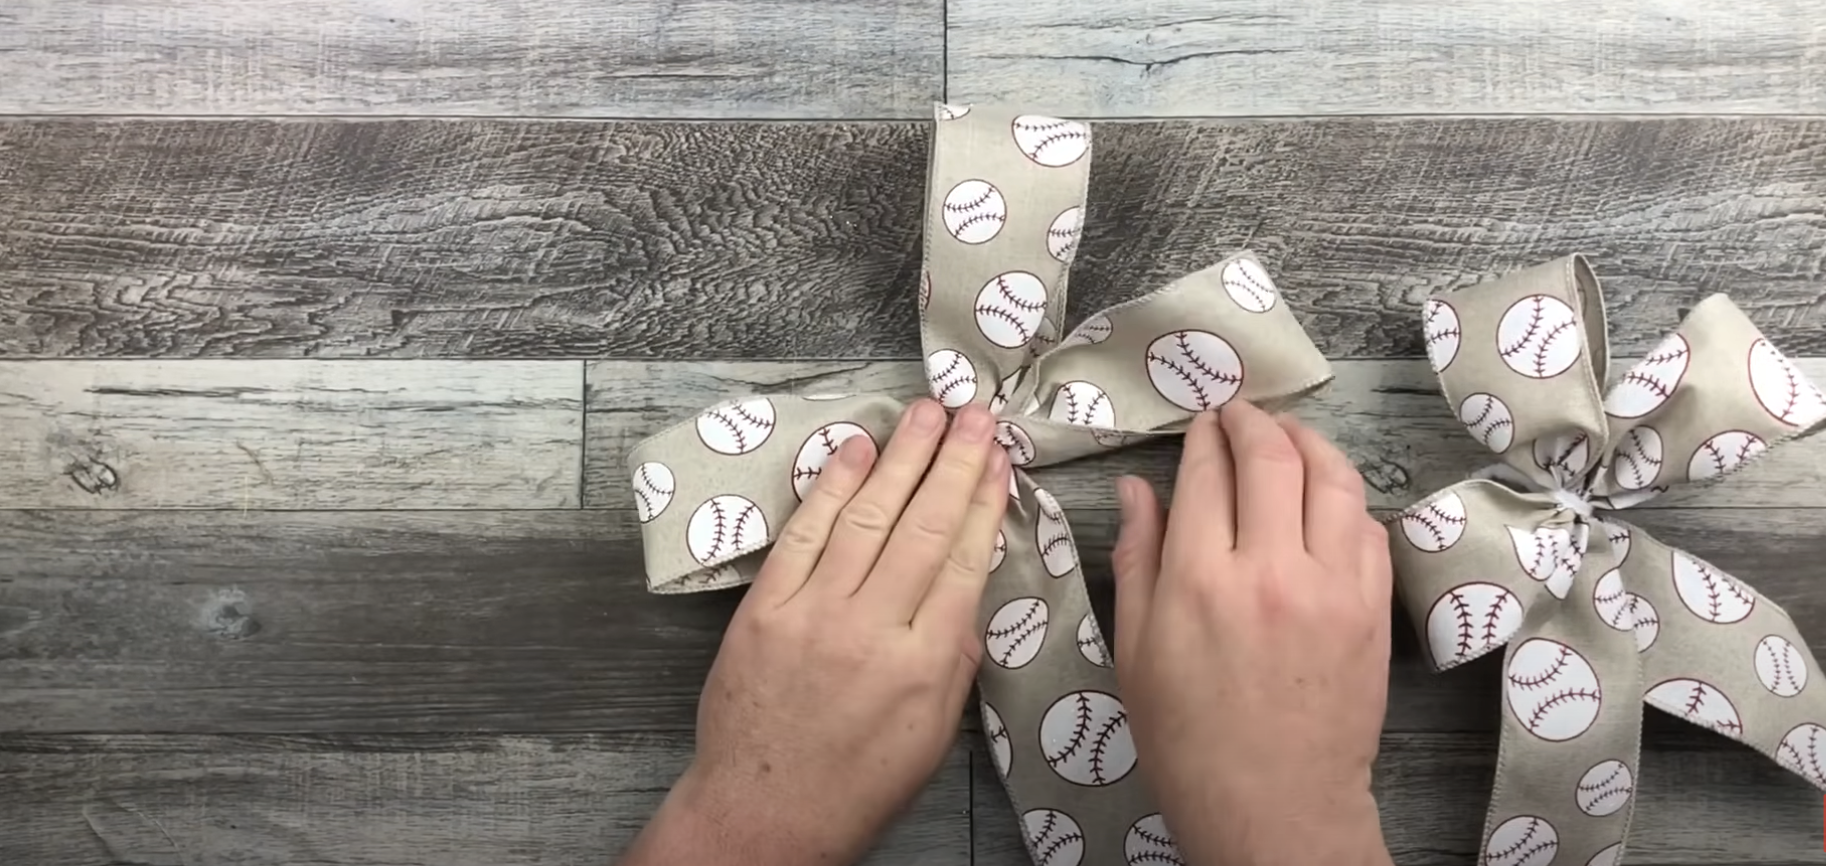
For the first segment with larger loops, measure out 12 inches of ribbon and gather it in your left hand.
Continue this process until you have 3 loops total, ending with a 12-inch tail. Secure this section with a pipe cleaner.
Just like with the first segment, make three loops with two tails and secure them with another pipe cleaner. Using the pipe cleaners, attach both segments, twisting them to hold them firmly.
Step 5: Final Assembly

Position your 5 baseballs on the wreath and attach them using hot glue. Since baseballs are heavy, use plenty of glue and hold them in place until secure.
Attach your bow by feeding the pipe cleaners through the back of the wreath and securing them to the middle wires. Take your dried sign and sand the edges with a sandpaper block to smooth them out.
Your baseball-themed burlap wreath is now complete and ready to display! This makes a perfect gift for baseball fans or a great addition to your home decor during baseball season.
For detailed tutorials on a DIY Baseball Wreath, check out the video below:
Tips to Make a Baseball Wreath Durable
| Step | Action | Tip |
|---|---|---|
| Choose a Weather-Resistant Base | Use a solid foam or plastic wreath form instead of straw or natural materials. | Foam or plastic withstands sun and rain better for outdoor use. |
| Treat the Baseballs | Apply a clear, waterproof sealant to each ball, using two thin coats. | Helps prevent fading and water damage. |
| Attach Items Securely | Use a high-quality glue gun with industrial-strength adhesive, and reinforce with thin wire. | Ensures stability and prevents items from falling off. |
| Display Location | Place the wreath in a somewhat sheltered spot if displayed outdoors. | Avoid direct sunlight and heavy rain for longevity. |
| Maintenance | Check wreaths every few months for loose pieces and repair if needed. | Prevents bigger problems later by addressing minor issues early. |
| Cleaning for Indoor Wreaths | Dust gently with a soft cloth or use low-pressure canned air to clean. | Keep wreaths neat without damaging materials. |
| Long-Term Care | With regular maintenance, your wreath can last several seasons. | The extra care helps avoid the need for creating a new wreath each year. |
Different Baseball Wreath Design Ideas
Want to make your baseball wreath unique? Here are some fun ways to change things up while keeping the baseball theme alive:
- Team Colors: Switch out the ribbon for one in your favorite team’s colors. For Yankees fans, navy and white ribbons work well, while Red Sox fans might prefer red and navy.
- Baseball Cards: Got extra cards of team players? Attach them with small clips or glue them to wooden sticks and tuck them into the burlap.
- Mini Bats: Add small baseball bats found at sports stores or online. Cross two at the bottom of the wreath for a neat look. Plastic ones work fine, too.
- Seasonal Changes: Create a base wreath and swap out items as the baseball season progresses. Add green items for spring training or a small pennant during the playoffs.
- Family Touch: Make it personal with items that show who plays. Add Little League team patches or a small glove to tell your family’s baseball story.
- Lighting: Consider adding battery-powered string lights in team colors for an evening glow and extra charm.
Conclusion
Creating your own baseball wreath is a fun and personal way to show off your team spirit right at home.
Not only will it catch the eyes of your guests, but they’ll also be surprised to find out it’s a handmade creation!
With simple materials and easy-to-follow steps, anyone, from beginners to experienced crafters, can make a wreath that looks like it came straight from a store.
Now that you know how to bring this sporty decor to life, grab your supplies and get crafting!


