Thin Brick Flooring 101: Types, Installation, and Maintenance

Thin brick flooring brings the classic look of brick to your home without the bulk and weight of traditional brick.
This smart flooring option provides the warmth and character of brick with easier installation and reduced structural support requirements.
They come in various colors and patterns, letting you create anything from rustic farmhouse to modern industrial styles.
In this guide, we will explain why thin brick might be the ideal choice for your next flooring project.
Why Choose Brick Tiles

Brick tiles offer a perfect blend of style and practicality for your home. Unlike full-sized bricks, these thinner versions give you the same beautiful look without the installation headaches or structural concerns.
The appeal goes beyond just good looks. Brick tiles are incredibly durable, standing up to busy households while developing a rich, lived-in character over time.
They work wonderfully in spaces where you want warmth and texture. Kitchens, living rooms, and entryways all benefit from their timeless appeal.
Installation is simpler than traditional brick, saving you time and money. Additionally, they’re versatile enough to complement almost any design style, ranging from rustic country to sleek industrial.
If you’re looking for flooring that combines beauty, durability, and easy maintenance, brick tiles are definitely worth considering.
How to Create a Beautiful Thin Brick Floor
Having these materials ready before starting will make your thin brick floor installation process smoother and more efficient.
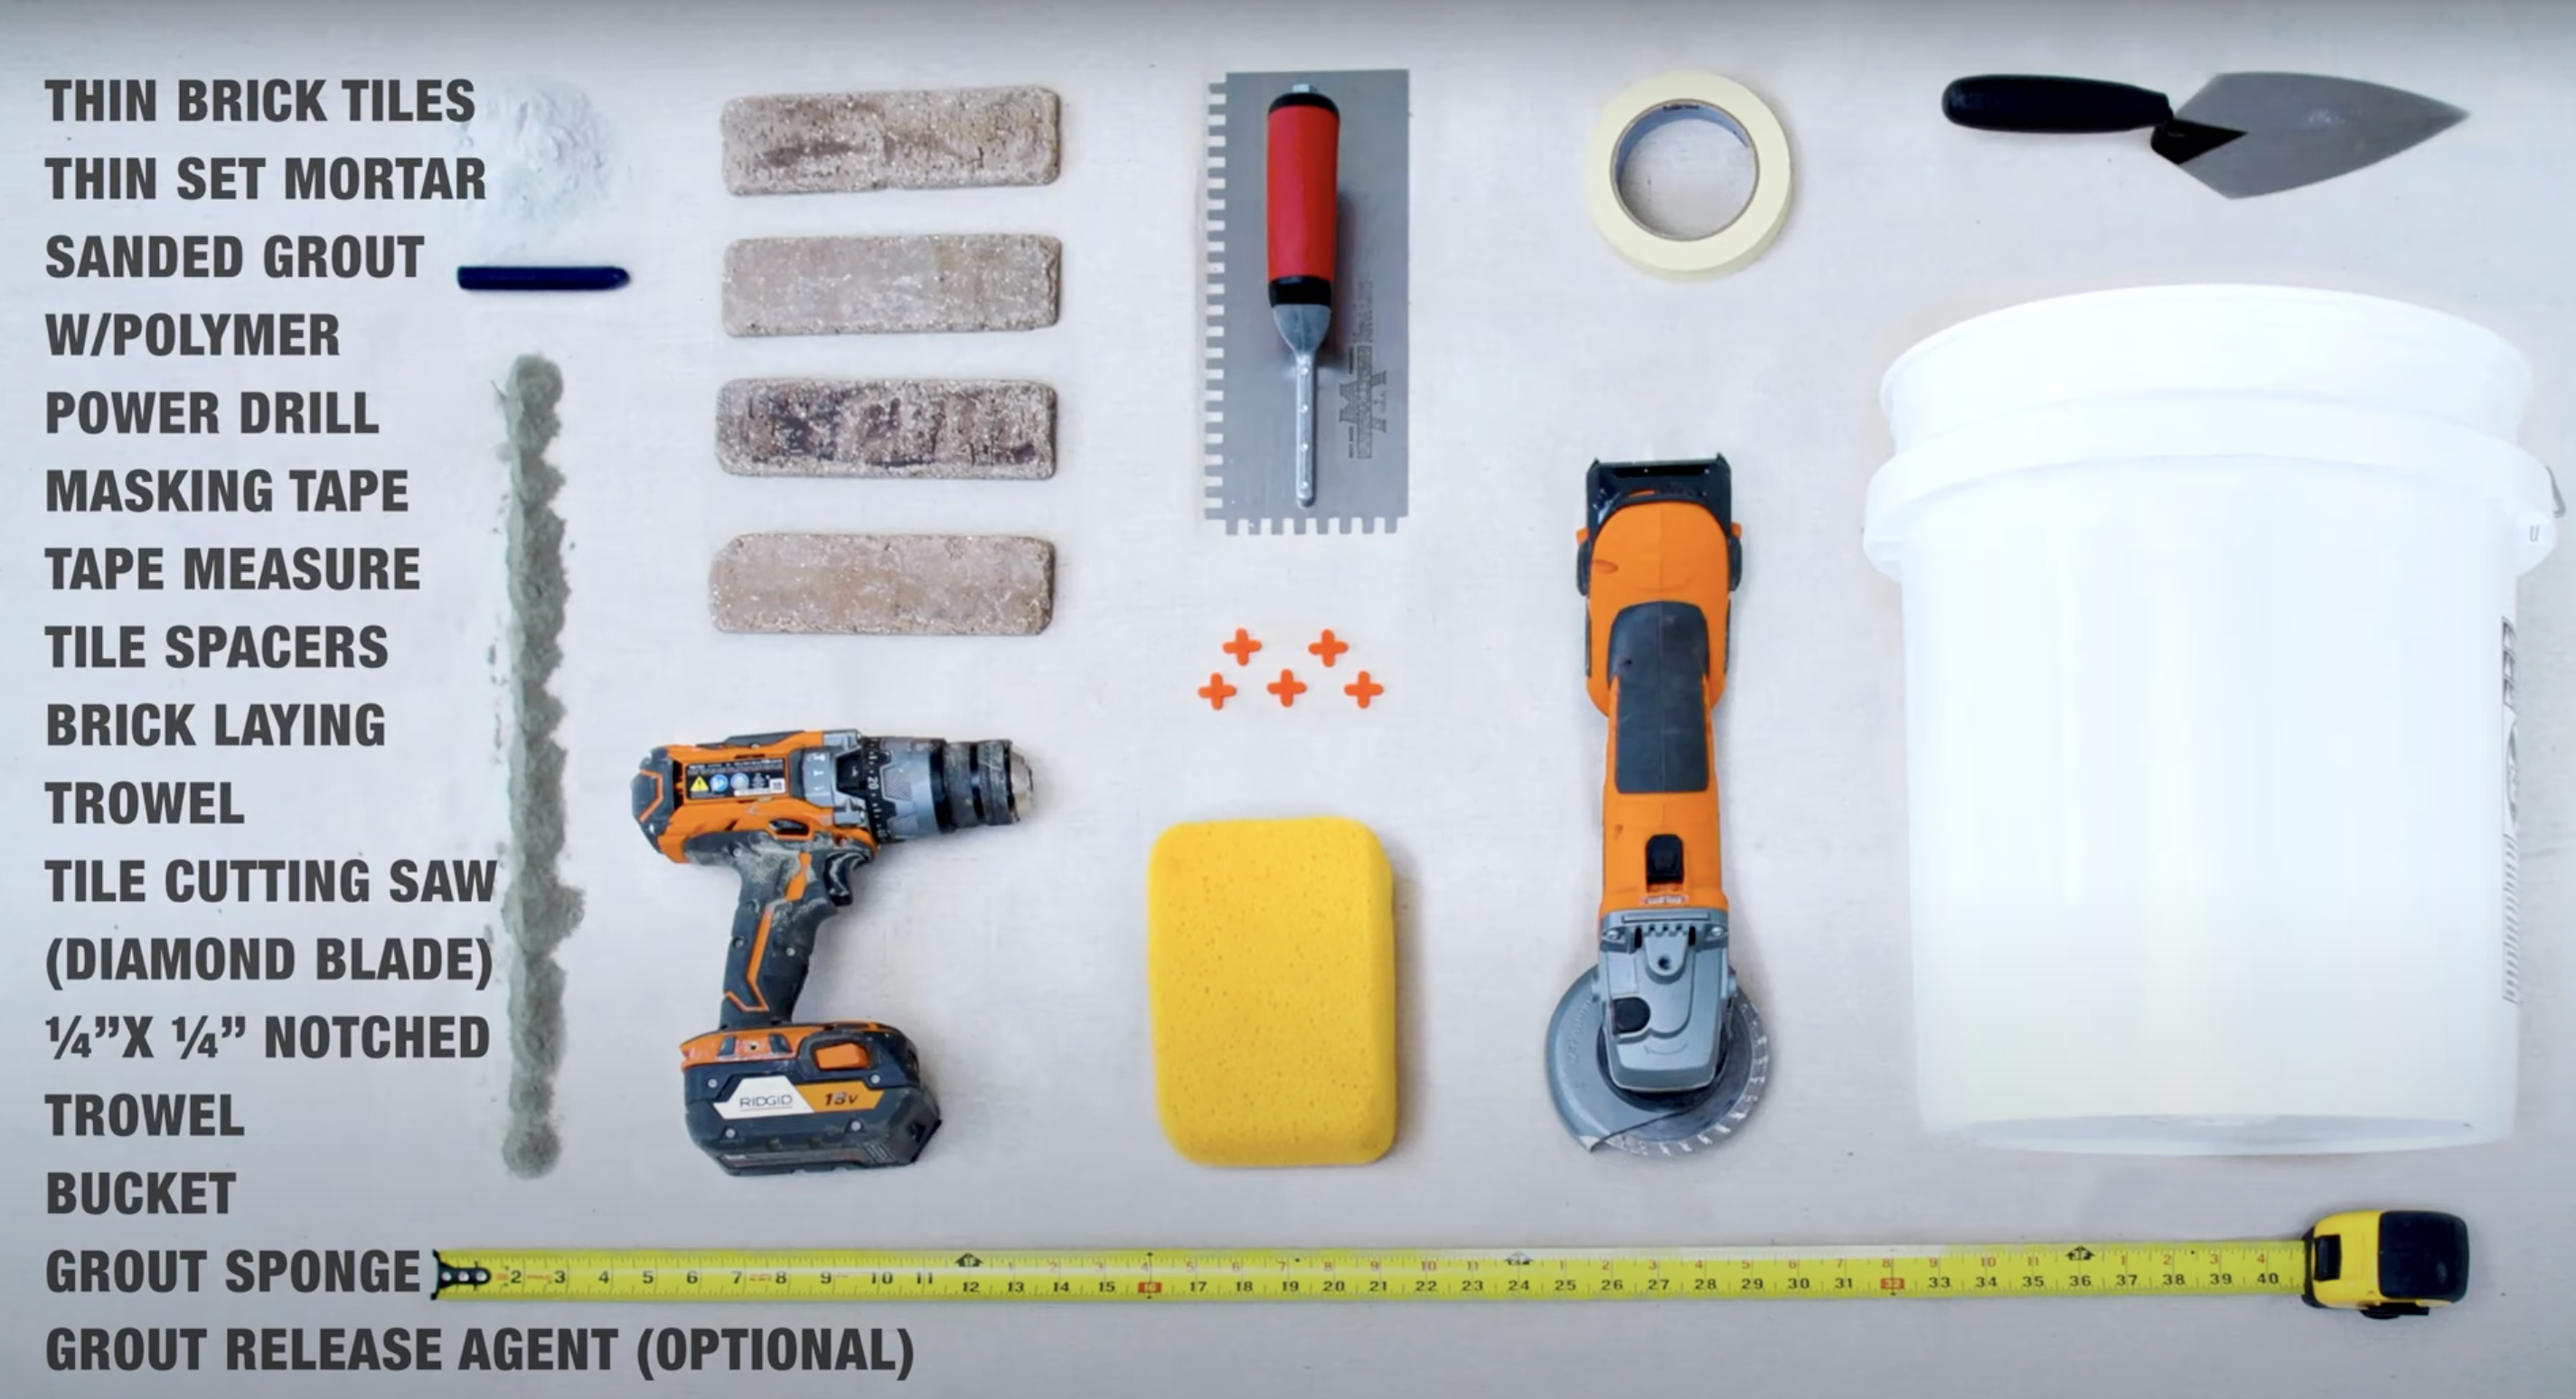
Materials Required
- Thin brick tiles (calculate square footage plus 10% extra for cuts and breakage)
- Mortar mix (premixed or powder form to be mixed with water)
- Water for mixing mortar
- Grout or additional mortar for joints
- Masking tape or painter’s tape for protecting baseboards
- Sealer (recommended, though not mentioned in steps)
Tools Required
- Notched trowel for spreading mortar
- A measuring tape for planning the layout
- Level to ensure even placement
- Mortar bag (similar to a piping bag) for filling joints
- Sponge for cleaning excess mortar
- Bucket for mixing mortar
- Mixing tool
Installing Thin Brick Tiles
To upgrade your space with the timeless charm of brick, proper installation makes all the difference. Follow these clear steps to achieve professional results with your thin brick flooring project.
Step 1: Gather your supplies
Collecting all necessary materials before starting saves time and prevents mid-project trips to the store.
The right tools ensure a professional-looking thin brick floor that will last for years. Quality supplies make the difference between an amateur and an expert finish.
- Thin brick tiles, mortar, grout, spacers, and sealer form the basic materials needed.
- Tools required include a notched trowel, level, rubber float, and measuring tape.
- Safety equipment such as gloves, knee pads, and eye protection helps prevent injuries.
Step 2: Apply Masking Tape Around the Baseboard
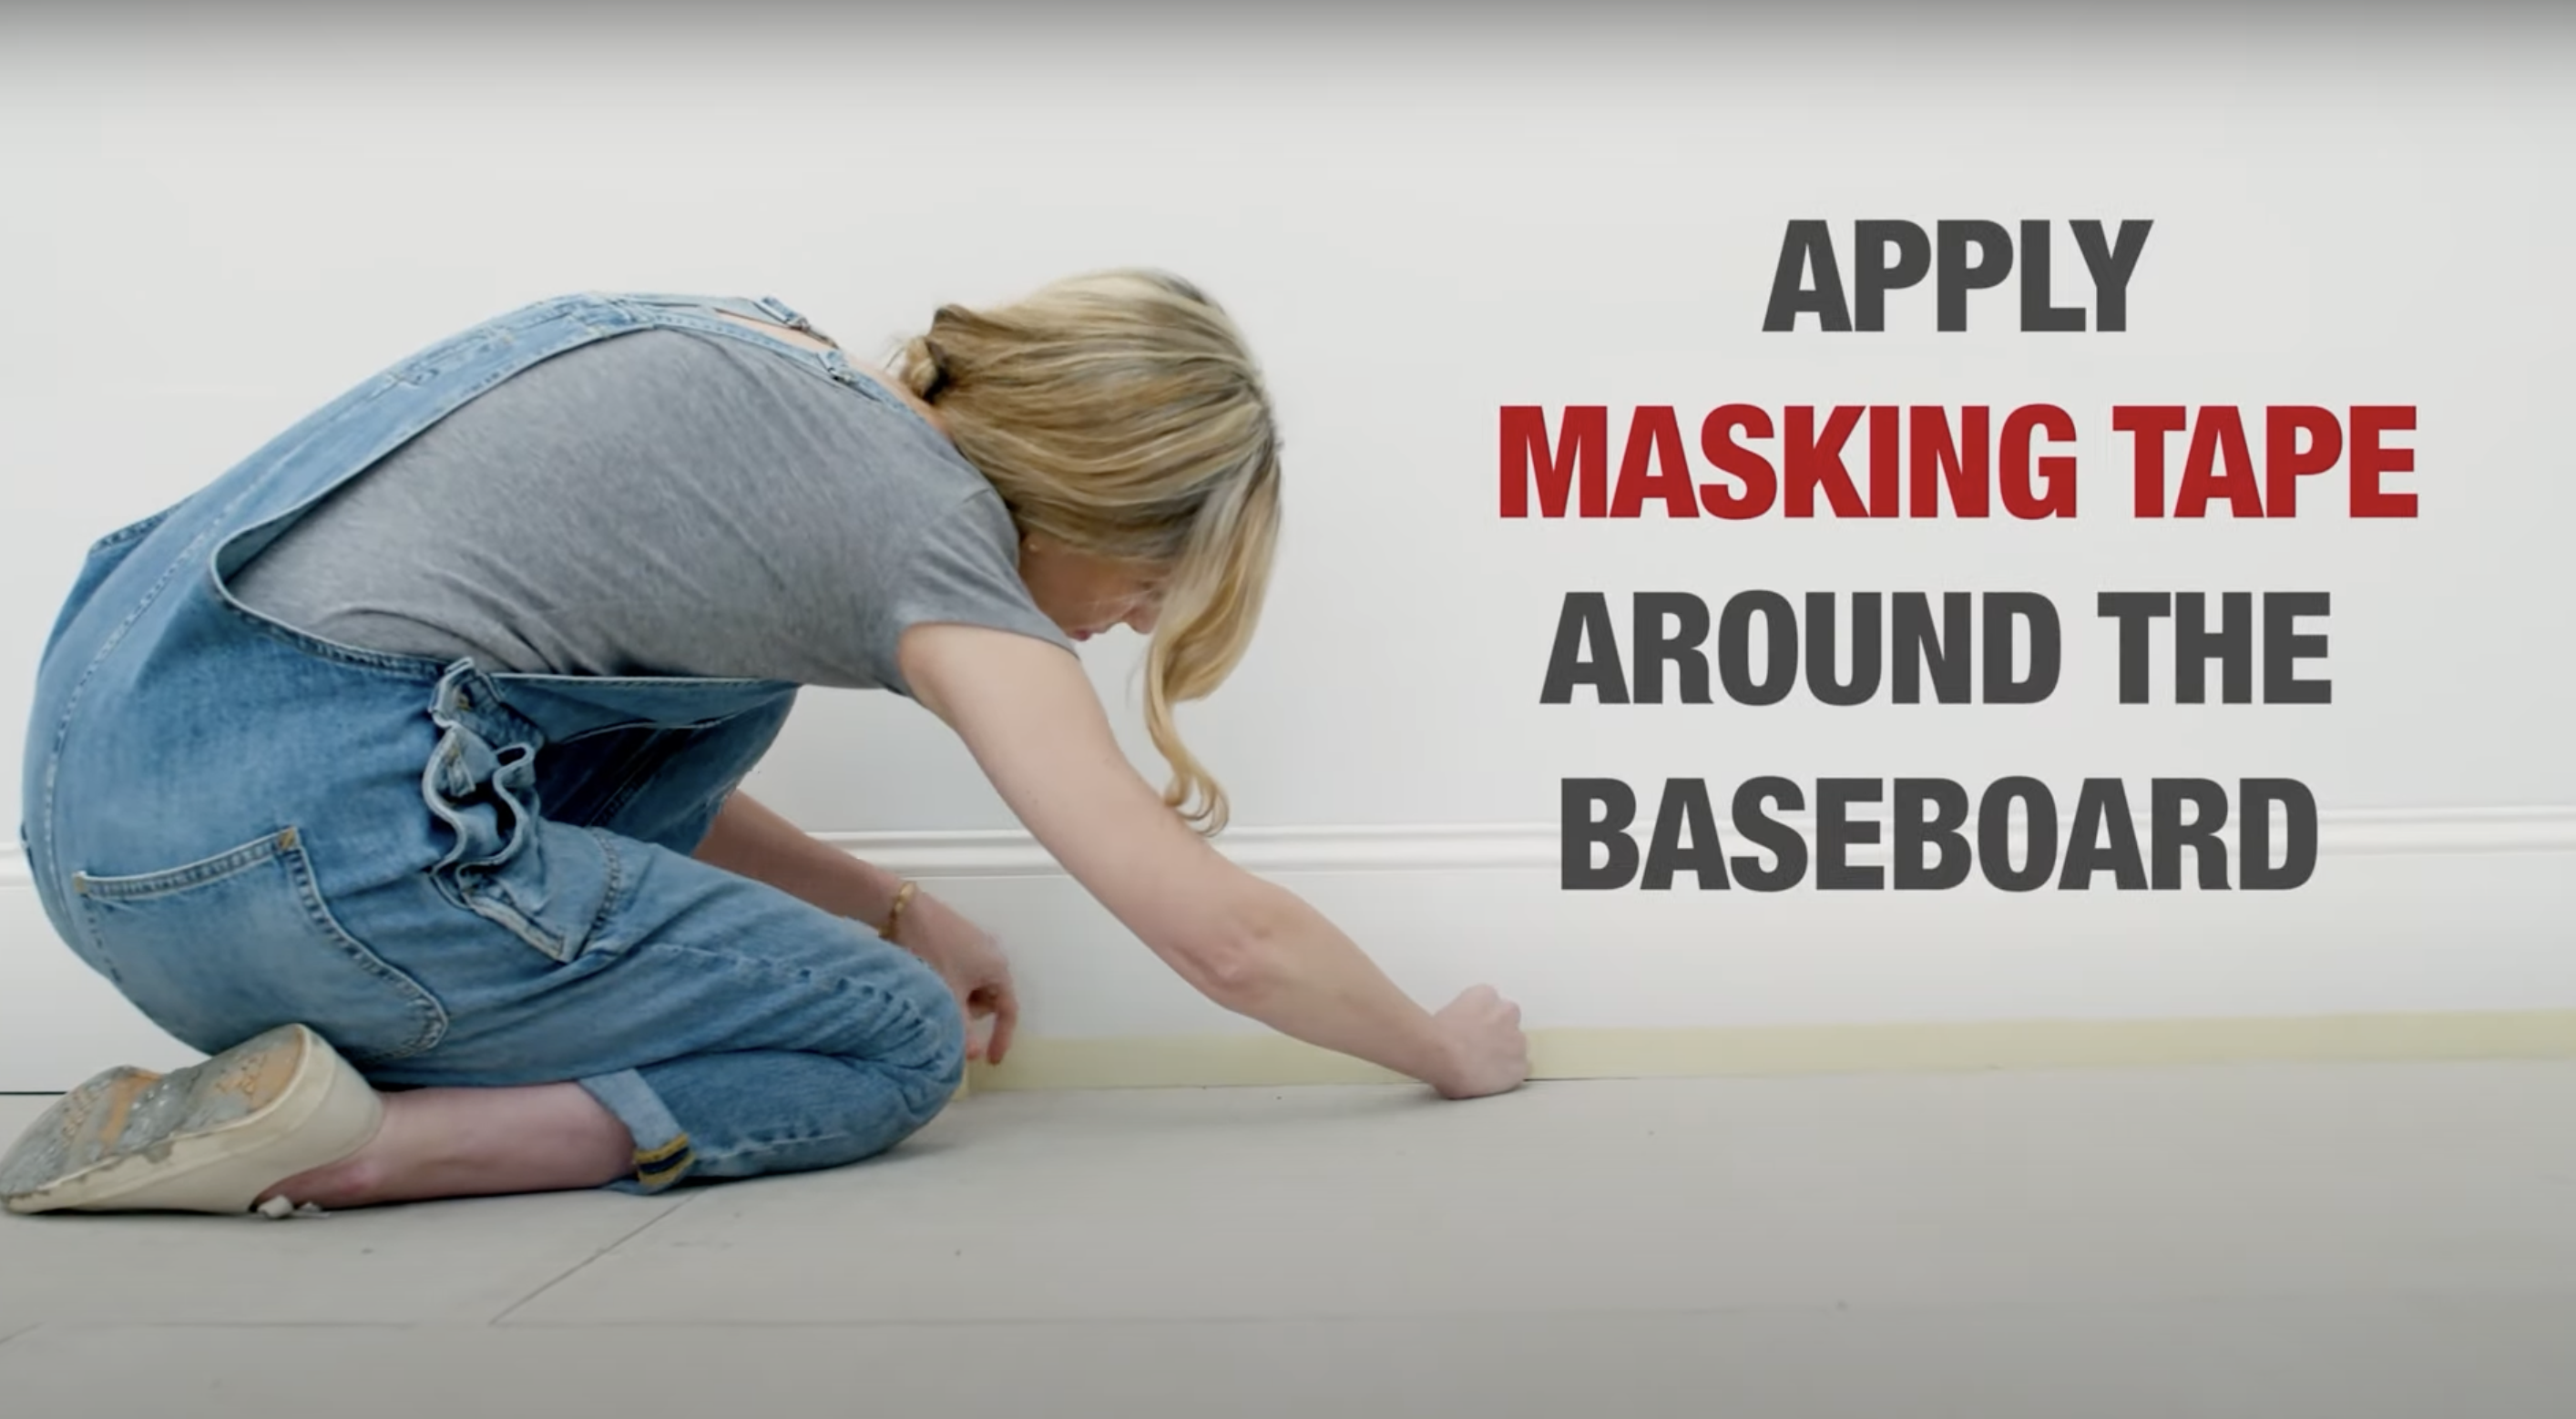
Adding masking tape creates a clean border and protects walls from mortar and grout. This simple step saves hours of cleanup work later.
The tape acts as a barrier between the new floor and existing structures.
- Apply tape at a consistent height along all baseboards in the room
- Press firmly to ensure the tape adheres properly and prevents seepage
- Use painter’s tape for easy removal that won’t damage paint or woodwork
Step 3: Mix Mortar With Water
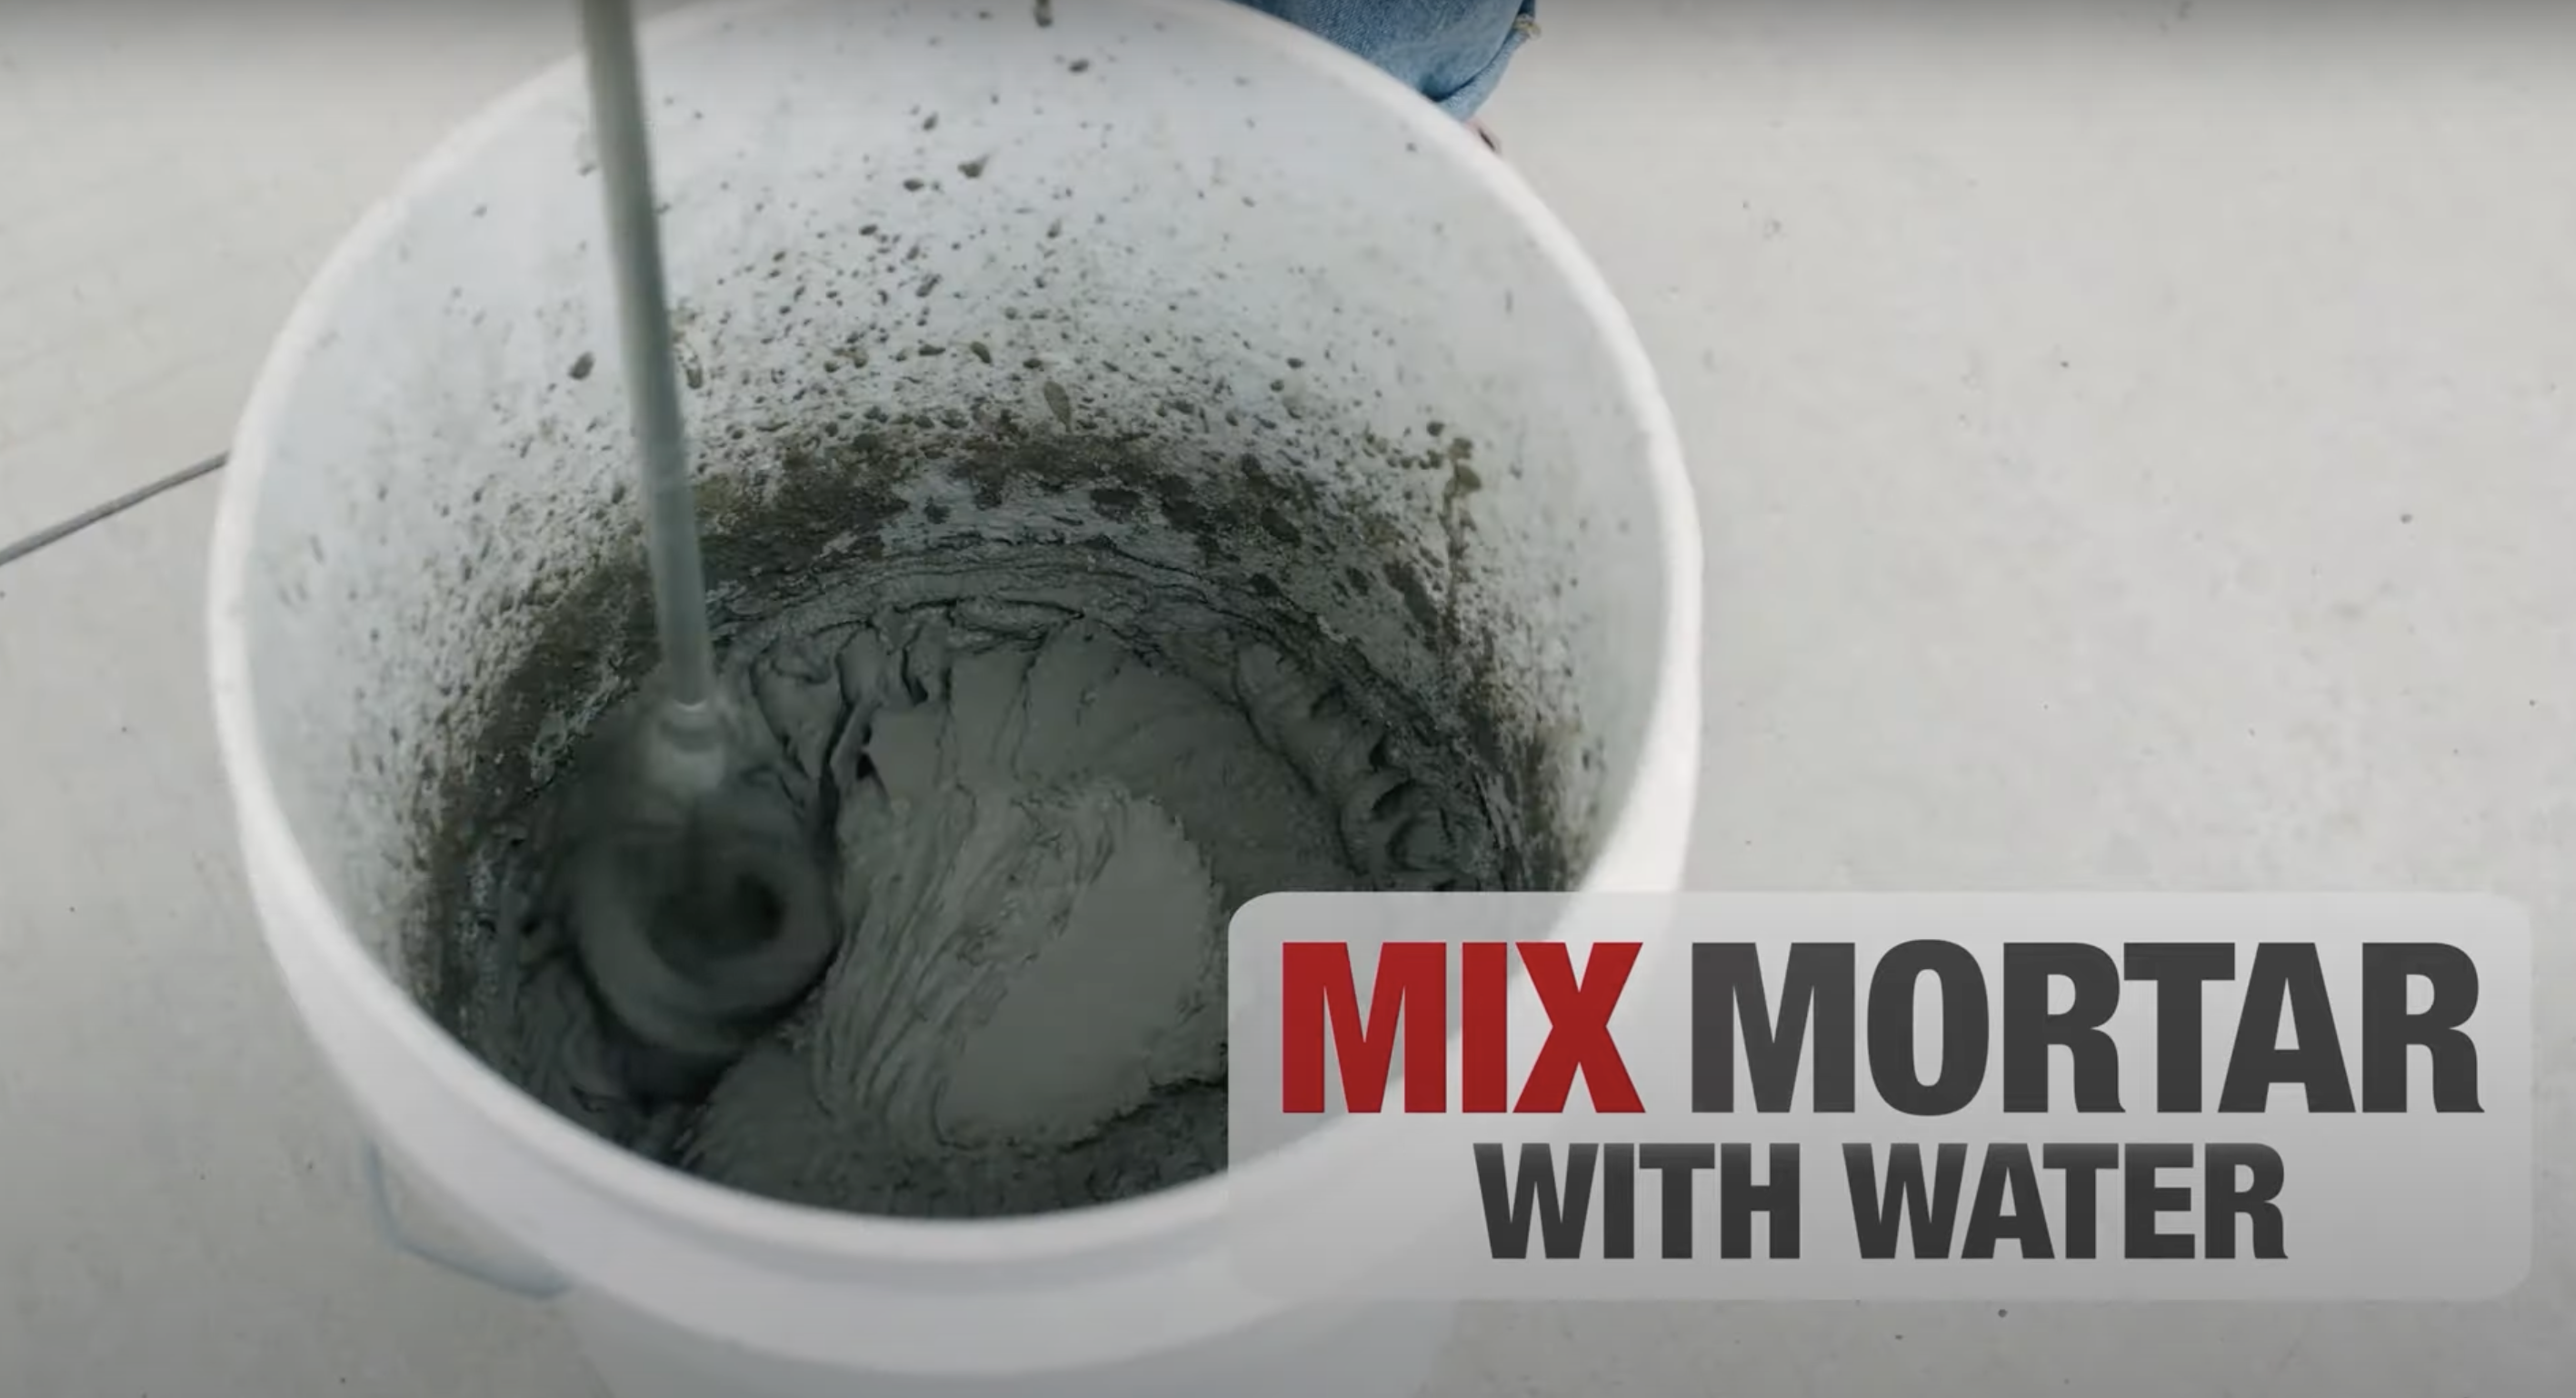
Proper mortar consistency resembles thick peanut butter, not too runny, not too stiff.
Following the package directions leads to the strongest bond between the floor and tiles. The mixing stage sets the foundation for the entire project.
- Add water slowly to dry mortar mix while stirring to prevent lumps
- Mix until reaching a smooth, consistent texture that holds its shape
- Let the mixture rest for the time specified on the package before using
Step 4: Spread Mortar
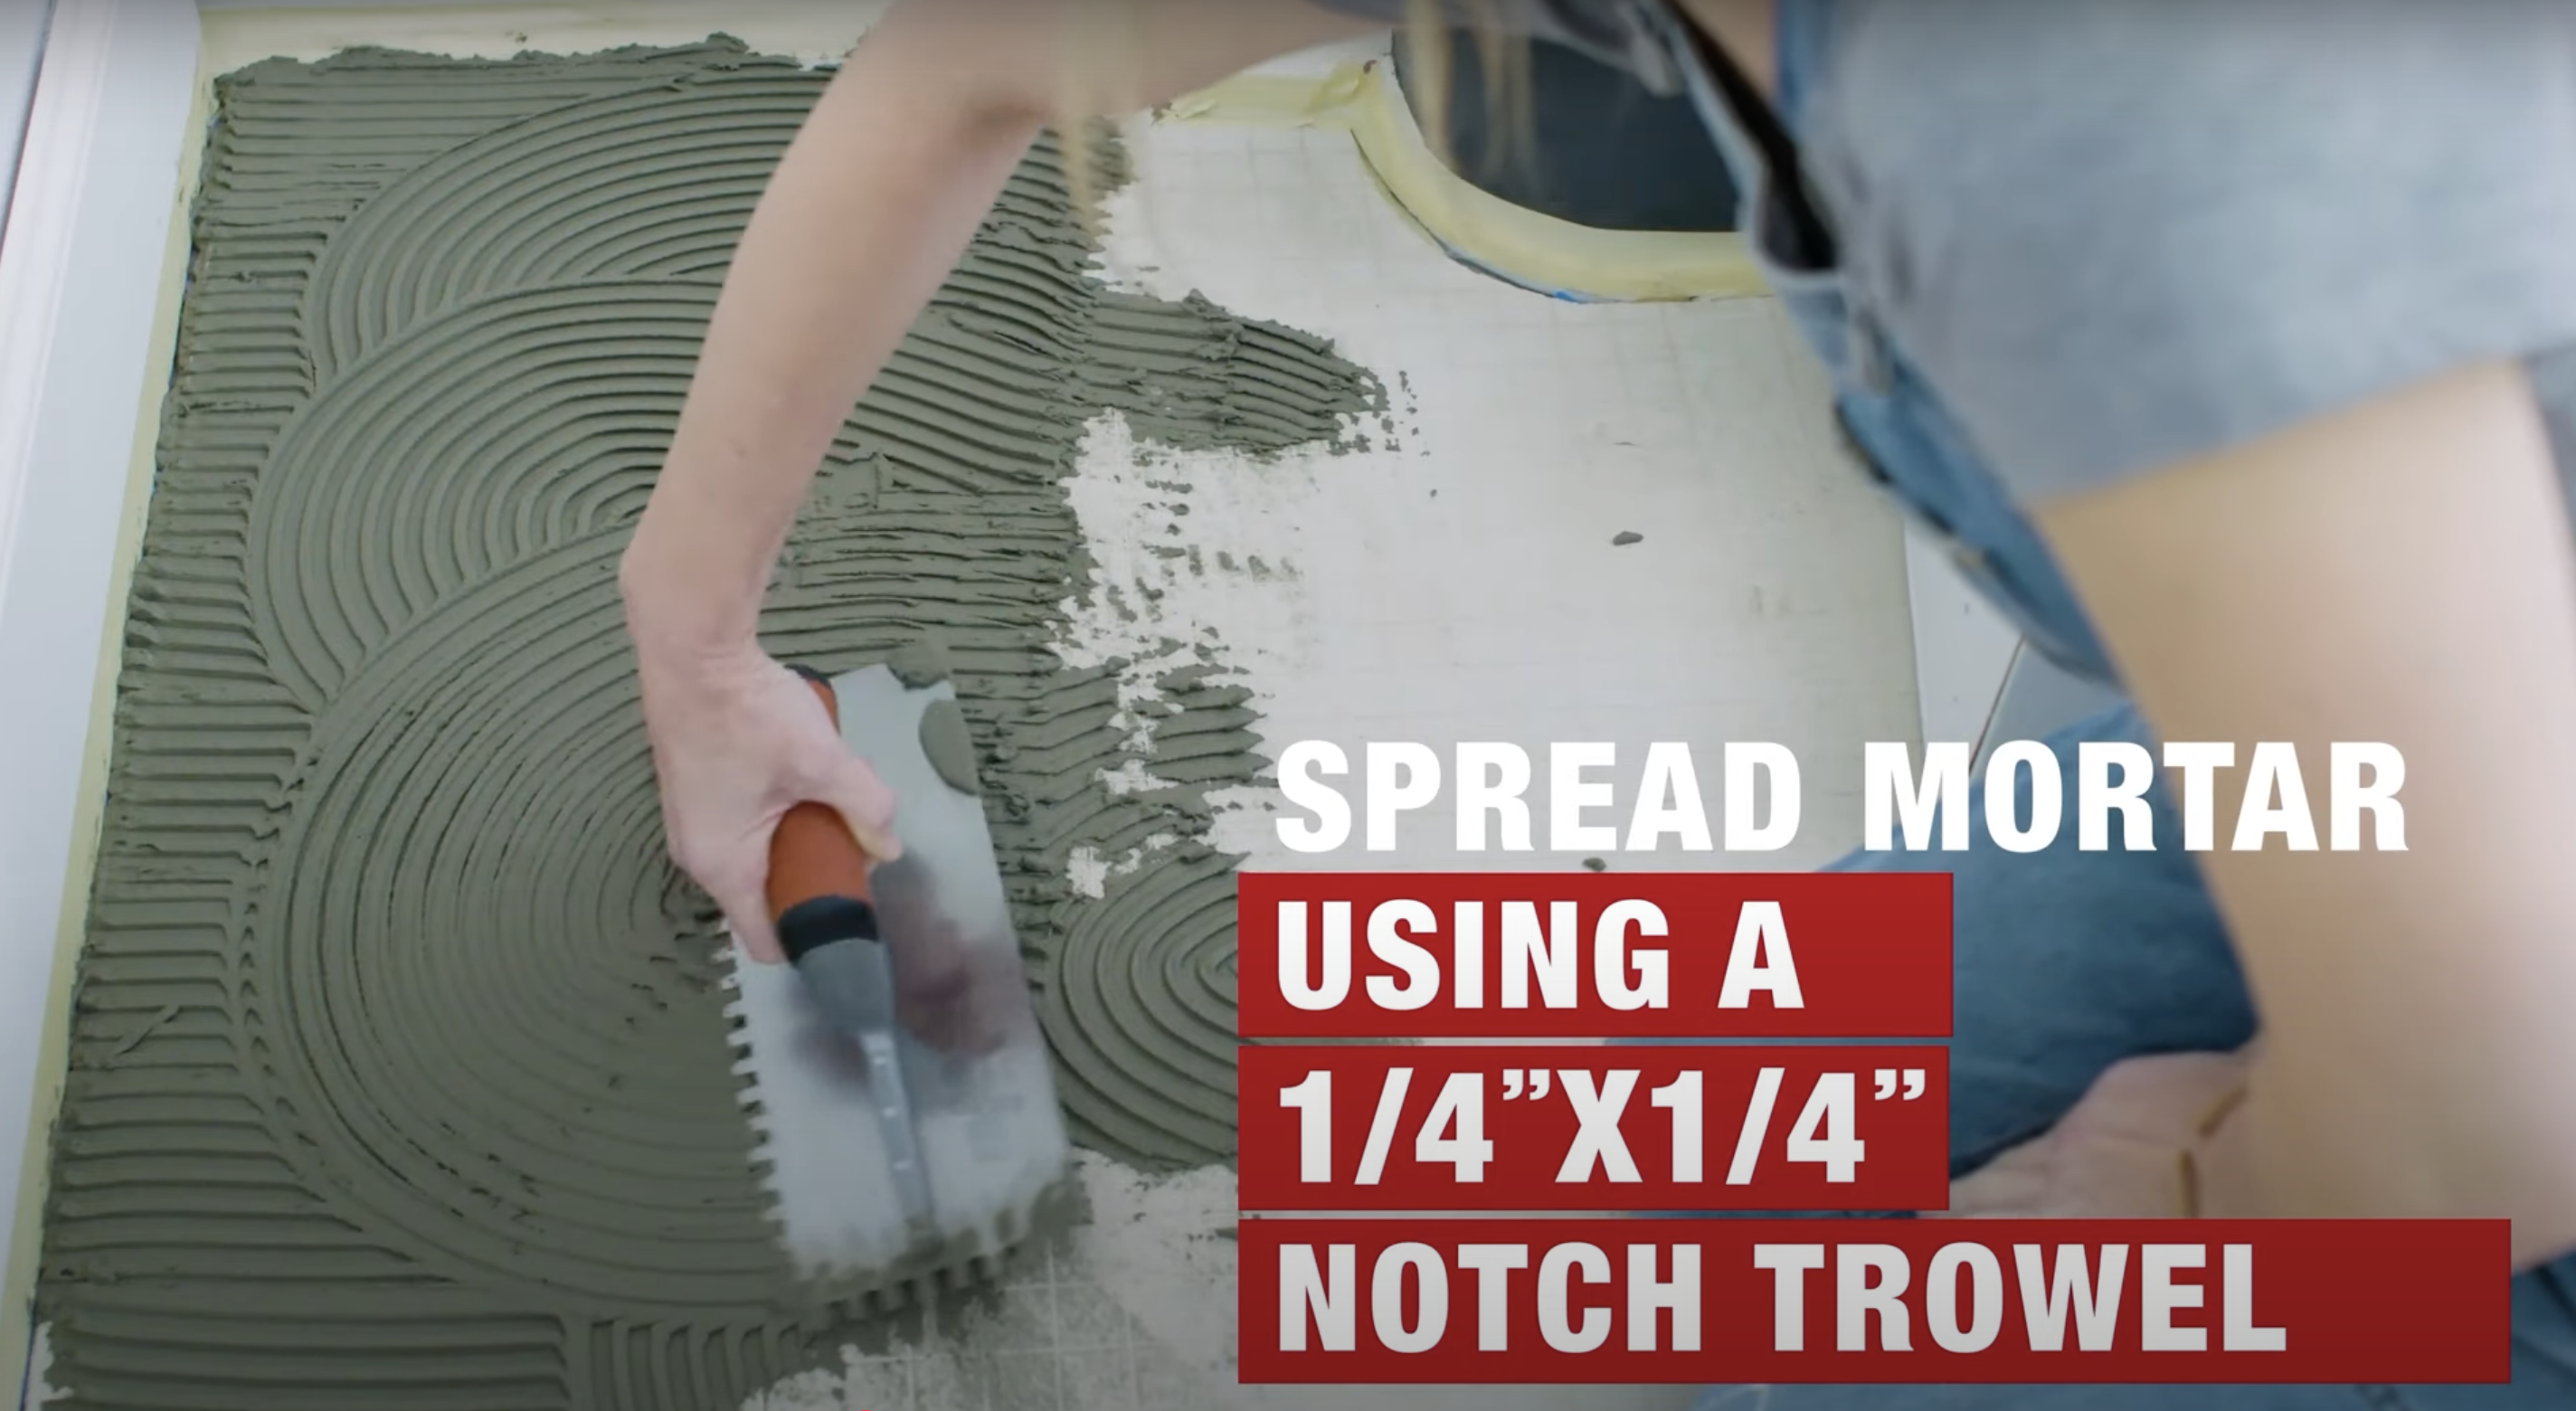
Working in small sections keeps the mortar from drying before tiles can be placed.
An even layer creates a stable base for the thin brick floor. The way mortar is spread affects how level the finished floor will be.
- Apply mortar to a 3-4 square foot area using the flat side of the trowel
- Create ridges with the notched edge held at a 45-degree angle
- Maintain consistent thickness throughout the section for an even surface
Step 5: Place the Tiles
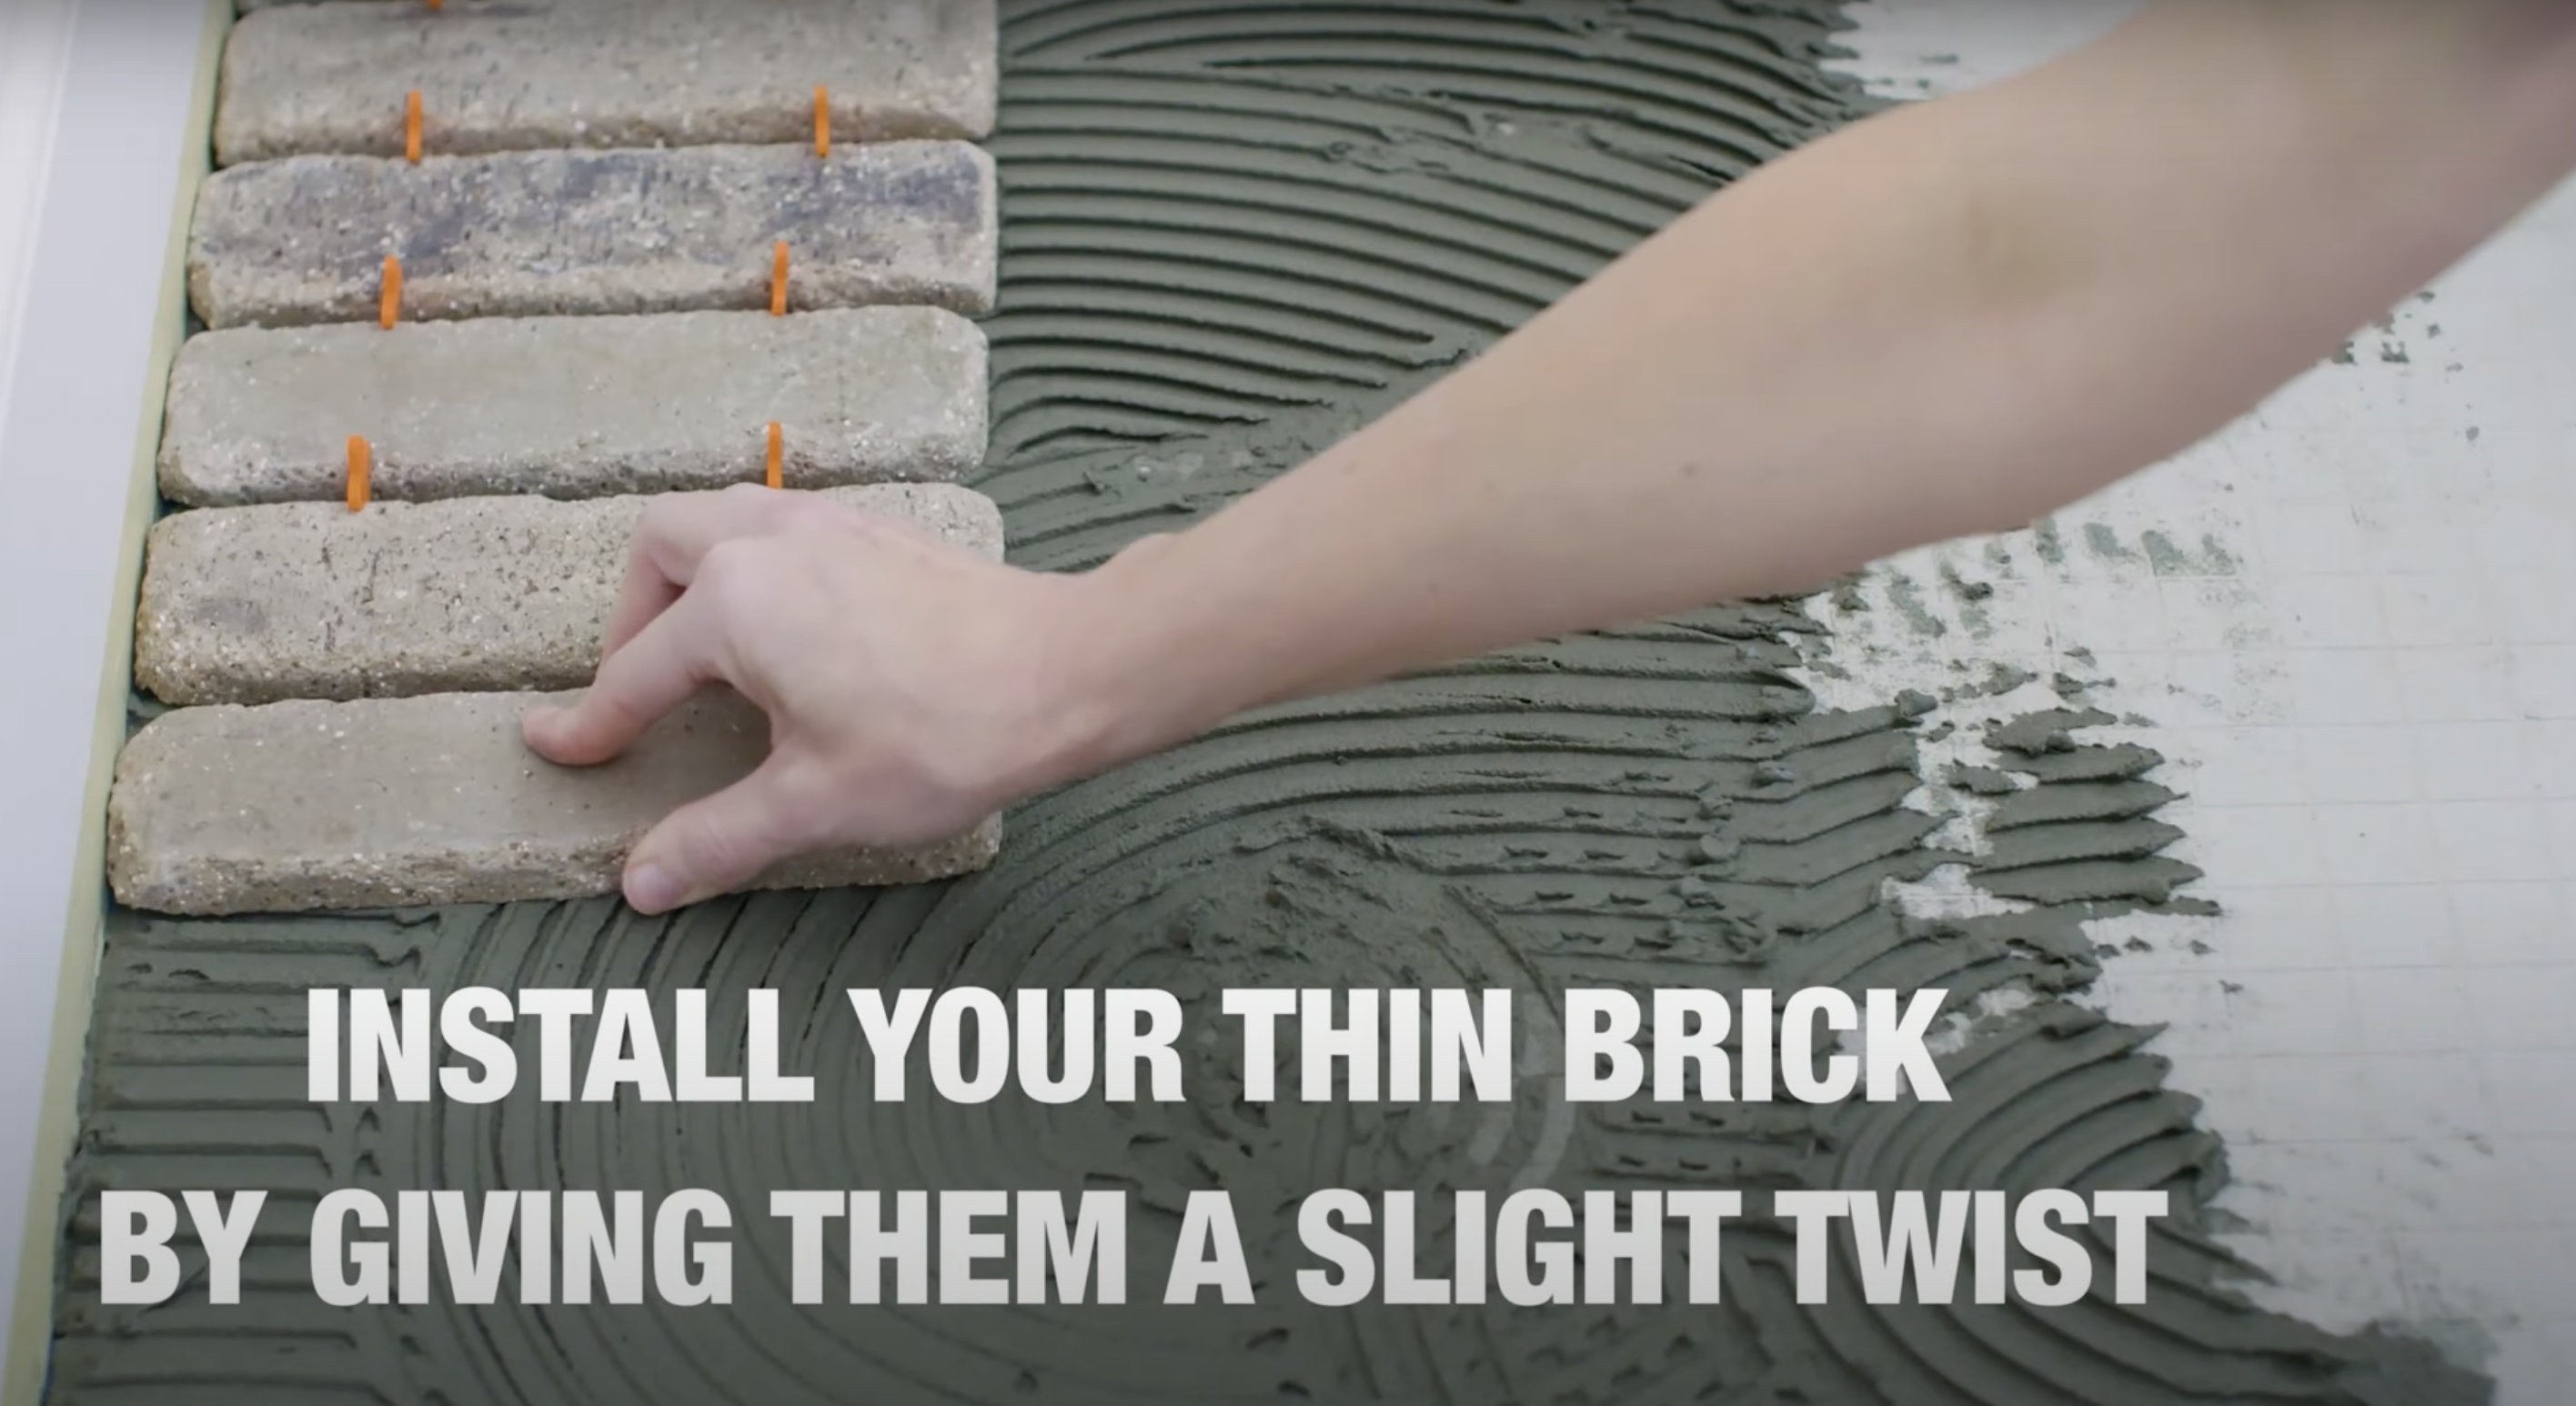
Careful placement according to the planned layout creates the desired pattern. Each brick must sit firmly in the mortar for proper adhesion.
This step changes the space with the distinctive look of brick.
- Position each tile with gentle pressure to embed it in the mortar
- Use spacers between tiles to maintain even gaps throughout the floor
- Check frequently with a level to ensure the surface remains flat
Step 6: Use a Mortar Bag to Fill Joints
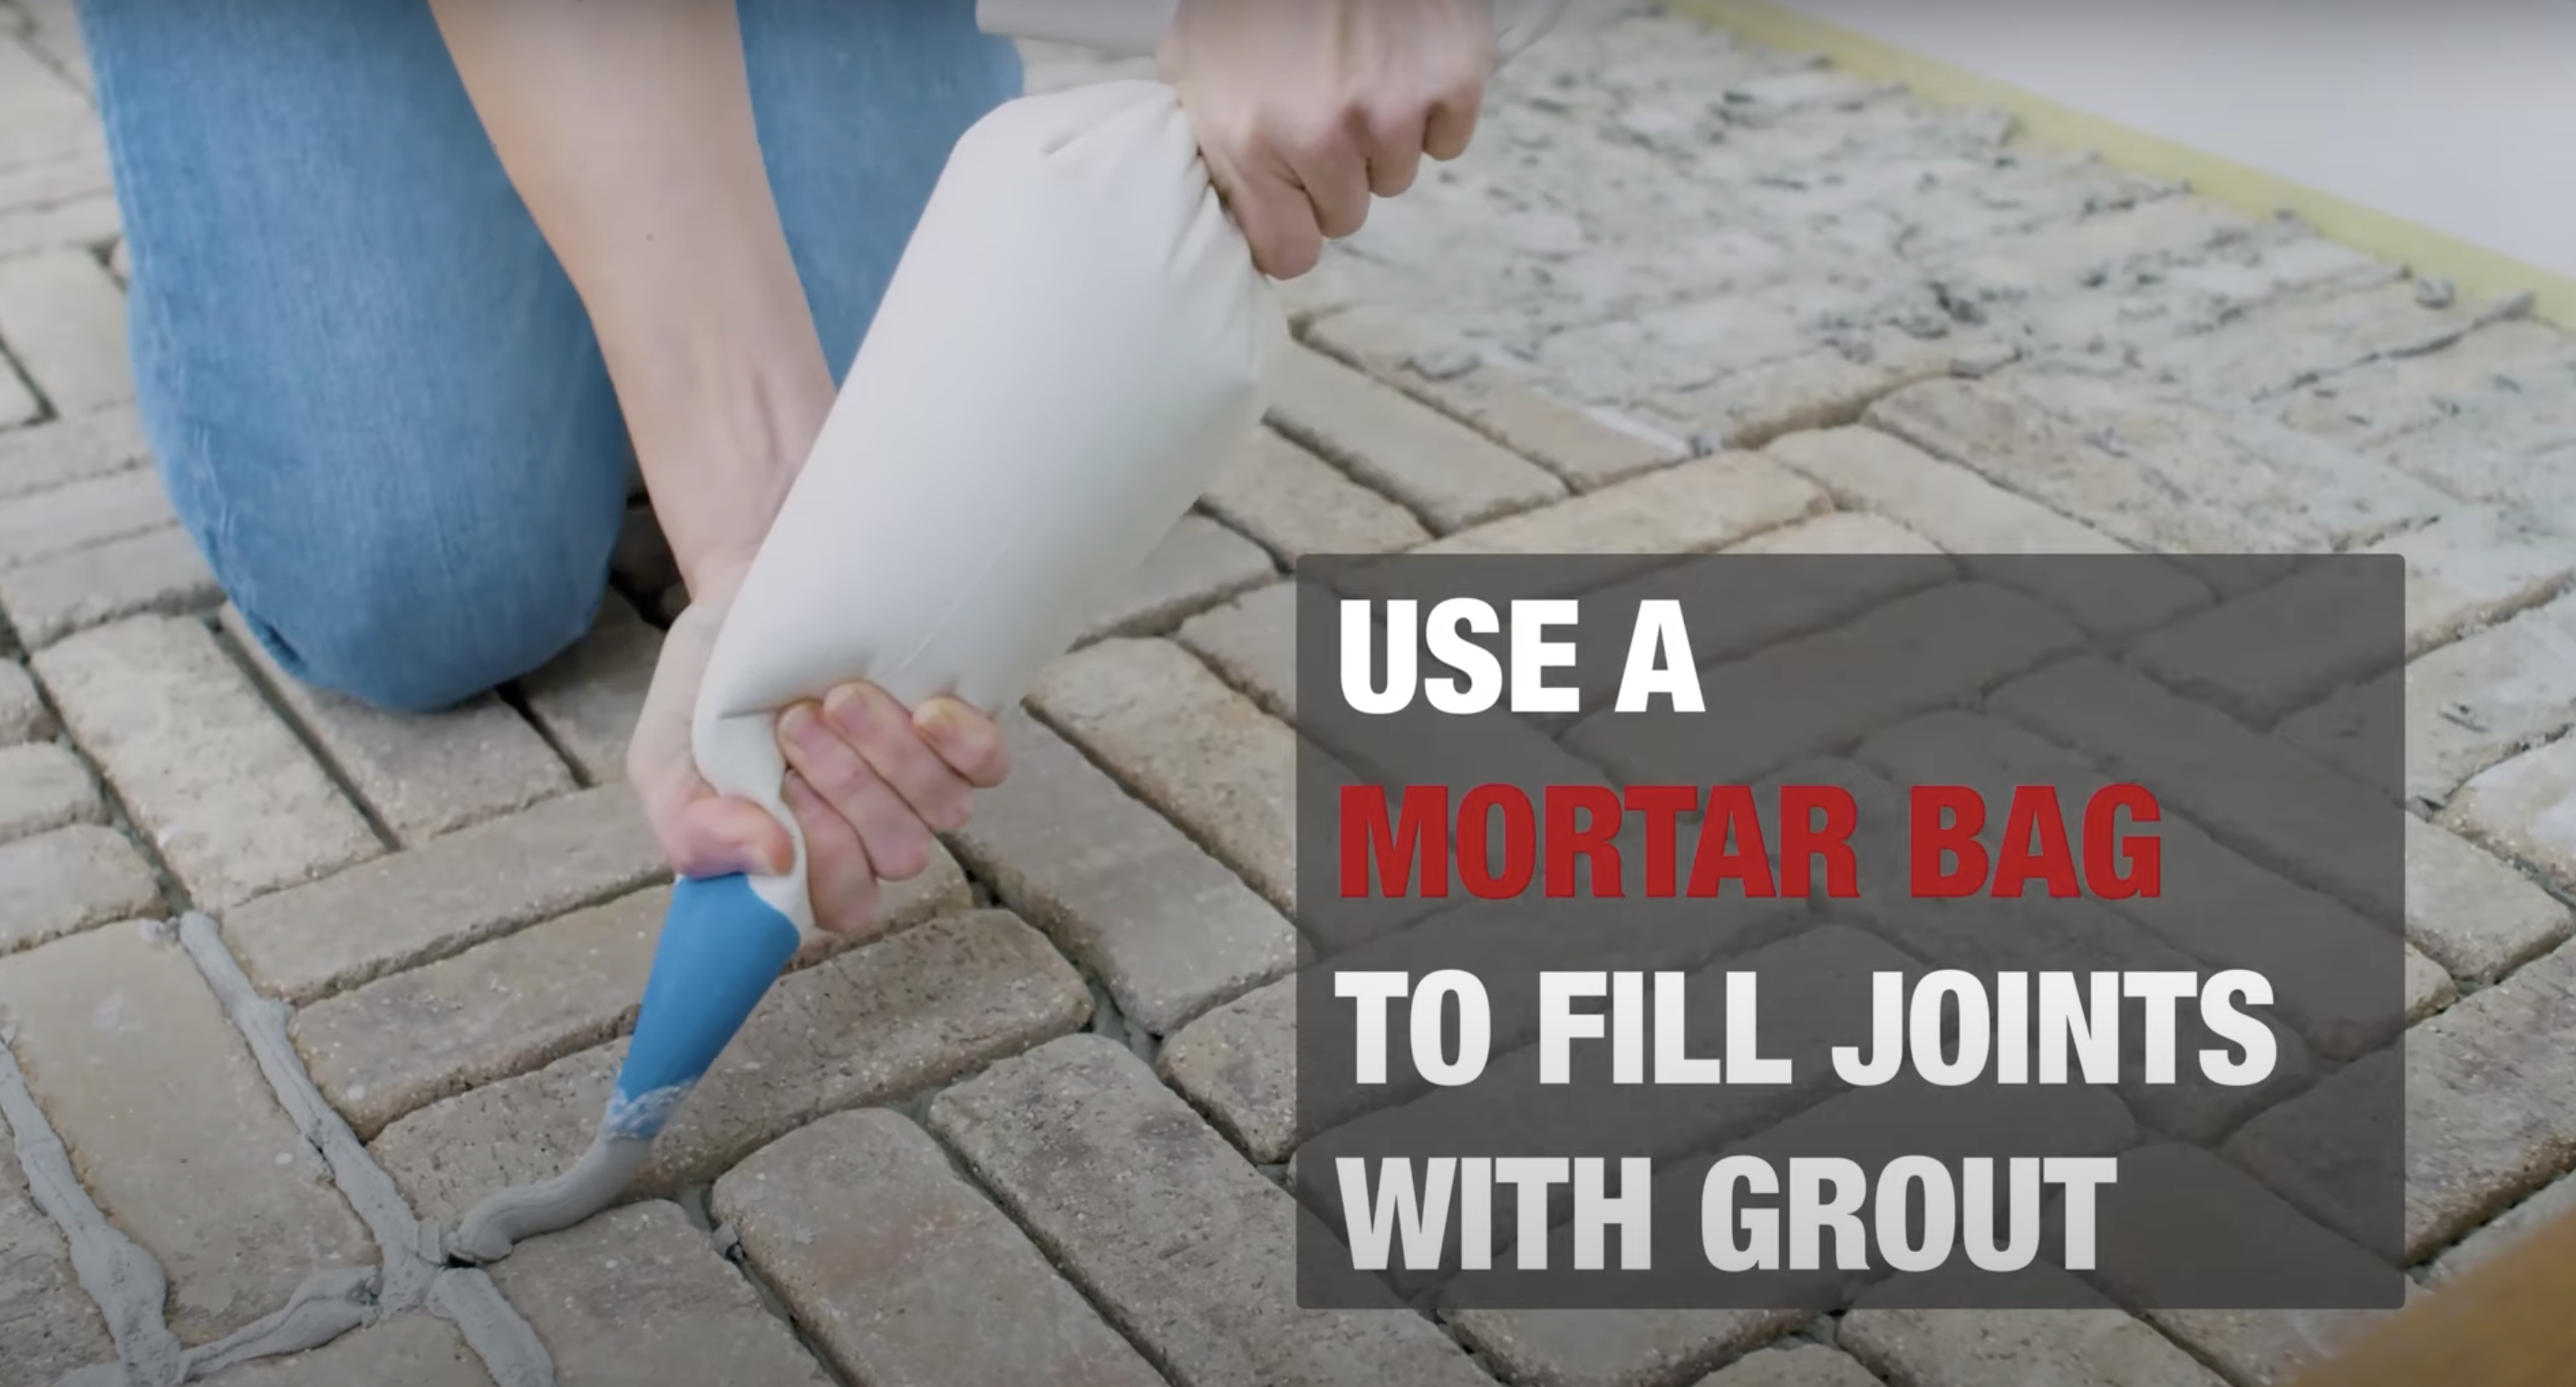
Filling the joints between tiles creates the authentic look of a brick floor.
The mortar bag allows precise application similar to decorating with frosting. This technique produces clean, consistent joints throughout the floor.
- Fill the mortar bag with slightly thinner mortar than used for tile setting
- Squeeze with steady pressure to create even joints between all tiles
- Work in small sections to maintain control over the application
Step 7: Clean Excess Mortar with a Sponge

Removing excess mortar before it fully hardens preserves the clean lines of the brick pattern.
Timing matters, cleaning too early disturbs the joints, too late makes removal difficult. This step reveals the true beauty of the installation.
- Wait until the mortar becomes slightly firm but not completely hardened
- Use a damp sponge with clean water, rinsing frequently
- Wipe with light pressure to avoid pulling mortar from the joints
Step 8: Continue this Pattern for the Rest of the Floor
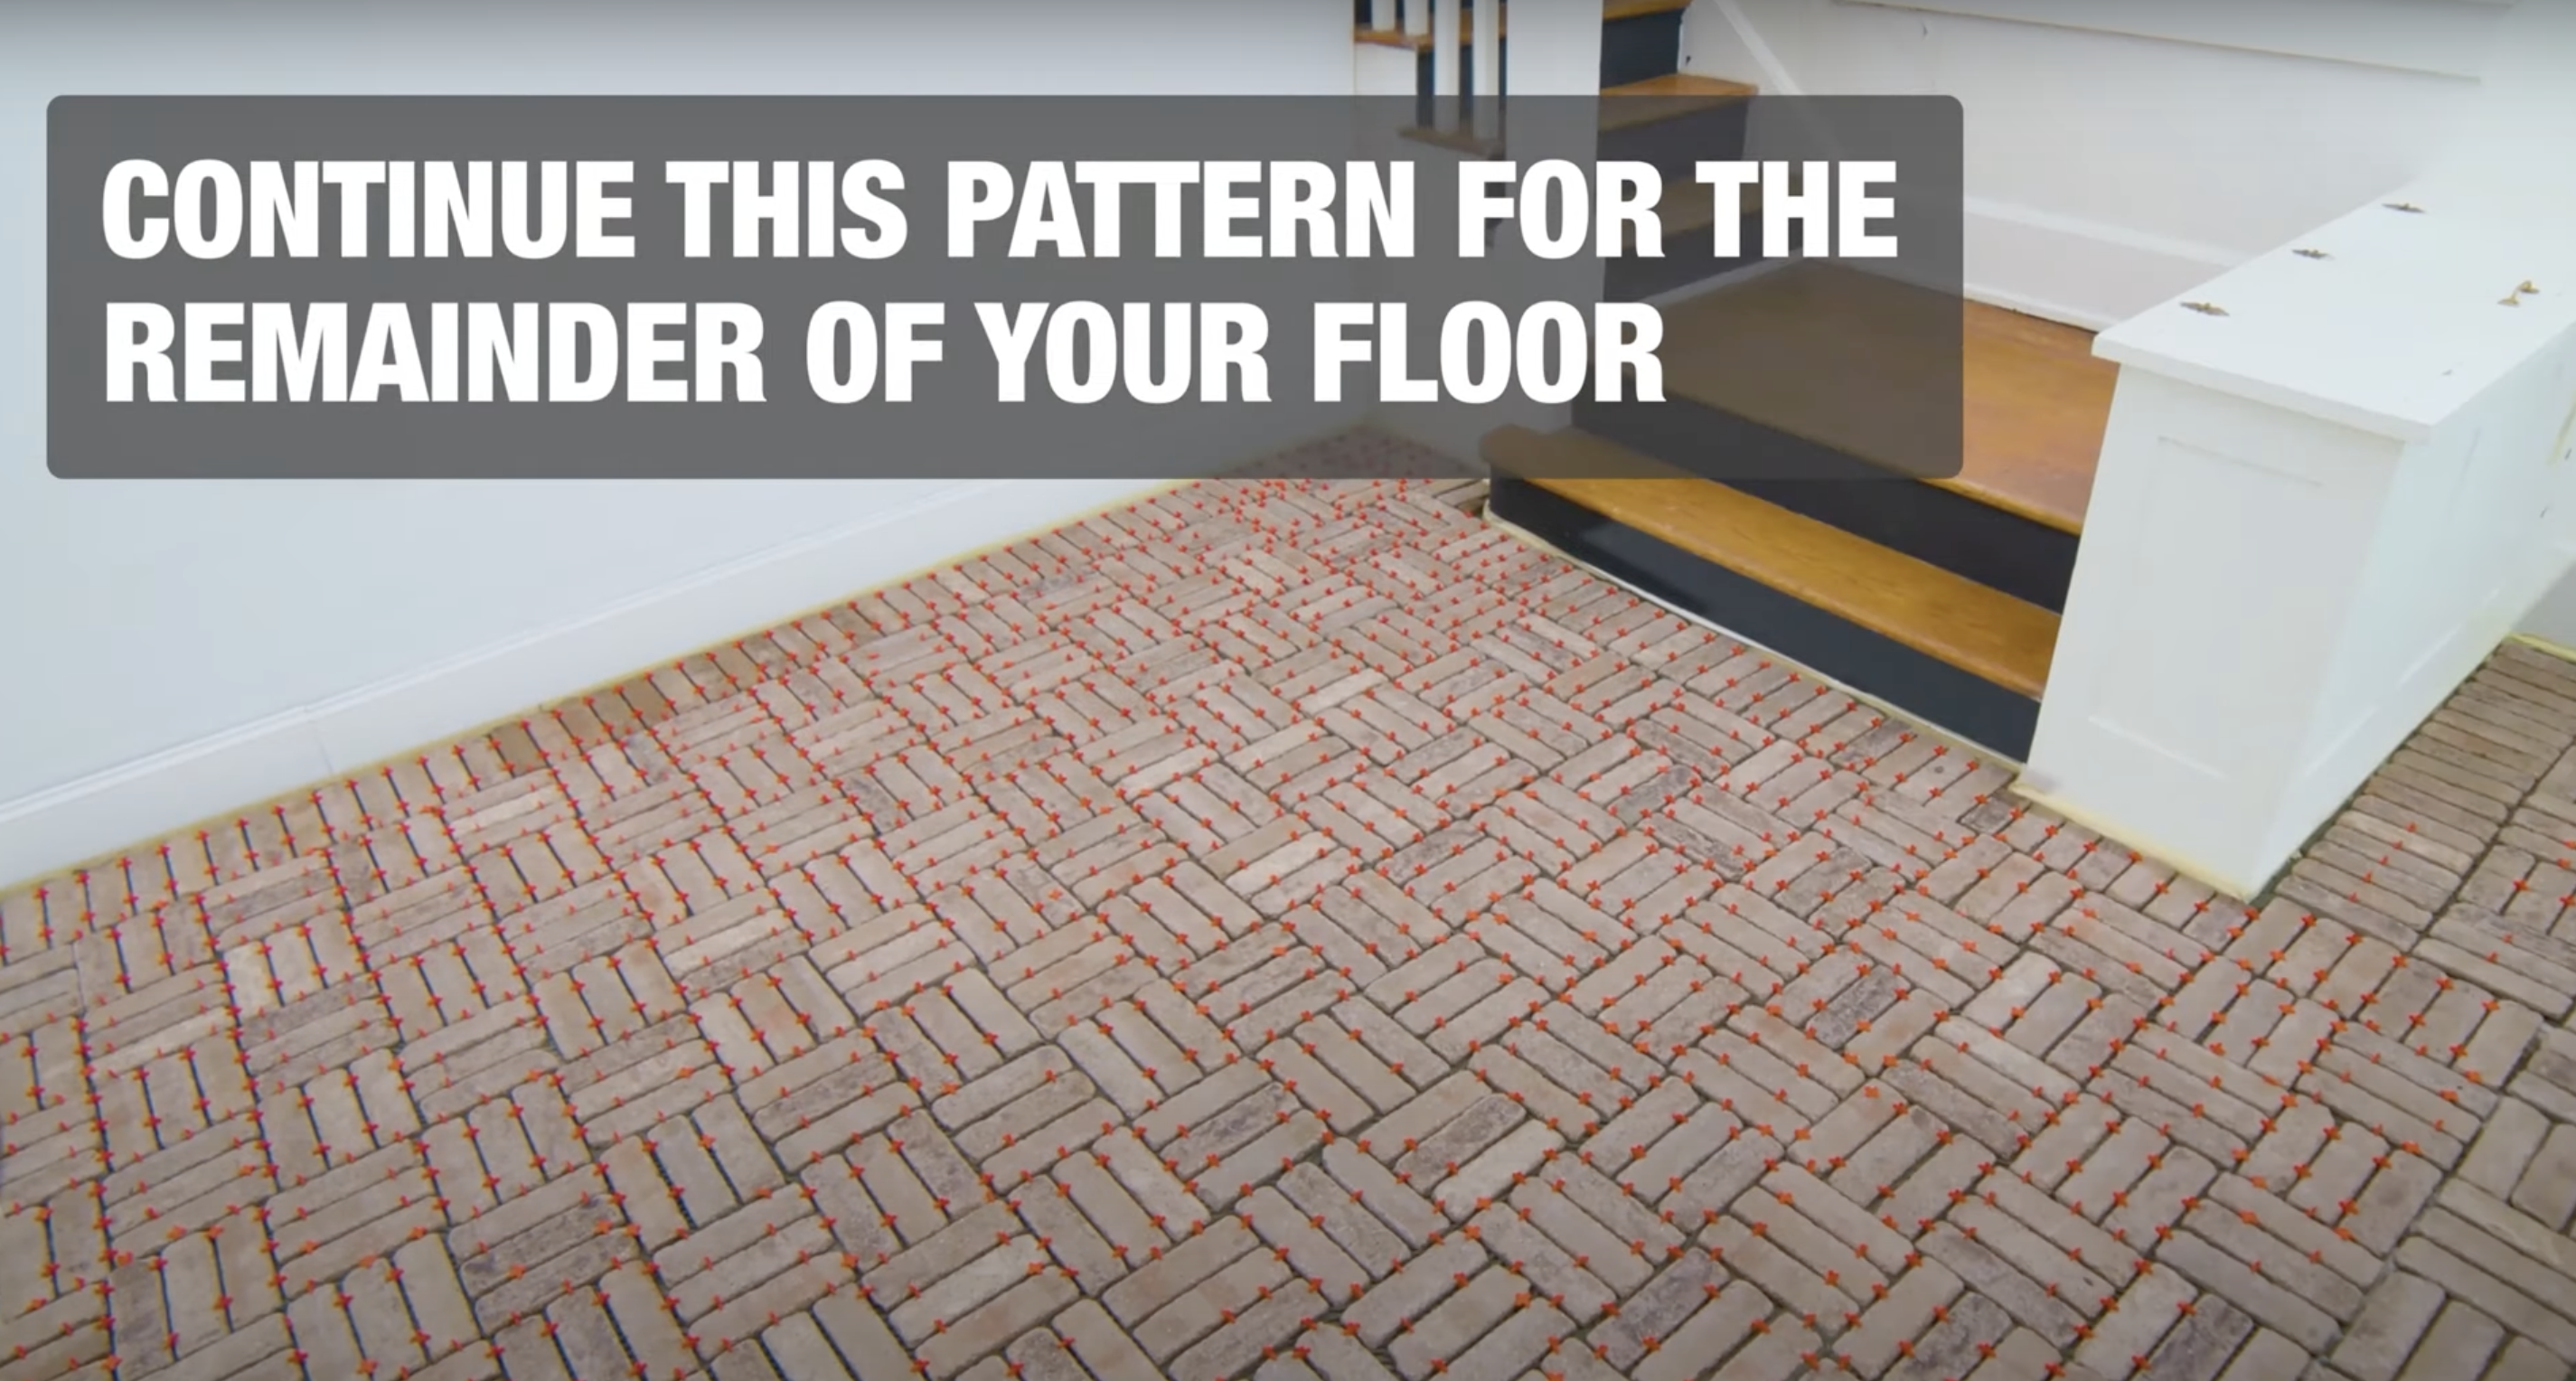
Maintaining consistency throughout the installation creates a professional appearance. The same techniques apply to each section until completion.
Patience during this final phase ensures the entire floor meets the same quality standard.
- Complete each section fully before moving to the next area
- Match patterns and joint widths across section transitions
- Take breaks as needed to maintain precision throughout the project
For a detailed tutorial you can also check out this YouTube video:
Types of Thin Brick Flooring
When shopping for thin brick tiles, you’ll find several distinct options to match your style and needs. Here’s a list of few common types of thin brick flooring:
1. Clay Brick Tiles

Made from natural clay and fired in kilns just like their full-sized counterparts, these tiles exhibit beautiful variations in color and texture, giving them unmatched character.
The natural thermal properties of clay help regulate room temperature, while the classic reds, rustic browns, and warm earthy tones blend seamlessly with various design styles.
At just 1/2 to 3/4 inch thick, they deliver the genuine brick look without the structural concerns of full bricks. Over time, clay brick tiles develop a beautiful patina that only enhances their appeal.
2. Concrete Brick Tiles

Concrete Brick Tiles are manufactured from a mixture of cement, sand, and pigments; these tiles provide reliable performance at a generally lower price point.
Their uniform coloration makes them ideal for contemporary spaces where consistency matters.
Available in an expanded palette including modern grays, crisp whites, and custom colors, concrete brick tiles can mimic various brick styles while standing up remarkably well to wear and tear.
3. Porcelain Brick Tiles

With water absorption rates below 0.5%, porcelain brick tiles excel in bathrooms, kitchens, and outdoor spaces where other brick tiles might prove problematic.
Their precise, uniform shapes simplify installation, while their resistance to freeze-thaw cycles makes them suitable for any climate.
Porcelain options require significantly less maintenance than natural clay, appealing to homeowners who want the brick look without the upkeep.
4. Reclaimed Look Tiles

Reclaimed Look Tiles capture the charm of historic bricks without the sourcing challenges.
These tiles feature intentional color variations, worn edges, and textured surfaces that mimic bricks salvaged from century-old buildings.
They add instant character to any space, creating focal points that suggest history and craftsmanship without the cost or installation difficulties of genuine antique materials.
5. Glazed Brick Tiles

Glazed Brick Tiles, with their glass-like finish, take brick in a more contemporary direction.
Applied before firing, this glazing creates a surface that’s not only vibrant and colorful but also exceptionally easy to clean.
Their stain resistance makes them practical for kitchens and other high-use areas, while their distinctive appearance works beautifully in modern design schemes where traditional brick might feel too rustic.
Approximate Cost of Thin Brick Flooring
Here’s a table with approximate costs for different types of brick tiles:
| Tile Type | Approximate Cost per Square Foot |
|---|---|
| Clay Brick Tiles | $3 – $18 |
| Concrete Brick Tiles | $3 – $8 |
| Porcelain Brick Tiles | $6 – $15 |
| Reclaimed Look Tiles | $7 – $20 |
| Glazed Brick Tiles | $8 – $20 |
Taking Care of Your Brick Flooring
Now that you’ve installed your beautiful thin brick flooring, it’s important to keep it looking its best. Let’s unearth the different types of care and maintenance your brick flooring will need to ensure its longevity and continued charm.
Initial Protection
- Apply a quality sealer immediately after installation.
- Allow the sealer to cure completely before walking on the floor.
- Choose a penetrating sealer for natural brick or a surface sealer for glazed options.
Regular Cleaning
- Sweep or vacuum frequently to remove grit and debris.
- Use a dust mop for quick daily cleaning.
- Damp mop with a pH-neutral cleaner when needed.
- Avoid excessive water, which can seep into porous bricks.
- Never use acidic cleaners, bleach, or harsh chemicals.
Handling Spills
- Wipe up spills immediately to prevent staining.
- Pay special attention to acidic substances like wine, juice, or tomato sauce.
- For stubborn stains, use a cleaner specifically formulated for brick.
- Test any cleaning solution in an inconspicuous area first.
Maintenance Schedule
- Reapply sealer every 1-2 years, depending on traffic.
- Clean grout lines with a soft brush and mild cleaner when they begin to look dirty.
- Inspect for any loose or damaged tiles and address promptly.
- Consider professional deep cleaning every few years.
Protection Measures
- Use felt pads under furniture legs to prevent scratches.
- Place mats at entrances to catch dirt from shoes.
- Consider area rugs in high-traffic zones.
- Avoid dragging heavy objects across the floor.
Conclusion
Thin brick flooring combines timeless appeal with practical durability for today’s homes.
Clay, concrete, porcelain, reclaimed-look, or glazed options, you’re investing in a distinctive surface that stands apart from conventional flooring choices.
While the installation process requires attention to detail, it is manageable for many homeowners or easily handled by professionals.
Best of all, brick flooring never goes out of style. While other trends come and go, the warm, textured look of brick continues to enhance homes year after year.


