A DIY Guide for Jewelry Wall Organizer
Are you tired of your necklaces all tangled up and your earrings lost in the jumble? Well, we’ve got a solution for you. We will show you how to create your very own DIY Wall Jewelry Organizer.
We’re here to create a stylish and useful jewelry organizer that you can make on your own: no more knotted chains or mismatched pairs.
Our step-by-step instructions will walk you through the process. Even if you’re not a seasoned crafter, don’t worry.
From gathering the materials to hanging the final product, we’ve everything in detail. You’ll learn how to change basic materials into a personalized jewelry organizer.
Not only does this organizer save you time, but it will also give an attractive mark to your decor. So, grab your crafting essentials and prepare to release your creative side.
Let’s turn your wall space into a jewelry wall organizer that sparkles and shines, all while keeping your jewelry beautifully ordered.
Why Choose a DIY Jewelry Organizer?
Getting jewelry holders from stores can cost a lot and might not be exactly what you want. But if you make your own, you can choose how it looks and works for you. It feels really good to make something useful and pretty yourself.
You can decide how big it is, how it’s set up, what colors it has, and all the things that fit you. It’s a fun way to keep your jewelry nice and show your creative side.
It doesn’t matter if you have lots of jewelry or just a few special pieces; a DIY jewelry wall organizer lets you keep them in a way that suits you. And you’ll feel proud using something you made with your own hands.
Gathering Your Materials
Before you start your DIY project, gather the following materials
- Wooden board or frame
- Hooks, knobs, and rods
- Small decorative shelves
- Paints and brushes
- Hammer, nails, and screws
- Screwdriver
- Measuring tape
Step-By-Step for DIY Wall Jewelry Organizer
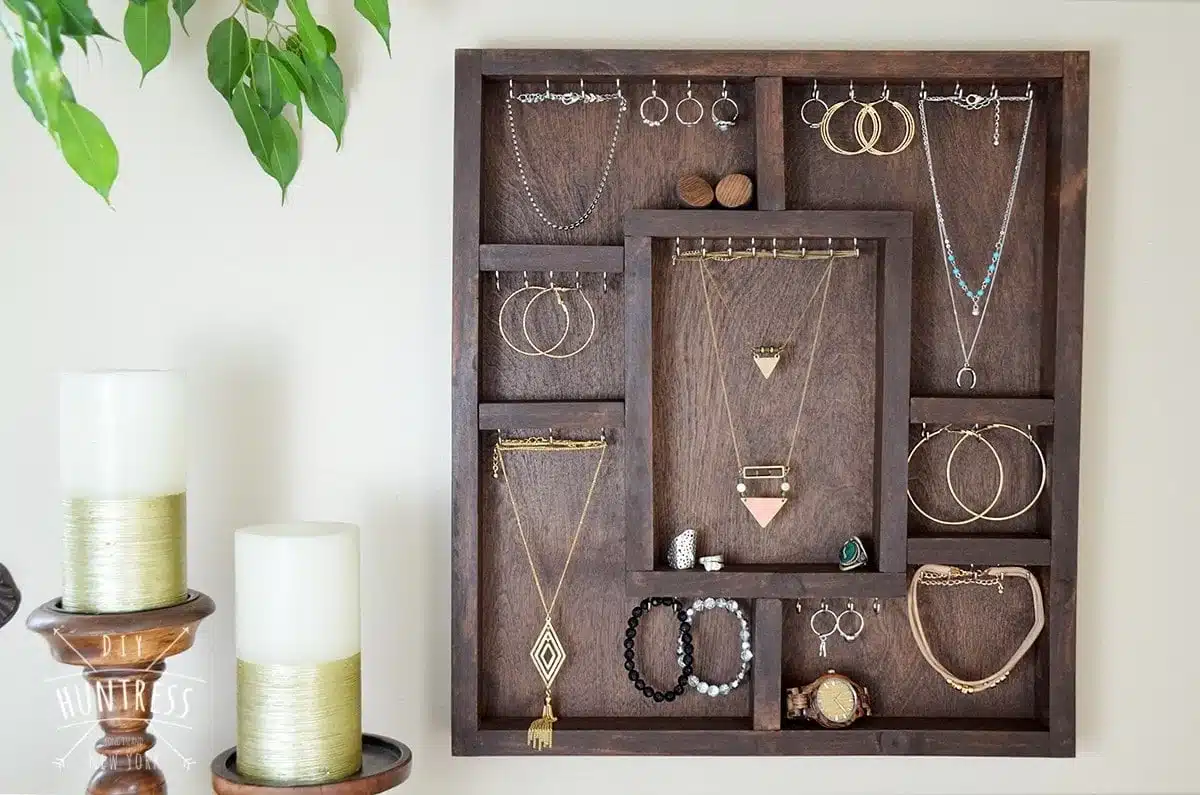
Step 1: Designing Your Organizer Layout
Time to organize your jewelry. Start by deciding where to put the hooks, rods, and shelves in your organizer. Think about your necklaces, bohemian stackable bracelets, rings, and other jewelry. Arrange them in a way that makes sight for you. You’ve got choices for how it looks. You could make both sides the same for a balanced style. Or, if you want to be creative, try something unbalanced. That means one side might look different from the other, but it still looks great.
Remember, the goal is to make your jewelry simple to find and put away. So, plan how you’ll set things up with your jewelry in mind. Have fun making your perfect jewelry wall organizer.
Step 2: Creating the Base
Use strong hooks or nails to attach the wooden board or frame to the wall firmly. Put it at a height that feels comfy for you to reach. Make sure the board or frame is really strong and doesn’t wobble when you put your stuff on it.
This matters because you’ll hang your accessories there, and you don’t want them to fall. If the board or frame isn’t tough enough, it might break, and your stuff could get hurt. So, make sure everything is strong and well-supported before you start adding your decorations. That way, you can enjoy your accessories without any worries.
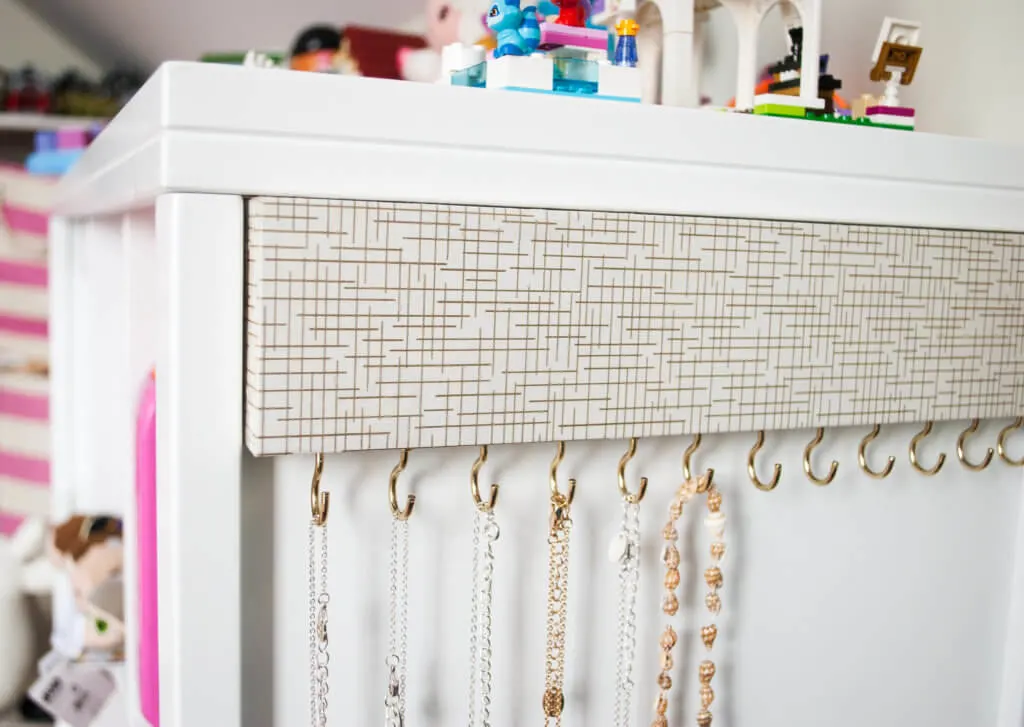
Step 3: Adding Hooks and Rods
Keep your jewelry tidy. Put hooks on the wall for your necklaces and bracelets, and use sticks for your earrings. Remember to give them enough room so they don’t get all mixed up and knotted.
For a special touch, you can even use fancy knobs as hooks. This jewelry wall organizer keeps your jewelry from twisting, and it’ll be easy to find. Plus, it will look cool and one-of-a-kind. No more hunting for your favorite piece in a mess. With this setup, you’ll know exactly where everything is.
Step 4: Including Mini Shelves
Having a way to keep your rings, watches, and little treasures neatly organized and looking attractive display. Well, you can do just that by adding some simple mini shelves to your space.
This DIY jewelry wall organizer might be tiny, but they have a big impact. These shelves are like little refreshments for your eyes. They break up the sameness and add a touch of excitement to your surroundings.
It’s like giving your room a mini makeover without much effort. And the best part is, these shelves don’t just add style; they’re super practical, too. You finally have a dedicated spot for your accessories and special trinkets.
Step 5: Painting and Personalizing
Make your organizer fit right into your room’s vibe by giving it a fresh coat of paint. Choose colors that work well together, like friends hanging out. These Hanging jewelry display ideas add a pinch of personality, making your jewelry wall organizer stand out from the crowd.
Turning your organizer into a personal canvas is like telling a story. Grab those paintbrushes and start painting. Once your masterpiece is dry and ready, place Space-saving jewelry organizers that not only keep it neat but also shine as proud evidence of your creativity.
Tips for Organizing Different Accessories
1. Include Small Containers
Raise your organizer’s use by adding mini bowls or cups, a simple yet impactful solution. These Space-saving jewelry organizers display ideas are perfect for keeping minor, often misplaced items like rings, hairpins, and earring backs organized. Think about the ease of never searching for an earring back again.
Beyond practicality, they add attractive beauty, turning dull storage into delightful displays. If you’re a collector, these containers bring a change shift. Envelop an organized lifestyle with this creative upgrade that easily blends utility and style.
2. Envelop Vertical Space
Often, we forget about the space that’s right above and below us when we’re organizing our jewelry. But here’s a smart tip: try using rods or sticks to hang up your bracelets, bangles, and hoop earrings.
Instead of letting your precious pieces get tangled up in a box, you’re giving them a stylish perch that is easy to see and access. So, don’t just think left and right; think up and down, too. Your jewelry wall organizer will thank you.
3. Include a Mirror
Adding a mirror to your DIY wall jewelry organizer is a great idea. It helps you try on different jewelry and makes your organizer look cool. The mirror is a helpful tool to see if your jewelry matches your clothes. It makes your jewelry wall organizer stand out and look pleasant on the wall. Think of quickly checking how your necklace or earrings look with your outfit before you go out.
It’s like having a personal dressing area on your wall. And the best part is, the mirror doesn’t just help you. Unique wall jewelry holders also make your room look better. So, go ahead and put up that mirror for a practical and good-looking jewelry setup.
4. Regular Maintenance
To keep your accessories looking super nice, remember to give your jewelry wall organizer some regular love. Keep both your jewelry and the organizer clean to stop them from losing their sparkle and getting all dull. Dust can gather over time, so give everything a gentle wipe.
This Wall-mounted jewelry organizer will help your accessories stay as good as new and ready to shine whenever you want to wear them. Spending a little time caring for them will help your jewelry and organizer stay in great shape so you can enjoy them for a long time.
5. Balance Beauty and Use
Remember, while it’s lovely for things to look good, it’s even more important for them to work well. So, when you’re busy creating your very own jewelry wall organizer, don’t forget its main job: making your jewelry quick to find and keeping it neat.
Think about having a special place to grab your favorite accessories without any fuss quickly. That’s what your DIY organizer is all about. It’s awesome if it looks pretty, but what truly matters is how it helps you keep things in order and within reach. So, go ahead and make it look cool, but always keep its usefulness in mind.
Benefits of a Wall-Mounted Jewelry Organizer

1. Maximizing Space and Organization
The jewelry wall organizer is your space-saving part. Unlike old boxes, it hangs neatly on your wall, giving you more room. Think of hooks for tangle-free necklaces, spots for rings and earrings, and shelves for watches and decor. No more mess. With this organizer, you’re not just saving space but making your room pop. Your jewelry becomes art—time to show off your stuff.
2. Easy Accessibility
Try a jewelry organizer you can hang on your wall. It’s like a magic trick for your jewelry. Instead of dealing with a tangled mess daily, you can neatly put each piece in its spot. Choose to have all your shiny options right there, so you don’t have to search hard for the perfect piece.
This jewelry organizer doesn’t just make your mornings smoother. It also keeps your jewelry from getting scratched. Just hang your jewelry on it, and you’re good to go. It’s practical and stylish, making your daily routine easier and turning your jewelry into both a fashion remark and a piece of art. Get the hang of organization and level up your jewelry game with this amazing jewelry wall organizer.
3. Showcasing Your Collection
Lots of people love their jewelry collections. Think about having a special organizer on your wall to show your pieces like beautiful artwork. It’s a great way to add your style to your home and start friendly chats. When friends or family visit and see your collection nicely displayed, they’ll ask about it.
Then, you can share stories about each piece and have a good time with your guests. So, you not only enjoy your jewelry wall organizer even when you’re not wearing it but also share its beauty and memories with others. It’s a sweet way to make your space truly yours and have good talks with people.
4. Encourages Regular Use
When you put your jewelry where you can see it, and it looks pleasant, you’ll want to wear it a lot. But if you hide it in drawers and forget about it, you won’t use it much.
Using a cool jewelry wall organizer on your wall helps you pick different pieces from your collection easily and enjoy wearing them. Unique wall jewelry holders are a fun way to show your jewelry and have a good time with it. So, make your jewelry part of how you decorate your place, and you’ll like wearing it every day.
Conclusion
We’ve learned that a little creativity goes a long way. By using just a few materials and some simple steps, we’ve changed everyday items into a useful and stylish jewelry wall organizer.
Remember, the key is to keep it simple. With a piece of wood, some hooks, and a splash of paint, you’ve designed a space that not only organizes your jewelry but also adds beauty to your room.
Now, as you hang your necklaces, earrings, and bracelets on your new creation, think about the time you’ve saved searching for that lost earring or tangled necklace. And who knows, maybe this is just the beginning. This small project might move you to try more DIY ideas around your home.
Your jewelry has found a home, and in the process, you’ve found a new way to make your space truly yours.
Frequently Asked Questions
Can I Customize the Size of The Organizer?
Of course. You can adjust the dimensions of the jewelry wall organizer according to your available space and needs.
Where Can I Find the Materials Needed for This Project?
You can find the necessary materials at hardware stores, craft shops, or even repurpose items from around your home.


