Quick and Easy Tutorial for a DIY Earring Holder

Don’t you think your beautiful earrings need proper organization so that you don’t have to go through a box full of strangled earrings just to find that one pair that you want? We think the earring stand is the solution.
Jewelry holds a special place in our hearts, often reflecting our unique style and memories. However, keeping your earrings easily accessible can sometimes be a challenge.
A DIY earring holder is a useful accessory that helps you keep your beautiful earrings organized and on display.
This simple yet beautiful stand allows you to showcase your earring collection while adding a personal feel to your space.
Have you ever struggled to find matching earrings in a jumbled mix-up? However, creating a DIY earring stand can be both useful and funny.
With just a few basic materials and a little bit of your time, you can make an earring stand.
Let’s discuss the materials you’ll need and the tools required to make an earring stand.
How to Make Earring Stand

1. Materials and Supplies Needed
Collect your creative tools. To make your earring stand, you’ll require basic materials like a wooden frame or a mesh screen. Other materials include hooks, paints, brushes, a saw, glue, and decorative accessories like beads or solid satin ribbons. Don’t forget a measuring tape and a pencil for precise markings. With these supplies in hand, you’re all set to work on the Earring storage solutions.
2. Cutting and Preparing the Wood Boards
To create your wooden earring holder, start by gathering your materials. You’ll need wood boards that are solid and of the desired size for your stand. Measure and mark the dimensions for the main frame and the base. You can use a saw to cut the wood boards according to your measurements carefully. Sand the edges and surfaces of the boards to ensure a smooth finish, preventing them from breaking. Choose sandpaper with a medium grit for best results.
3. Joining the Frame Corners
Now, let’s assemble the frame. Arrange the cut boards to form the main frame of your earring wooden holder. Position the corners at right angles to create a square or rectangular shape, depending on your choice. To secure the frame corners, you can use wood glue or screws. Apply a thin layer of wood glue on the edges that will be joined together, then press the corners firmly.
Also, you can use small wood screws to join the corners. Make sure to pre-drill guide holes to prevent the wood from splitting. Allow the glue to dry, or tighten the screws as needed, ensuring the frame is fixed and stable.
4. Attaching the Frame to The Base
To complete your earring stand, attach the frame to the base. Position the assembled frame onto the baseboard, ensuring proper alignment. Mark the points where the frame and base meet. Apply wood glue along the bottom edges of the frame, then carefully place it onto the base. Press down gently to secure the bond. You can also use screws from the base for added stability.
Allow the glue to dry completely before moving or using the stand. Once everything is set, your Hanging earring storage is ready to showcase your beautiful earrings in an organized and stylish manner.
5. Finishing Options for The Stand
When it comes to giving your Easy DIY Earring Stand a polished look, you have several finishing options to choose from. One popular choice is painting the stand with bright colors that match your style or room decor.
You can use acrylic paints for a smooth finish, and don’t forget to apply a clear varnish for added protection. Adding a glossy finish will give it a polished look and protect it from wear and tear. Remember, your choice of finish can completely change the stand’s look, so pick one that matches your personal choice and the look you want for your space.
6. Adding Decorative Aluminum Sheet
Raise the look of your Earring holder by adding a decorative aluminum sheet. These lightweight sheets come in various patterns and designs, allowing you to personalize your stand to your liking.
Simply cut the sheet to fit the stand’s backing and secure it in place with adhesive or small screws. The reflective surface of aluminum adds a feel of a modern shape and catches the light beautifully, making your earring display stand out even more.
7. Loading Earrings onto The Holder
Loading your earrings onto the Easy Earring stand gives you pleasure. The stand usually features multiple holes or hooks, perfect for hanging your earrings.
Gently insert the earring hooks or posts into the designated openings. For heavy earrings, you can attach earring backs to keep them in place.
This arrangement not only keeps your Earring display stand organized but also allows you to showcase your collection artfully. You can arrange them by color, size, or style for a pleasing arrangement that lets you easily pick and choose your favorite pair for the day.
Types of Earring Holders
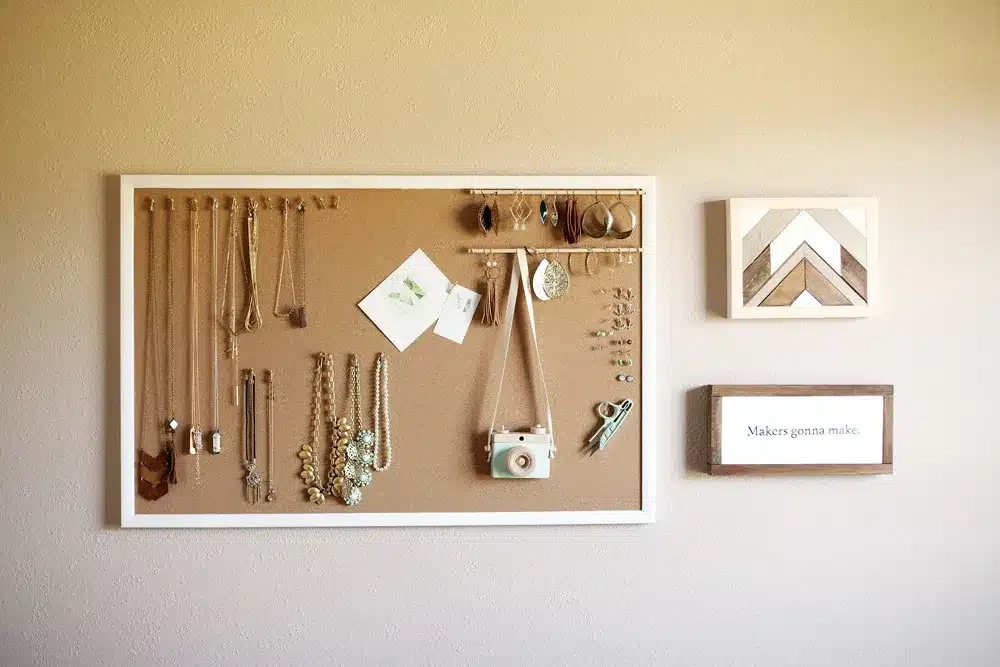
1. Framed Holder

A Framed Holder is a stylish and useful project that gives you the best Earring storage solutions and is easily accessible. It’s a crafty way to display your earrings with this beautiful Earring display stand while adding a tone of decor to your space.
To create this holder, you’ll need a small picture frame, a piece of mesh or wire, and some hooks or small pegs. Remove the glass from the frame and attach the mesh or wire securely.
You can paint the frame to match your room’s color scheme. Once the frame is ready, hang your earrings on the mesh or wire, and you’ve got yourself a nice earring holder that doubles as wall art. It’s a good way to showcase your earring collection and prevent them from getting mixed.
2. Old Vinyl Record Earring Holder

Turn your old vinyl records into a unique and funny stand for your Earring storage solutions. Take an old vinyl record and heat it in the ovenuntil it becomes flexible. Then, carefully shape it into a bowl or dish shape using a heat-resistant mold.
Once it cools and hardens, you’ll have a one-of-a-kind earring holder with an old look. The channel of the record can hold your earrings in place, making it easy to keep them organized and visible. This DIY project not only reuses old records but also increases the beauty of your room.
3. Cheese Grater Earring Holder

Change a vintage cheese grater into an Earring storage solution that’s sure to be a conversation starter. Find a clean and rust-free cheese grater at a store or in your kitchen. You can leave it as is or give it a fresh coat of paint for a personalized look.
Hang the cheese grater on your wall or place it on a tabletop. The holes of the grater provide a perfect spot to hang your earrings, and the handle or top can hold stud earrings.
This reused earring holder adds a classic and new view to your space while helping you keep your earrings organized and within reach. It’s an easy and eco-friendly DIY project that showcases your creativity and love for unique decor.
4. Embroidery Hoop Earring Stand

Renew your jewelry organization with the special Embroidery Hoop into a jewelry display earring holder. This creative project combines a classic look. Simply take an embroidery circle, a larger one, and cover it with a stylish fabric of your choice. Secure the fabric in place by tightening the hoop’s inner ring. Then, attach small hooks or loops along the outer edge of the hoop.
These hooks are where you can hang your earrings neatly, making them easily accessible and beautifully displayed. The Embroidery Hoop Earring Stand not only keeps your earrings organized but also gives an attractive decor piece for your vanity or dresser.
5. Chipboard Cut Out Earring Stand

This crafty project combines practicality and customization. To create it, you’ll need a piece of chipboard or strong cardboard. Draw or print a design; it could be anything from trees to abstract shapes.
Carefully cut out the design using a craft knife or scissors. Paint or decorate the chipboard cutout to match your style. Attach it to a small stand or base for stability.
The cutouts serve as both Hanging earring storage and a Jewelry display. This earring stand not only keeps your earrings tangle-free but also adds a personalized shape to your space.
6. Cork Earring Holder
Work with eco-friendly and simplicity with the Cork Earring Holder. This easy project reuses cork to keep your earrings organized and easily visible. Take a corkboard, either in a square or custom shape. Gently press in earring hooks or pins at various intervals.
You can arrange them in rows or any pattern you like. Hang your earrings on hooks, and the cork material prevents them from mixing. This holder is not only real but also a great way to recycle and reuse cork, making it an environmentally friendly choice. Plus, you can easily customize the size and shape of thecorkboard to fit your available space and earring collection.
7. Ribbon Earring Holder

Craft a cute holder using ribbons to add beauty to your jewelry arrangement. Choose a pretty ribbon of your choice, wide, silky, or patterned, and create a hanging loop. Attach this ring to a hook or a decorative ball on your wall.
Now, attach individual earrings through the ribbon’s loops, allowing them to swing slowly. This method keeps your earrings in a Jewelry display holder and displays them like a piece of art. You can use different ribbons for various earring collections, giving your room a view of your choice.
8. Metal Mesh Pen Cup Earring Holder
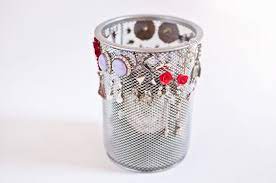
Modify a simple metal mesh pen cup into a new holder. Pick a strong metal mesh cup; you can find them at office supply stores. Place the cup on your vanity or dressing table. The holes in the mesh make it easy to slip in the earrings’ hooks, while the cup’s interior is great for storing stud earrings or other small jewelry items.
You can spray-paint the cup to match your room’s decor or leave it as is for an industrial look. This Jewelry display earring holder keeps your earrings within reach and adds a modern look to your space.
Benefits of DIY Earring Holders

No more searching for lost earrings or dealing with mix-up jewelry. An earring stand offers several advantages. It keeps your earrings organized, making it easy to pick the perfect pair. It adds a decorative element to your room, doubling as an art piece. Crafting your stand allows you to customize its design to match your style, giving you a sense of art.
Conclusion
Last but not least, creating your own Easy DIY Earring stand is a fun and easy project that anyone can do. By using simple materials and following step-by-step instructions, you can craft a stylish and useful earring holder to keep your jewelry organized and easily accessible.
This project not only helps you save money on store purchase stands but also allows you to customize the design to match your style.
By choosing to craft your earring stand, you contribute to a more environment-friendly lifestyle. So, gather your materials, follow the simple steps, and start your journey of creativity and design. Enjoy the process of designing, crafting, and organizing your earrings while displaying your unique creations.
The Easy DIY Earring holder truly represents the beauty of simplicity and creativity coming together in an enjoyable and useful way.
Frequently Asked Questions
Can I Use an Existing Wooden Block as a Base?
If you have a wooden block or piece of furniture that you’d like to reuse, it can make for a Hanging earring storage stand base.
Can I Make Larger Earrings Stand for a Bigger Collection?
Of course! Adjust the size of your base and dowels/rods to create a stand that suits the size of your earring collection.
What’s the Best Way to Clean and Maintain My Earrings Stand?
Simply wipe down the base and dowels/rods with a damp cloth to remove dust. If you have a Wooden earring holder, you can sometimes apply furniture polish for a bright finish.
Can I Use the Same Stand for Necklaces and Bracelets?
While this stand is designed for earrings, you can modify it by using longer dowels/rods to hold necklaces and bracelets as well.
Where Can I Find Unique Knobs or Hooks for My Earrings Stand?
Check out local thrift stores, craft shops, or online marketplaces for a wide variety of decorative knobs and hooks.


